Перейти к основному содержанию

Samsung SGH A707 Front Pane Replacement

Выберете то, что вам нужно

  1. Samsung SGH A707 Front Pane Replacement, Battery: шаг 1, изображение 1 из 1
    • Press on the markings on the cover and pull it down to reveal the battery.

  2. Samsung SGH A707 Front Pane Replacement: шаг 2, изображение 1 из 1
    • Use your fingers to pull the battery out of its position. You may also flip the phone and the battery will fall out.

  3. Samsung SGH A707 Front Pane Replacement: шаг 3, изображение 1 из 1
    • Here is the phone without the battery.

  4. Samsung SGH A707 Front Pane Replacement, Motherboard: шаг 4, изображение 1 из 2 Samsung SGH A707 Front Pane Replacement, Motherboard: шаг 4, изображение 2 из 2
    • Unscrew the six screws on the back of the phone using the Phillips #0 screw driver.

  5. Samsung SGH A707 Front Pane Replacement: шаг 5, изображение 1 из 1
    • Use the prying tool the pry off the phone's plastic frame.

  6. Samsung SGH A707 Front Pane Replacement: шаг 6, изображение 1 из 3 Samsung SGH A707 Front Pane Replacement: шаг 6, изображение 2 из 3 Samsung SGH A707 Front Pane Replacement: шаг 6, изображение 3 из 3
    • Use the prying tool to disconnect the rectangular connector.

  7. Samsung SGH A707 Front Pane Replacement: шаг 7, изображение 1 из 1
    • Use the prying tool to disconnect the small connector.

  8. Samsung SGH A707 Front Pane Replacement: шаг 8, изображение 1 из 1
    • Gently pull off the circuit board.

  9. Samsung SGH A707 Front Pane Replacement: шаг 9, изображение 1 из 1
    • Here is the phone without the logic board.

  10. Samsung SGH A707 Front Pane Replacement, Keypad: шаг 10, изображение 1 из 1
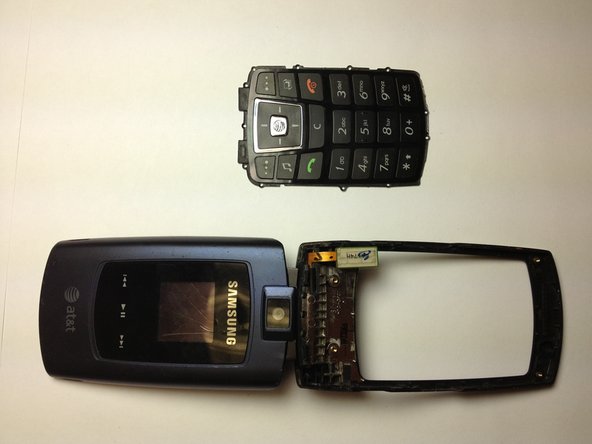
    • Hold the phone and gently separate the circuit board that holds the dome switches and the front face of the phone, revealing the rubber keyboard.

  11. Samsung SGH A707 Front Pane Replacement: шаг 11, изображение 1 из 1
    • Here is the phone without the dome switch circuit board.

  12. Samsung SGH A707 Front Pane Replacement: шаг 12, изображение 1 из 2 Samsung SGH A707 Front Pane Replacement: шаг 12, изображение 2 из 2
    • Here is the phone and the rubber keyboard.

  13. Samsung SGH A707 Front Pane Replacement: шаг 13, изображение 1 из 1
    • Here is the rubber keyboard and the dome switch circuit board. A quick inspection of these elements can reveal keypad malfunctions. Look for dirt or debris that do not belong there.

  14. Samsung SGH A707 Front Pane Replacement, Front Pane: шаг 14, изображение 1 из 2 Samsung SGH A707 Front Pane Replacement, Front Pane: шаг 14, изображение 2 из 2
    • Use the Phillips #0 screw driver to remove the two screws.

    • Place the screws in a safe place.

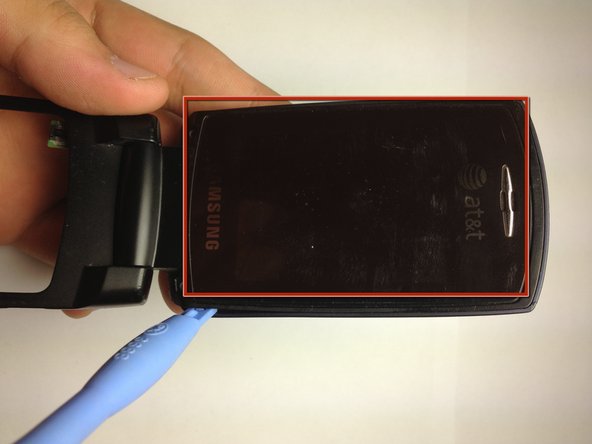
    • Use the prying tool to gently pry the screen off, by slowly moving the prying tool around the entire edge of the screen (roughly highlighted with a red rectangle). You must be very gentle, otherwise the screen will crack.

  15. Samsung SGH A707 Front Pane Replacement: шаг 15, изображение 1 из 1
    • Now we have access to the camera.

    • We also have access to the speakers.

    • Disconnect the flat cable to separate the two pieces.

  16. Samsung SGH A707 Front Pane Replacement: шаг 16, изображение 1 из 1
    • Samsung SGH A707

Заключение

To reassemble your device, follow these instructions in reverse order.

yfm

Участник с: 11/06/12

25 Репутация

Автор 7 руководств

Команда

University of Maryland, Team 1-1, Calloway Fall 2012 Участник University of Maryland, Team 1-1, Calloway Fall 2012

UMD-CALLOWAY-F12S1G1

4 членов

Автор 14 руководств

0 Комментариев

Добавить комментарий

Просмотр статистики:

За последние 24часов: 1

За последние 7 дней: 1

За последние 30 дней: 1

За всё время: 679