Перейти к основному содержанию

Shure SM58 Capsule Installation Replacement

Выберете то, что вам нужно

  1. Shure SM58 Capsule Installation Replacement, Collar: шаг 1, изображение 1 из 3 Shure SM58 Capsule Installation Replacement, Collar: шаг 1, изображение 2 из 3 Shure SM58 Capsule Installation Replacement, Collar: шаг 1, изображение 3 из 3
    • Grab the microphone base with one hand. With the other hand, grab just below the grille (the collar). Twist the collar clockwise to loosen it.

    • Be careful to not pull on the collar or you may rip the wires from the faceplate.

  2. Shure SM58 Capsule Installation Replacement, Faceplate: шаг 2, изображение 1 из 1
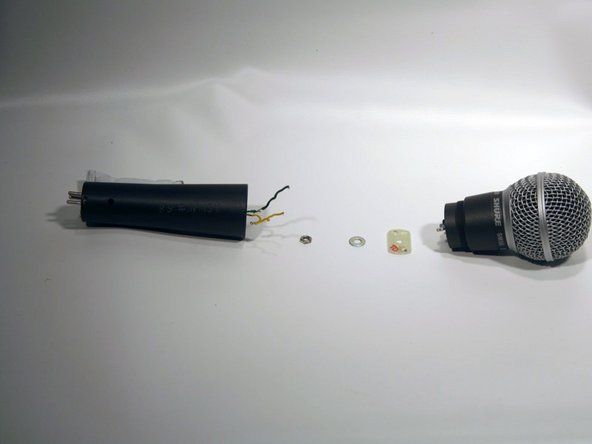
    • Remove the yellow and green wires from the face plate.

    • Note which side the yellow and green wires connect to.

    Why should I replace the plate?

    Gerrit - Ответить

    This guide was done as part of the capsule replacement—I don’t think there is any reason to solely replace the plate unless there was corrosion on it.

    Daniel Berger - Ответить

  3. Shure SM58 Capsule Installation Replacement: шаг 3, изображение 1 из 2 Shure SM58 Capsule Installation Replacement: шаг 3, изображение 2 из 2
    • Never open the microphone capsule. Attempting to open the capsule will likely result in permanent damage and make the microphone unusable.

    • Using an adjustable crescent wrench, remove the nut and washer from the face plate by twisting the nut counterclockwise.

  4. Shure SM58 Capsule Installation Replacement: шаг 4, изображение 1 из 2 Shure SM58 Capsule Installation Replacement: шаг 4, изображение 2 из 2
    • Slide the face plate over the connector.

  5. Shure SM58 Capsule Installation Replacement, Capsule Installation: шаг 5, изображение 1 из 2 Shure SM58 Capsule Installation Replacement, Capsule Installation: шаг 5, изображение 2 из 2
    • Using an adjustable wrench, remove the nut and the washer behind the face plate by twisting the nut counterclockwise.

  6. Shure SM58 Capsule Installation Replacement: шаг 6, изображение 1 из 1
    • Hold the body of the microphone, right below the grille, in one hand. Using your other hand, rotate the grille clockwise.

    Step 6 is incorrect. The grill screws off counter clockwise.

    Bill Kahler - Ответить

  7. Shure SM58 Capsule Installation Replacement: шаг 7, изображение 1 из 1
    • Slide the grille off the top of the microphone once it is all the way loosened.

  8. Shure SM58 Capsule Installation Replacement: шаг 8, изображение 1 из 3 Shure SM58 Capsule Installation Replacement: шаг 8, изображение 2 из 3 Shure SM58 Capsule Installation Replacement: шаг 8, изображение 3 из 3
    • Hold the black plastic piece under the grille in one hand. In the other hand, hold the microphone collar.

    • Slowly, pull upward while twisting the black plastic piece clockwise.

    • Be careful not to scratch the copper microphone capsule. Another face plate may fall out when removing capsule.

    • Never open the microphone capsule. Attempting to repair the capsule will result in permanent damage.

    Can you replace the yellow tape/cable if broken? (seen in last pic)

    karl_ivers - Ответить

    Honestly, I’m not sure. If I was in your position, I would assume a similarly sized piece of electrical tape should be fine, but if you’re not sure you may want to contact a repairman.

    Daniel Berger - Ответить

Заключение

Once installed, reassemble the microphone following the steps in reverse.

7 участников успешно повторили данное руководство.

nat coll

Участник с: 09/27/12

642 Репутация

Автор 14 руководств

Команда

Cal Poly, Team 7-53, Forte Fall 2012 Участник Cal Poly, Team 7-53, Forte Fall 2012

CPSU-FORTE-F12S7G53

5 членов

Автор 20 руководств

5 Комментариев

Thanks for that,

Can i just replace the capsule as seen in the last picture?

Has it to be resoldered? Where do those very fine copper wires go?

Eanoid - Ответить

It's been a few years since I made the guide and no longer have any microphones nearby to examen, but if I remember correctly, there is no soldering between the capsule and the housing. I believe the housing is soldered to the rest of the body with the silver leads at the bottom left of the picture.

Daniel Berger -

Somehow the grill got really stuck and I want to replace it. It it screwed or is it as you've said - slidable?

arnold - Ответить

You can unscrew just the grill.

Burke McQuinn - Ответить

Hi, a bit unrelated but I accidentally twisted the black plastic piece slightly while everything was still intact. I turned it back though, did I damage the SM58 in any way?

Emje De - Ответить

Добавить комментарий

Просмотр статистики:

За последние 24часов: 7

За последние 7 дней: 50

За последние 30 дней: 228

За всё время: 39,165