Введение
Motherboard is a printed circuit board containing the principal components of a computer or other device, with connectors into which other circuit boards can be slotted. If a short circuit happen to it, your camera might not be able to turn on. This guide will guide you step by step on how to replace the motherboard of your Sony α6000 camera.
Выберете то, что вам нужно
-
-
Remove the 1.75mm Phillips #00 screw from the left side of the camera.
-
-
-
Carefully remove the ribbon of the flash from the socket by using a pair of tweezers.
-
-
-
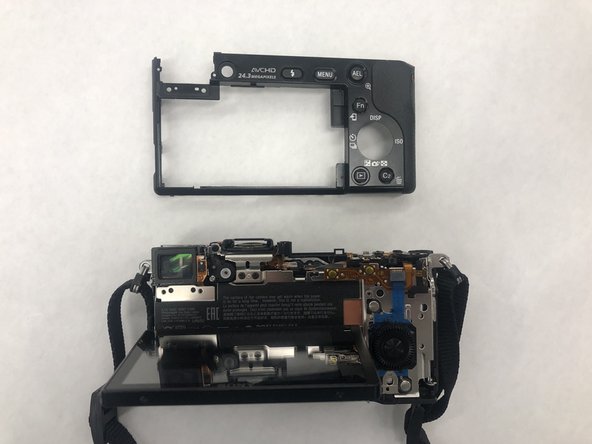
The top of the camera will be free and can be removed.
-
Set the top of the camera to the side.
-
-
-
-
Remove the two 1.25mm Phillips #00 screws near the top of the camera, just to the left of the eye socket.
-
-
-
Remove one ribbon that is attached to the selector wheel with a pair of tweezers.
-
-
-
lift up the protector plate and remove one ribbon that is attached to the LCD screen with a pair of tweezers.
-
-
-
Lift up the black cover to reveal the motherboard and ten ribbons.
-
With a pair of tweezers separate the ribbons from the motherboard by pulling them out of their sockets.
-
-
-
Remove the four 1.25mm Phillips #00 screws located on the borders of the motherboard.
-
-
-
Remove the power supply at the bottom right hand corner with a pair of tweezers.
-
-
-
Lift the motherboard up and remove the last ribbon cable with a pair of tweezers.
-


To reassemble your device, follow these instructions in reverse order.
To reassemble your device, follow these instructions in reverse order.
Отменить: Я не выполнил это руководство.
3 участников успешно повторили данное руководство.
Команда

IUPUI, Team S2-G2, Harley Summer 2019 Участник IUPUI, Team S2-G2, Harley Summer 2019
IUPUI-HARLEY-SU19S2G2
3 членов
Автор 5 руководств
3 Комментариев
I have been wondering what path I will take when I replace my battery contacts part and this looks like an ideal guide for how I can do it. I wondered why you don’t discharge the capacitor before removing ribbon cables. When I removed the top block off my nex-6 I did discharge the capacitor as what the service manual suggested before I removed the control dial and flash ribbon cables. Before I did it I found a youtube about using wires to the discharge contacts going to a light bulb to safely discharge the capacitor. The service manual suggests using a short jig R:1 k Ω/1 W but since I don’t have access to an electronics store nearby the youtube did the trick trouble free.
is there a way to fix the hdmi out port without buying a new mother board?