Введение
This guide will go through step by step on the replacement of the motherboard on a Sony Alpha A350. These steps will include removal of all screws, wires, ribbon strips, eye cup, front case, and rear case of the camera in order to safely pull the motherboard out of the main device. The motherboard plays an important role in image processing and it has a major influence on the quality of the eventual image that is produced. The motherboard will need replaced if the camera is not powering or turning on. (Especially if the camera has been subjected to outside trauma such as a drop or water damage.) Replacing the motherboard will help in fixing the camera to work again.
Выберете то, что вам нужно
-
-
Using a Phillips #00 Screwdriver, remove the four 5.5mm screws from the bottom of the camera.
-
Using a Phillips #00 Screwdriver, remove the one 4.3mm screw.
-
-
-
Using a Phillips #00 screwdriver, remove one 3.6mm screw on the left side of the camera.
-
Open the remote / DC under the rubber flap to reveal a screw.
-
Using the Phillips #00 screwdriver, remove one 4.3mm screw.
-
-
-
Open the flash on the top of the camera and remove two 4.3mm screws with a Phillips #00 screwdriver.
-
-
-
Open the plastic SD card door.
-
Using Phillips #00 screwdriver, remove two 4.4 mm screws outside and two 4.4mm screws inside the door.
-
-
-
Identify the bottom of the eye cup
-
Using the heavy duty spudger, push the eye cup upward to remove it from the camera body.
-
-
-
-
Using the Phillips #000 screwdriver, unscrew the two screws from the eye cup.
-
Remove the back side of the eye cup.
-
-
-
Push down on the hard plastic part of the eye cup and remove it from the cushion.
-
-
-
Using a Phillips #00 screwdriver, remove the two 4.3mm screws attaching the ribbons to the front case.
-
-
-
After taking off the eye cup, remove two screws using a Phillips #00 screwdriver.
-
-
-
Gently pry the rear case off of the body of the camera using your hands or a spudger.
-
-
-
After opening the case up and exposing the motherboard, remove five 3.6 mm screws with a Phillips #00 screwdriver from the board.
-
-
-
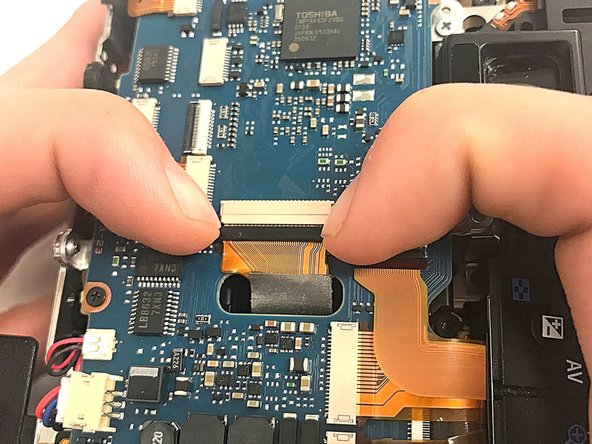
Remove all ribbon cables that are connected to the motherboard with a pair of tweezers or spudger by pulling them gently towards you.
-
-
-
Carefully pull up upward on the red and black wire ports with a pair of tweezers to remove the connections from the motherboard.
-
-
-
Gently remove the motherboard now that all connections to the camera are removed.
-


To reassemble your device, follow these instructions in reverse order.
To reassemble your device, follow these instructions in reverse order.
Отменить: Я не выполнил это руководство.
Еще один человек закончил это руководство.

Команда

IUPUI, Team S1-G6, Henning Fall 2019 Участник IUPUI, Team S1-G6, Henning Fall 2019
IUPUI-HENNING-F19S1G6
3 членов
Автор 6 руководств