Введение
This guide will teach you how to remove and replace the LCD. The guide has nine steps and will take time to complete, but each step is relatively easy since the guide requires no advanced techniques.
Выберете то, что вам нужно
-
-
Place the device so bottom of the camera is facing up .
-
Remove the five marked screws with a Phillips #000 screwdriver.
-
-
-
Remove the marked screw on the side of the camera with a Phillips #000 screwdriver.
Achtung! Die Schraube beim Zusammenbau der Seitenabdeckung nicht zu fest anziehen, da ansonsten der Kunststoff einreißt!
-
-
-
Remove the marked screw with a Phillips #000 screwdriver.
Achtung! Die Schraube beim Zusammenbau der Seitenabdeckung nicht zu fest anziehen, da ansonsten der Kunststoff einreißt!
-
-
-
-
Use the plastic opening tool to remove the button board.
For me this step was troublesome. The prying tool did not really do the trick. There are some snaps on the inside edge that are very tenacious. I actually cracked the plastic trying to pry it out.
there is a small circuit board in addtion to the control board. It is originally attached by double sided tape, but the tape may have lost its ability to retain the board. SO some care might be needed if the board come loose.
-
-
-
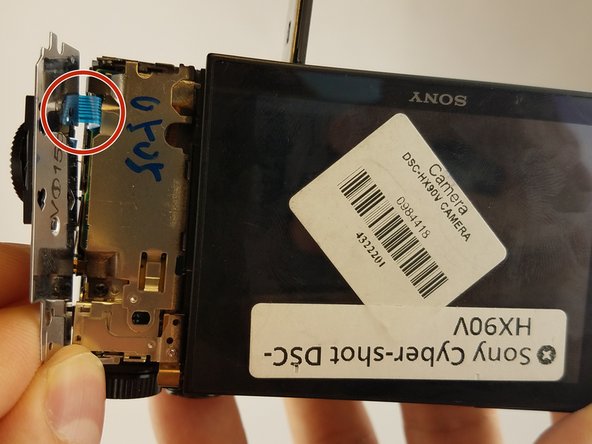
Disconnect the control board data cable by wiggling carefully with your fingertips. Set the control board to the side once it is disconnected.
-
-
-
Use the plastic opening tool with a prying motion to remove the side cover of the camera.
It will not come out if you do not first remove the screw inside the screen bay. Otherwise the light snapping noise will be actual snapping. The slide direction is towards the back of the camera keeping the side cover flat as originally oriented,
Panneau très délicat à enlever
-
-
-
Orient the device so the lens is facing down.
-
Remove the two black M1.4 X 3.5 Phillips head screws using Phillips #000 screwdriver.
-
-
-
Orient the device so the lens is facing down.
-
Remove the black M1.4 X 3.5 Phillips head screw .
Hier sind 3 Schrauben vergessen worden!
This screw needs to be removed before removing the side panel
-
-
-
Remove the ribbon cable connecting LCD display to camera sensor and battery housing gently.
Es muss vor dem lösen des Flachbandkabels vom Display die Verriegelung der Anschlussbuchse über den kleinen Hebel (schwarz oder grau) entriegelt werden. Diesen vorsichtig von hinten in Richtung Flachbandkabel hochklappen aber Vorsichtig!
To replace the lcd screen ribbon cable remove the four screws holding the screen inside the carrier frame. The ribbon cable has two connectors that have pop up locking tabs like some of the other ribbon cables.
Pour retirer l'ensemble écran LCD étape 9, il y a encore une vis à démonter sur le coté de l'appareil , une fois enlevé le panneau du boitier latéral de l'étape n°6.
Dommage, il manque une étape 10 décrivant le remplacement de l'écran LCD dans le support écran.
-


To reassemble your device, follow these instructions in reverse order.
To reassemble your device, follow these instructions in reverse order.
Отменить: Я не выполнил это руководство.
2 участников успешно повторили данное руководство.
19 Комментариев
The title says this is a lens replacement, but isn't it in fact an LCD replacement?
This is truly a terrible guide. There are numerous steps missing, steps in the wrong order and little or no description of where and how to apply any pressure to separate or remove parts. I’m glad I didn’t follow this guide as I quite likely would have ruined my camera, or at the very least caused more and quite possibly expensive-to-repair damage. I strongly urge ifixit staff to investigate this guide and remove it, or to at least strongly warn anyone who is contemplating following it.
Hallo David,
mit dieser Anleitung habe ich schon mehr als 20 Displays gewechselt und es ist mir noch nie etwas kaputt gegangen. Es fehlt auch nichts was man hätte noch schreiben können. Wenn Du Angst hast etwas kaputt zu machen lass die Finger davon.
Hier rumkritisieren ist schon ein bisschen unverschämt, diese Übersetzung schreibe ich in meiner Freizeit! Du kannst ja eine neue bessere Anleitung schreiben aber vermutlich bist Du jemand der die Finger von solche Reparaturen lassen soll. So eine Reparatur erfordert Sachverstand, wenn es Dir mit dieser Anleitung nicht gelingt, fehlt Dir dieser.
Gruß Detlef
Entschuldigung,
nach dieser Anleitung habe ich schon 20Displays gewechselt ohne das etwas kaputt gegangen ist.
Wenn man sich dieses nicht zutraut oder 2 linke Daumen hat, Finger weg!
Hello Detlef. Will you consider doing a video tutorial please?
Hello Detlef. Do you offer a video tutorial please? Thank you, from Sarah
Hello Sarah,
sorry for a Video tutorial I have no time.
Regards Detlef
Hello Detlef Dormann,
I do not appreciate your condescending comments. As a retired machinist and aircraft maintenance engineer I have plenty of ‘expertise’ to get the job done. Many steps were omitted that would not be obvious to an amateur .. luckily I have enough sense to treat these so-called guides with a good dose of apprehension so as not to f*** up my equipment.
Hi,
I’m looking for this screenplay for my Sony DSC-HX90V and I can’t find it anywhere
Can you help me and give me some website for buy it ?
Thanks a lot
Good description and pictures for the replacement of the complete display unit.
I found a much simpler solution if only the LCD is broken. I had to replace my LCD while nothing else on the camera was damaged so my first research brought me to this article at iFixit. Because I looked up replacement parts first I was a little confused about the above description.
Further research on the Internet have led me to the following video: https://www.youtube.com/watch?v=iDhhbW_5...
Anyhow - a the dealer where I bought my camera about 10 months before called up about 165 €. I decided to have my camera sent back which at the end costed 30€ (inkl. shipping), ordered a LCD via ebay for 16€. The replacement could have been done in 10 minutes but it took me about 45 mins (actually 3 repair cycles) due to a unproper cable connection/seating and due to the not correctly placed magnet for the display orientation.
Hi Thilo, ‘and due to the not correctly placed magnet for the display orientation.’ Could you please explain this a bit more. I’ve found also two small magnets. My problem is that after changing the LCD via your Utube suggestion There’s still no picture on the screen nor the seeker. I do have some light (only screen) Thx in advance
Peter -
Thanks Thilo,
this is excatly what I was looking for. 5min, and the camera is working fine again.
BR
Hallo, wo bestelle ich denn den LC die Bildschirm? Erhalte ich gehe eben noch mal Shop?
Grüße
Norbert
Schau mal bei EBay, dort werden die angeboten
I seriously doubt this can be done in twenty minutes even if the instructions were clear and this had been done before. It helps to have some kind of magnifier for some of the close up work and a small pair of tweezers for handling the small screws. Good lighting also helps. Be very careful not to lose screws or the camera won’t be properly reassembled. I got the job done ()LCD ribbon cable replacement), but like Davis said I broke some plastic parts due to the ambiguous and insufficient instructions. I found it helpful to refer to the Sony manual both for part numbers and for the exploded diagrams. Parts are available in the US through Encompass.
Weiß jemand wo ich ne komplette Einheit herbekomme, bei ebay find ich nur das Display, bei mir is das Datenkabel in der mitte gerissen also welches zur Hauptplatine geht.
Hallo,
einfach mal Google bemühen,
es gibt fast alles für die Kamera, evtl. aber nicht in DE.
VG
I don’t believe this tutorial is focused only for a LCD replacement. After completing the first steps, I hesite demounting the button panel while the LCD seems far from it.
I followed this video https://www.youtube.com/watch?v=iDhhbW_5..., then I mounted the unnecessary screws mentioned on this tutorial.
Additional advice :
1) Be careful with magnets : this camera uses a rectangular magnet to detect the screen position. If the magnet slips away, insert it back following this. The red line of my magnet got erased, so I rotated it until I got the right image.
2) There’s also a second pair of magnets used for the Finder (check this image) I had to place them again.
3) If you bought and LCD with the protective glass, you may need to glue the screen to the frame.
Hätte ich blos David geglaubt! Ich bin blind dieser Anleitung gefolgt, bis ich gemerkt habe, dass zum Wechseln des Display´s nur die 4 Schrauben am Rahmen desselben herausgeschraubt, der innere Rahmen herausgedrückt und dann das Display herausgedrückt werden muss. Danach noch die beiden Flachbandkabel entfernen und das Display ist entfernt. Zusammenbau: Die beiden Flachbandkabel einstecken und das Display in den Rahmen klappen. Den inneren Rahmen in den äußeren vorsichtig eindrücken und die 4 Schrauben einschrauben. Fertig.
Das Ergebnis der falschen Anleitung: Jetzt liegt ein Magnet neben meiner Kamera und die Kamera lässt sich nicht mehr einschalten. Übrigens: Ich bin Maschinenbautechniker und Mechanikermeister. Habe also keine 2 linke Daumen.
Mein Rat: Diese Montageanweisung schnellstmöglich aus dem Internet beseitigen.
Not all screws are the same length so pay close attention to what exact screw came from what hole.
guywindsurfer - Ответить
The mini loudspeaker is under the tree little holes, and may fal out of position when handling. SO look how it is situated right after removing the bottom cover. It is connected by red and black wires. After I was done the speaker no longer functioned and there isn’t any obvious reason why not.
guywindsurfer - Ответить
Ce tutoriel est bien trop compliqué et délicat à réaliser!
Pour changer uniquement l'écran LCD, il suffit de démonter les 4 vis du cadre de l'écran orientable, déboiter ensuite délicatement le cadre de l'écran (à l'aide d'un petit tournevis plat), et décoller l'écran LCD de sont cadre en exerçant délicatement une poussée tout autour du cadre avec pouce et index. Attention il y a 2 nappes de connexion (une grande et une petite) à retirer en tirant délicatement entre pouce et index en exerçant un mouvement oscillant. Au remontage veiller à bien les ré-engager à fond. Mettre un peu de colle (type colle contact) pour fixer le nouvel écran LCD dans son cadre.
Jean-Denis RANCHOUP - Ответить