Перейти к основному содержанию

Sony SRS-X11 Bluetooth Speaker Disassembly

Выберете то, что вам нужно

  1. Sony SRS-X11 Bluetooth Speaker Disassembly, Tools Required: шаг 1, изображение 1 из 2 Sony SRS-X11 Bluetooth Speaker Disassembly, Tools Required: шаг 1, изображение 2 из 2
    • Phillips 00 Bit

    • Plastic and metal spudgers

    • Plastic Pick

    • Tweesers

  2. Sony SRS-X11 Bluetooth Speaker Disassembly, Back Pannel: шаг 2, изображение 1 из 2 Sony SRS-X11 Bluetooth Speaker Disassembly, Back Pannel: шаг 2, изображение 2 из 2
    • Get one of your pry tools and pry up the back rubber.

    • Then peel back the rubber and put it to one side

    • The adhesive can be a bit hard at first but it should come loose. The adhesive will also stay on the rubber and can be re applied.

  3. Sony SRS-X11 Bluetooth Speaker Disassembly, Remove The Back Pannel: шаг 3, изображение 1 из 2 Sony SRS-X11 Bluetooth Speaker Disassembly, Remove The Back Pannel: шаг 3, изображение 2 из 2
    • Get your 00 Phillips bit and unscrew all of the screws.

    • Then get a spudger and take off the back plastic pannel

  4. Sony SRS-X11 Bluetooth Speaker Disassembly, Removing The Battery: шаг 4, изображение 1 из 2 Sony SRS-X11 Bluetooth Speaker Disassembly, Removing The Battery: шаг 4, изображение 2 из 2
    • Get a plastic spudger and carefully pry the battery out.

    • Give the power connector a firm tug whilst wiggling the connector back and forth.

    • Alternatively you could use your tweezers to pry the connector out.

    • DO NOT use a metal pry tool for this process because you don't want to puncture the battery.

  5. Sony SRS-X11 Bluetooth Speaker Disassembly, Removing The Top: шаг 5, изображение 1 из 2 Sony SRS-X11 Bluetooth Speaker Disassembly, Removing The Top: шаг 5, изображение 2 из 2
    • Use a pry tool to remove the top cover like you did in Step 2

    • Then peel back the rubber and put it to one side.

    • Just like the back cover the adhesive can be hard at first. It can also be reapplied when you reassemble.

    Como puedo volver a pegar la goma frontal cuando se ha despegado sola y ha pedido el pegante?

    Moniquilla80 - Ответить

  6. Sony SRS-X11 Bluetooth Speaker Disassembly, Removing The Top Board: шаг 6, изображение 1 из 3 Sony SRS-X11 Bluetooth Speaker Disassembly, Removing The Top Board: шаг 6, изображение 2 из 3 Sony SRS-X11 Bluetooth Speaker Disassembly, Removing The Top Board: шаг 6, изображение 3 из 3
    • Get you screwdriver and unscrew the screws.

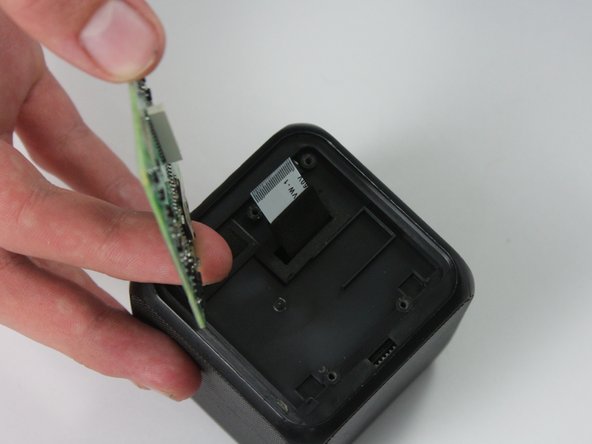
    • Once all of the screws are removed you can then pull out the board.

    • You can remove the ribbon cable with your fingers or with some tweezers.

    • The screws for the top panel are different so you'll want to keep them separate.

  7. Sony SRS-X11 Bluetooth Speaker Disassembly, Removing The Bottom Pannel: шаг 7, изображение 1 из 2 Sony SRS-X11 Bluetooth Speaker Disassembly, Removing The Bottom Pannel: шаг 7, изображение 2 из 2
    • Get a metal pry tool and get it between the rubber and the plastic.

    • Once you have a good piece preyed up you can remove it with your hand.

    • This will deform the plastic a little bit but you can re-adhere this to the plastic underneath.

  8. Sony SRS-X11 Bluetooth Speaker Disassembly, Removing The Bottom Panel: шаг 8, изображение 1 из 2 Sony SRS-X11 Bluetooth Speaker Disassembly, Removing The Bottom Panel: шаг 8, изображение 2 из 2
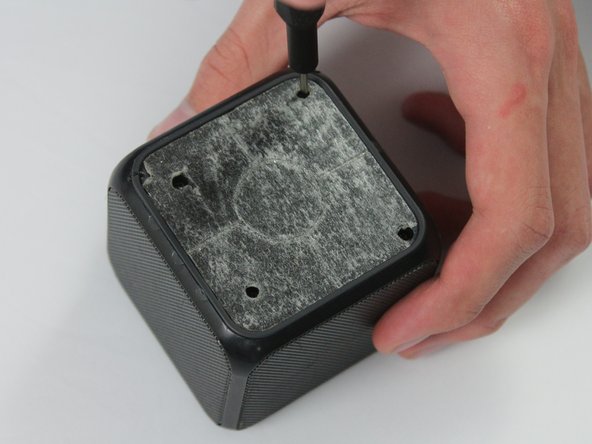
    • Get your screwdriver and unscrew all of the screws.

    • You can the get a pry tool and pry up the plastic panel.

    • If the panel doesn't come off completely try unscrewing the screws a little more until the plastic panel comes off with the rubber.

  9. Sony SRS-X11 Bluetooth Speaker Disassembly, Removing The Bottom Board: шаг 9, изображение 1 из 2 Sony SRS-X11 Bluetooth Speaker Disassembly, Removing The Bottom Board: шаг 9, изображение 2 из 2
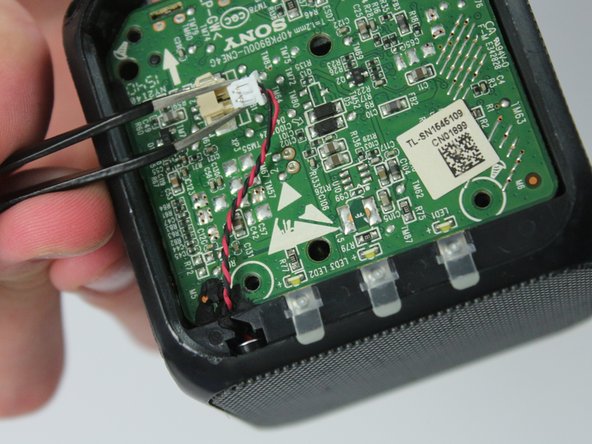
    • Get your tweezers and pry off the connector being careful not to tear the cable.

    • You can then get a plastic pry tool and put it in one of the corners of the board to pry it up and out of the casing.

  10. Sony SRS-X11 Bluetooth Speaker Disassembly, Removing connectors: шаг 10, изображение 1 из 1
    • You can then remove the speaker cable and the top board cable.

Заключение

To reassemble your device, follow these instructions in reverse order.

10 участников успешно повторили данное руководство.

Hadena

Участник с: 07/13/18

915 Репутация

Автор 2 руководств

5 Комментариев

Dear sir,

Can you supply boards for sony SRS-X11 boards kindly replay immediately.

kamath

biomedical engineer

nagkamath@gmail.com

kamath - Ответить

our device is not getting on, no indication can you any thing to check.

kamath - Ответить

Did someone replace the battery?

Daniel Barrera - Ответить

Dónde puedo conseguir el flexor que conecta las dos lógica

ca_zador222 - Ответить

Porque al estraerlo se vencieron

ca_zador222 - Ответить

Добавить комментарий

Просмотр статистики:

За последние 24часов: 3

За последние 7 дней: 26

За последние 30 дней: 91

За всё время: 9,709