Перейти к основному содержанию

Sony SRS-X7 AM/FM Chip Replacement

Выберете то, что вам нужно

  1. Sony SRS-X7 AM/FM Chip Replacement, Sony SRS-X7 Faceplate Disassembly: шаг 1, изображение 1 из 2 Sony SRS-X7 AM/FM Chip Replacement, Sony SRS-X7 Faceplate Disassembly: шаг 1, изображение 2 из 2
    • On the bottom of the device, you'll see 4 rubber pieces at the corners. Peel off these rubber pieces.

    • Unscrew the 4 10mm Philips J1 screws beneath them.

  2. Sony SRS-X7 AM/FM Chip Replacement: шаг 2, изображение 1 из 3 Sony SRS-X7 AM/FM Chip Replacement: шаг 2, изображение 2 из 3 Sony SRS-X7 AM/FM Chip Replacement: шаг 2, изображение 3 из 3
    • The black stickers between the 4 foam pieces are there to protect the unit's warranty. If you try to send the device back to Sony after poking through said stickers, they will not accept it as the device has been tampered with.

    • Poke through said stickers and unscrew the 2 10mm Philips J1 screws beneath those.

    • Insert the blue plastic tool into the corner of the bottom faceplate and slide along the edge.

    • It will be a bit difficult as there is adhesive holding the faceplate to the unit, but with it bit of playing it should come off with ease.

  3. Sony SRS-X7 AM/FM Chip Replacement: шаг 3, изображение 1 из 2 Sony SRS-X7 AM/FM Chip Replacement: шаг 3, изображение 2 из 2
    • Using a metal spudger, insert it into one of the corners or sides of the units faceplate and lightly pry open.

    • While pried, insert a plastic opening tool and slide along the edges of the unit.

    • Repeat the last step on each side of the unit's faceplate, until the faceplate is off.

    • The first time you attempt to take the faceplate off of the speaker, it will be difficult because there is adhesive holding it to the unit. After this time, disassembly and reassembly should be easier.

  4. Sony SRS-X7 AM/FM Chip Replacement: шаг 4, изображение 1 из 2 Sony SRS-X7 AM/FM Chip Replacement: шаг 4, изображение 2 из 2
    • With the faceplate now off, the speakers should be revealed. There should be 8 visible screws around the border of the speakers. Remove the 8 10mm Philips J1 screws.

    • Take the 2 20mm Philips J1 screws out of the middle of the speaker as shown.

  5. Sony SRS-X7 AM/FM Chip Replacement: шаг 5, изображение 1 из 2 Sony SRS-X7 AM/FM Chip Replacement: шаг 5, изображение 2 из 2
    • The speaker should come out of the unit with ease, however you should use caution as it is still connected to the motherboard.

    • Take the whole speaker out, and disconnect the connectors from the motherboard by lightly pulling on them.

  6. Sony SRS-X7 AM/FM Chip Replacement, AM/FM Chip: шаг 6, изображение 1 из 2 Sony SRS-X7 AM/FM Chip Replacement, AM/FM Chip: шаг 6, изображение 2 из 2
    • Using your fingers, unplug the gold connector from the AM/FM chip.

  7. Sony SRS-X7 AM/FM Chip Replacement: шаг 7, изображение 1 из 2 Sony SRS-X7 AM/FM Chip Replacement: шаг 7, изображение 2 из 2
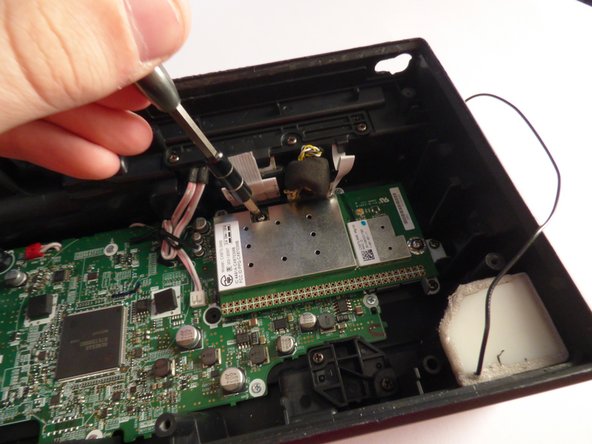
    • Remove the two Philips J1 10mm screws from the top side and right side of the AM/FM chip.

  8. Sony SRS-X7 AM/FM Chip Replacement: шаг 8, изображение 1 из 2 Sony SRS-X7 AM/FM Chip Replacement: шаг 8, изображение 2 из 2
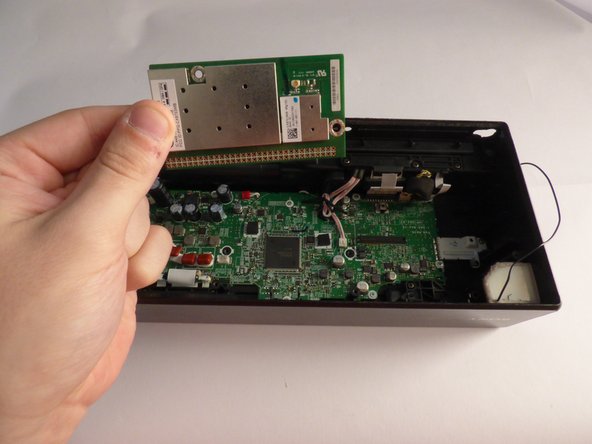
    • Gently with your fingers, or a plastic grasping tool, remove the chip from the unit.

Финишная черта

Tyler Lamar

Участник с: 03/10/16

685 Репутация

Автор 5 руководств

Команда

UMass Dartmouth, Team 7-6, Catania Spring 2016 Участник UMass Dartmouth, Team 7-6, Catania Spring 2016

UMASSD-CATANIA-S16S7G6

3 членов

Автор 5 руководств

Один комментарий

AM-FM Chip ?? Bad Translation ?

This Model has no Radio Funktion

This is the WIFI Circuit for Wireless Communication

backi480 - Ответить

Добавить комментарий

Просмотр статистики:

За последние 24часов: 0

За последние 7 дней: 0

За последние 30 дней: 6

За всё время: 1,693