Перейти к основному содержанию

Sony VAIO VPC-EB33FM Keyboard Replacement

Выберете то, что вам нужно

  1. Sony VAIO VPC-EB33FM Keyboard Replacement, Battery: шаг 1, изображение 1 из 2 Sony VAIO VPC-EB33FM Keyboard Replacement, Battery: шаг 1, изображение 2 из 2
    • Power down the laptop by pressing the power button.

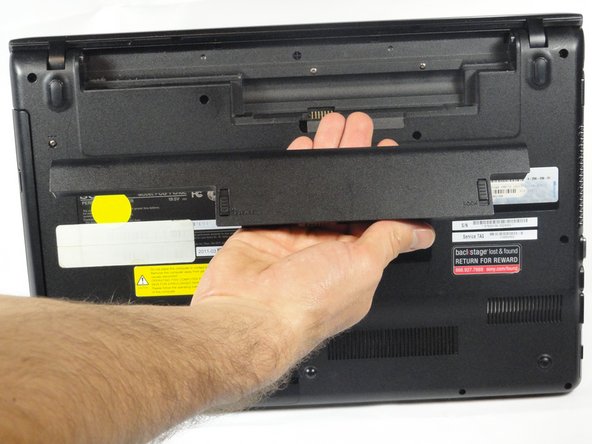
    • Turn the laptop onto its backside.

  2. Sony VAIO VPC-EB33FM Keyboard Replacement: шаг 2, изображение 1 из 1
    • To release the battery, hold both the release button and the unlock button at the same time.

  3. Sony VAIO VPC-EB33FM Keyboard Replacement: шаг 3, изображение 1 из 2 Sony VAIO VPC-EB33FM Keyboard Replacement: шаг 3, изображение 2 из 2
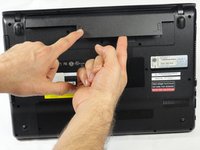
    • Remove the battery out from the notch while continuing to hold the release button.

  4. Sony VAIO VPC-EB33FM Keyboard Replacement, Hard Drive: шаг 4, изображение 1 из 3 Sony VAIO VPC-EB33FM Keyboard Replacement, Hard Drive: шаг 4, изображение 2 из 3 Sony VAIO VPC-EB33FM Keyboard Replacement, Hard Drive: шаг 4, изображение 3 из 3
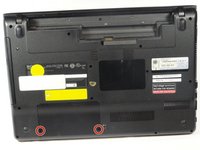
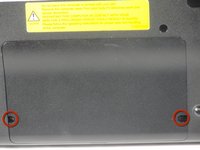
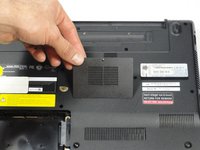
    • Use a Phillips #00 screwdriver to remove the two 7.8 mm cover screws on the bottom corners of the panel.

  5. Sony VAIO VPC-EB33FM Keyboard Replacement: шаг 5, изображение 1 из 3 Sony VAIO VPC-EB33FM Keyboard Replacement: шаг 5, изображение 2 из 3 Sony VAIO VPC-EB33FM Keyboard Replacement: шаг 5, изображение 3 из 3
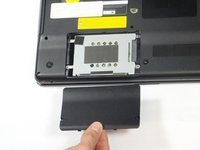
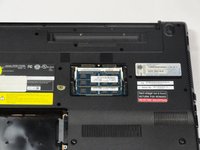
    • Use a finger/fingernail to grip the notch at the bottom of the panel to lift it off.

    • You may need to use your other hand to safely remove the panel.

    • You can also use a spudger for this step.

  6. Sony VAIO VPC-EB33FM Keyboard Replacement: шаг 6, изображение 1 из 1
    • Remove the two remaining 7.8 mm screws using the Phillips #00 screwdriver.

  7. Sony VAIO VPC-EB33FM Keyboard Replacement: шаг 7, изображение 1 из 1
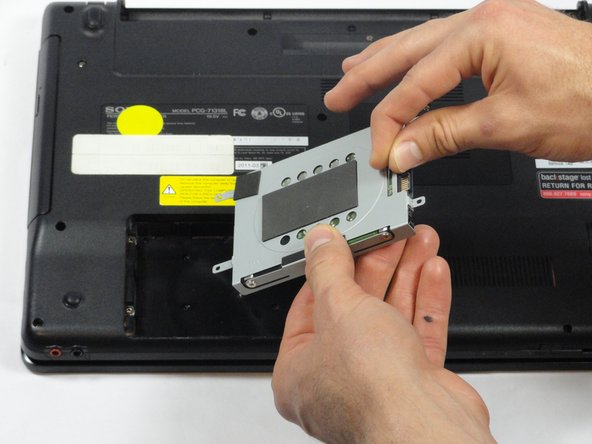
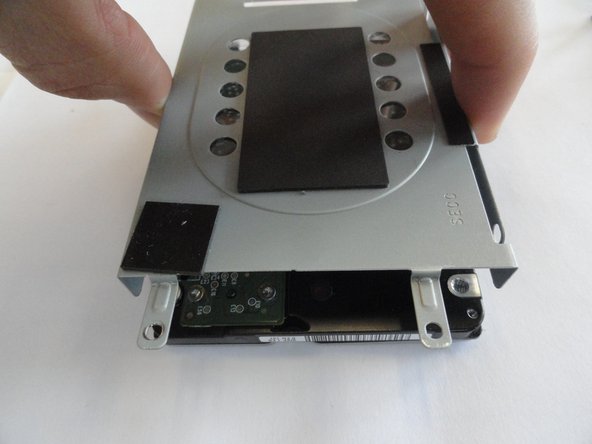
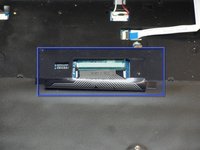
    • Grab the tab between your thumb and index finger.

    • Hold the hard drive securely in a horizontal position using your other hand.

    • Push the hard drive to the left using the plastic tab to disconnect it from the laptop.

    • To prevent damage of the connection on the hard disk drive or the laptop, perform this task slowly and with care.

  8. Sony VAIO VPC-EB33FM Keyboard Replacement: шаг 8, изображение 1 из 2 Sony VAIO VPC-EB33FM Keyboard Replacement: шаг 8, изображение 2 из 2
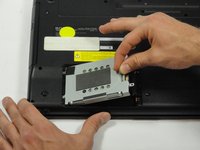
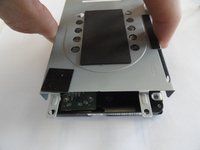
    • While still holding the plastic tab, lift the right side of the hard drive out at a 45º angle.

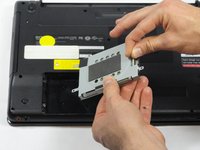
    • Pull the hard drive out.

  9. Sony VAIO VPC-EB33FM Keyboard Replacement: шаг 9, изображение 1 из 2 Sony VAIO VPC-EB33FM Keyboard Replacement: шаг 9, изображение 2 из 2
    • If you need to remove the bracket from the hard drive, follow the next few steps:

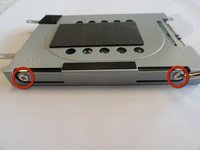
    • Remove the two 3.7 mm screws from either side of the bracket with a Phillips #00 screwdriver.

    • Lift the bracket off the hard drive.

  10. Sony VAIO VPC-EB33FM Keyboard Replacement, RAM: шаг 10, изображение 1 из 3 Sony VAIO VPC-EB33FM Keyboard Replacement, RAM: шаг 10, изображение 2 из 3 Sony VAIO VPC-EB33FM Keyboard Replacement, RAM: шаг 10, изображение 3 из 3
    • Remove the one screw with a Phillips #00 screwdriver.

    • The screw cannot be removed from the RAM casing cover.

  11. Sony VAIO VPC-EB33FM Keyboard Replacement: шаг 11, изображение 1 из 2 Sony VAIO VPC-EB33FM Keyboard Replacement: шаг 11, изображение 2 из 2
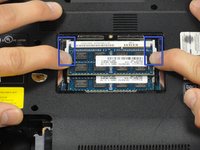
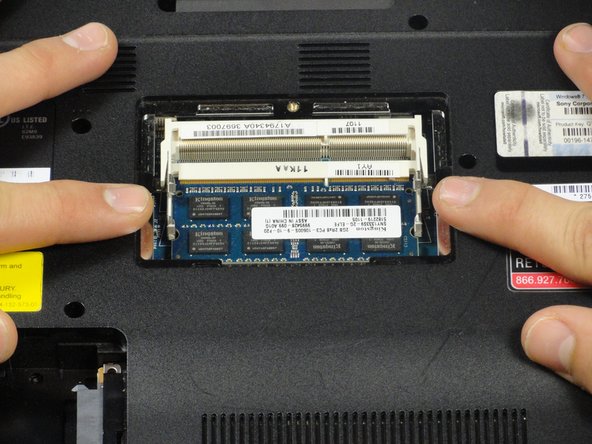
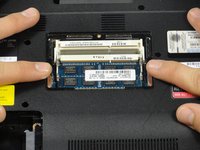
    • Pull the two retaining arms away from the center of the RAM chip.

    • The RAM will make a "pop" sound and the RAM stick will rise for ease of handling.

  12. Sony VAIO VPC-EB33FM Keyboard Replacement: шаг 12, изображение 1 из 3 Sony VAIO VPC-EB33FM Keyboard Replacement: шаг 12, изображение 2 из 3 Sony VAIO VPC-EB33FM Keyboard Replacement: шаг 12, изображение 3 из 3
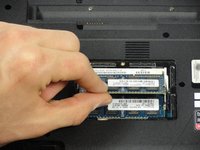
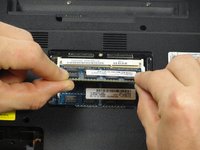
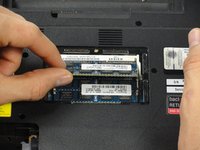
    • Pull the RAM stick out of its socket.

    • To remove the second stick of RAM, repeat steps six and seven.

    • When installing RAM, make sure sticks are firmly in place or the computer will not register them.

  13. Sony VAIO VPC-EB33FM Keyboard Replacement, Keyboard: шаг 13, изображение 1 из 1
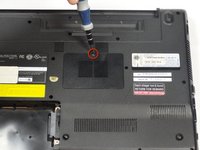
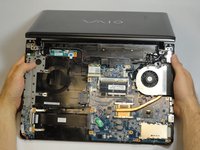
    • Using a Phillips #00 screwdriver remove the following screws securing the back cover :

    • Two 3.8-mm screws

    • Two 8.9-mm screws

    • Twelve 7.75-mm screws

  14. Sony VAIO VPC-EB33FM Keyboard Replacement: шаг 14, изображение 1 из 1
    • Check to make sure all screws have been removed.

    • Using both hands separate the back cover by lifting from the back and working around the perimeter to release tabs.

  15. Sony VAIO VPC-EB33FM Keyboard Replacement: шаг 15, изображение 1 из 1
    • Uninstalling the keyboard may require a second set of hands.

    • During the removal of the back cover, a screw that attaches the optical drive to the laptop is also taken out. This means the optical drive is ready to be removed.

    • Remove the optical drive by sliding it out.

  16. Sony VAIO VPC-EB33FM Keyboard Replacement: шаг 16, изображение 1 из 2 Sony VAIO VPC-EB33FM Keyboard Replacement: шаг 16, изображение 2 из 2
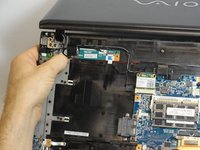
    • Once the optical drive is removed, locate the keyboard ejection button and press down on it until you hear a snap.

    • Once you hear this sound, it means that a section of the keyboard has been ejected.

  17. Sony VAIO VPC-EB33FM Keyboard Replacement: шаг 17, изображение 1 из 1
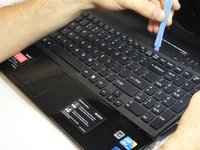
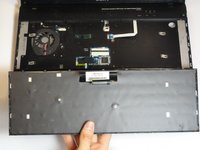
    • Turn the laptop onto its frontside and unfold the laptop so the keyboard is fully visible.

    • Locate the area where the section of the keyboard was ejected.

  18. Sony VAIO VPC-EB33FM Keyboard Replacement: шаг 18, изображение 1 из 2 Sony VAIO VPC-EB33FM Keyboard Replacement: шаг 18, изображение 2 из 2
    • Start to pry out the keyboard with your hands.

    • Be careful not to break any of the hooks that attach the keyboard to the laptop.

    • If it seems difficult to remove the keyboard with your hands, then use a plastic opening tool.

  19. Sony VAIO VPC-EB33FM Keyboard Replacement: шаг 19, изображение 1 из 2 Sony VAIO VPC-EB33FM Keyboard Replacement: шаг 19, изображение 2 из 2
    • Remain cautious to not break the hooks.

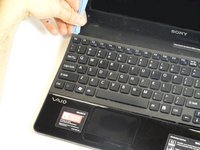
    • Continue all the way around the keyboard until you can detach it from the laptop.

  20. Sony VAIO VPC-EB33FM Keyboard Replacement: шаг 20, изображение 1 из 2 Sony VAIO VPC-EB33FM Keyboard Replacement: шаг 20, изображение 2 из 2
    • Do not immediately pull the keyboard away from the laptop. There is still an attachment between the keyboard and laptop.

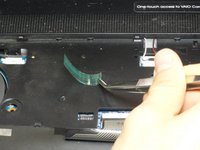
    • Turn the keyboard on its face and locate the green tape and the ribbon attachment.

    • Using the metal tweezer, remove only the green sticker.

    • Place the sticker at any location as long as you remember to use it for installing the keyboard.

  21. Sony VAIO VPC-EB33FM Keyboard Replacement: шаг 21, изображение 1 из 2 Sony VAIO VPC-EB33FM Keyboard Replacement: шаг 21, изображение 2 из 2
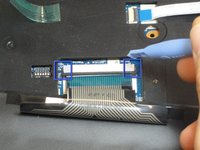
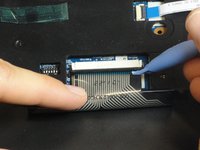
    • Locate the black retaining arms.

    • Using the plastic opening tool, pull the retaining arms out.

    • The retaining arms will not come off completely.

  22. Sony VAIO VPC-EB33FM Keyboard Replacement: шаг 22, изображение 1 из 2 Sony VAIO VPC-EB33FM Keyboard Replacement: шаг 22, изображение 2 из 2
    • It is safe to touch the ribbon attachment.

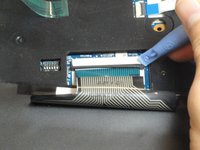
    • Lift the retaining arms with the plastic opening tool at an angle so that the ribbon attachment can be pulled out.

Заключение

To reassemble your device, follow these instructions in reverse order.

10 участников успешно повторили данное руководство.

Kevin

Участник с: 01/11/13

513 Репутация

Автор 3 руководств

Команда

Cal Poly, Team 18-39, Regan Winter 2013 Участник Cal Poly, Team 18-39, Regan Winter 2013

CPSU-REGAN-W13S18G39

5 членов

Автор 15 руководств

0 Комментариев

Добавить комментарий

Просмотр статистики:

За последние 24часов: 0

За последние 7 дней: 1

За последние 30 дней: 11

За всё время: 19,316