Перейти к основному содержанию

Sony Vaio Fit SVF15N26CXB Hard Drive Replacement

Выберете то, что вам нужно

  1. Sony Vaio Fit SVF15N26CXB Hard Drive Replacement, Battery: шаг 1, изображение 1 из 2 Sony Vaio Fit SVF15N26CXB Hard Drive Replacement, Battery: шаг 1, изображение 2 из 2
    • Remove the following ten screws from the bottom case of the laptop:

    • Two 6.5mm Phillips #00 Phillips screws.

    • Four 8.95mm Phillips #00 screws.

    • Four 6.25mm Phillips #00 screws.

    • The screws may be hidden underneath a rubber foot that can be removed with a spudger.

  2. Sony Vaio Fit SVF15N26CXB Hard Drive Replacement: шаг 2, изображение 1 из 2 Sony Vaio Fit SVF15N26CXB Hard Drive Replacement: шаг 2, изображение 2 из 2
    • Use a plastic opening tool to separate the bottom cover from the laptop.

    • Lift the lower cover and pull away from the laptop.

  3. Sony Vaio Fit SVF15N26CXB Hard Drive Replacement: шаг 3, изображение 1 из 3 Sony Vaio Fit SVF15N26CXB Hard Drive Replacement: шаг 3, изображение 2 из 3 Sony Vaio Fit SVF15N26CXB Hard Drive Replacement: шаг 3, изображение 3 из 3
    • Remove the eight Phillips #00 screws from the battery:

    • Six 4.65mm screws.

    • Two 4.65mm screws.

  4. Sony Vaio Fit SVF15N26CXB Hard Drive Replacement: шаг 4, изображение 1 из 1
    • Lift the battery up and pull it out of the laptop.

  5. Sony Vaio Fit SVF15N26CXB Hard Drive Replacement, Hard Drive: шаг 5, изображение 1 из 2 Sony Vaio Fit SVF15N26CXB Hard Drive Replacement, Hard Drive: шаг 5, изображение 2 из 2
    • Remove the four 3.20mm Phillips #00 screws from the hard drive.

  6. Sony Vaio Fit SVF15N26CXB Hard Drive Replacement: шаг 6, изображение 1 из 3 Sony Vaio Fit SVF15N26CXB Hard Drive Replacement: шаг 6, изображение 2 из 3 Sony Vaio Fit SVF15N26CXB Hard Drive Replacement: шаг 6, изображение 3 из 3
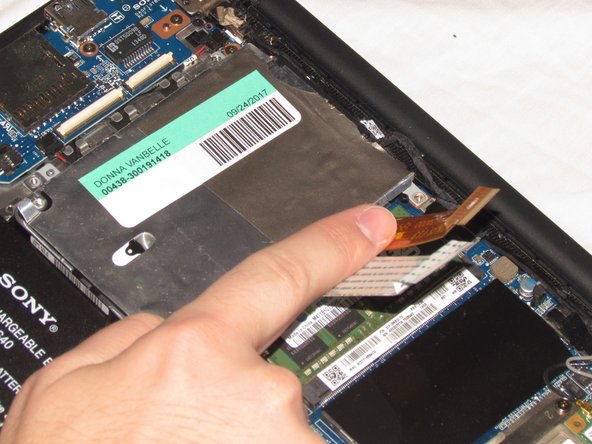
    • Use a spudger to flip up the black latch on the ZIF connectors.

    • Pull the ribbon cables out of the ZIF connectors and fold them over the hard drive.

    • Disconnect the hard drive and remove.

  7. Sony Vaio Fit SVF15N26CXB Hard Drive Replacement: шаг 7, изображение 1 из 2 Sony Vaio Fit SVF15N26CXB Hard Drive Replacement: шаг 7, изображение 2 из 2
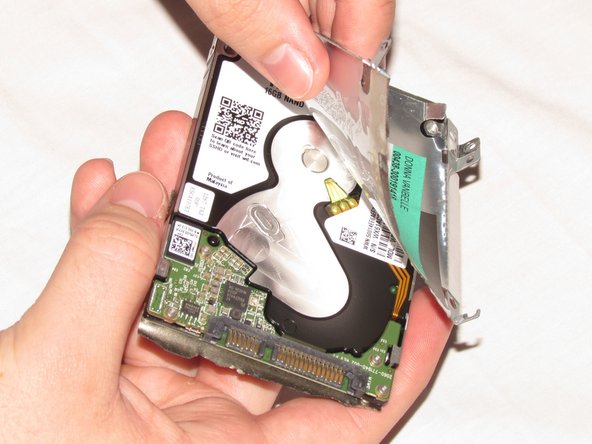
    • Remove the four 3.70mm Phillips #00 screws from the hard drive mounting case.

    • Carefully peel foil tray off of hard drive.

Заключение

To reassemble your device, follow these instructions in reverse order.

2 участников успешно повторили данное руководство.

Althea McDavid

Участник с: 02/14/18

857 Репутация

Автор 6 руководств

Команда

USF Tampa, Team S2-G4, Nance Spring 2018 Участник USF Tampa, Team S2-G4, Nance Spring 2018

USFT-NANCE-S18S2G4

4 членов

Автор 12 руководств

0 Комментариев

Добавить комментарий

Просмотр статистики:

За последние 24часов: 0

За последние 7 дней: 3

За последние 30 дней: 5

За всё время: 1,145