Перейти к основному содержанию

Sony Vaio SVE151G11L Display Replacement

Выберете то, что вам нужно

  1. Sony Vaio SVE151G11L Display Replacement, Display: шаг 1, изображение 1 из 1
    • Flip laptop over so the bottom is facing upwards.

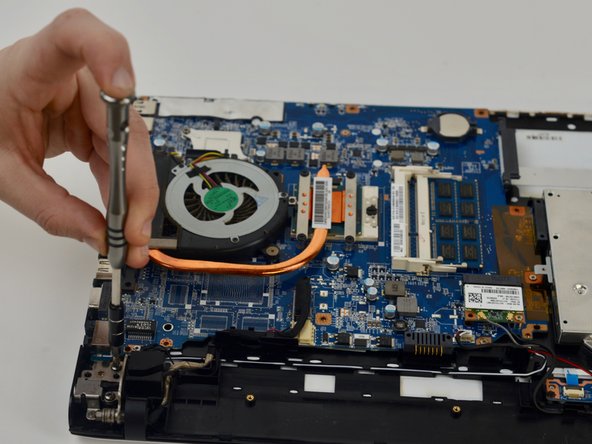
    • Remove bottom of laptop.

  2. Sony Vaio SVE151G11L Display Replacement: шаг 2, изображение 1 из 1
    • Remove antenna wires attached to the WiFi card using a plastic opening tool.

  3. Sony Vaio SVE151G11L Display Replacement: шаг 3, изображение 1 из 1
    • Remove the other antenna wire.

  4. Sony Vaio SVE151G11L Display Replacement: шаг 4, изображение 1 из 1
    • Remove the display cable by pulling upwards.

  5. Sony Vaio SVE151G11L Display Replacement: шаг 5, изображение 1 из 1
    • Remove the power display cable with a plastic opening tool by pushing outwards.

  6. Sony Vaio SVE151G11L Display Replacement: шаг 6, изображение 1 из 2 Sony Vaio SVE151G11L Display Replacement: шаг 6, изображение 2 из 2
    • Remove 4 hinge screws with a Phillips #0 screwdriver.

  7. Sony Vaio SVE151G11L Display Replacement: шаг 7, изображение 1 из 2 Sony Vaio SVE151G11L Display Replacement: шаг 7, изображение 2 из 2
    • Lift upward on the hinges with a plastic opening tool to release them.

  8. Sony Vaio SVE151G11L Display Replacement: шаг 8, изображение 1 из 1
    • Separate the bottom of the laptop from the monitor.

  9. Sony Vaio SVE151G11L Display Replacement: шаг 9, изображение 1 из 1
    • Completely detach screen from the laptop.

Заключение

To reassemble your device, follow these instructions in reverse order.

Еще один человек закончил это руководство.

Azka Khanani

Участник с: 10/17/18

313 Репутация

Автор 2 руководств

Команда

UMass Dartmouth, Team S9-G9, Valliere Fall 2018 Участник UMass Dartmouth, Team S9-G9, Valliere Fall 2018

UMASSD-VALLIERE-F18S9G9

4 членов

Автор 12 руководств

0 Комментариев

Добавить комментарий

Просмотр статистики:

За последние 24часов: 0

За последние 7 дней: 6

За последние 30 дней: 18

За всё время: 884