Перейти к основному содержанию

Sony Xperia E3 Touch Screen Replacement

Выберете то, что вам нужно

Видео обзор

  1. Sony Xperia E3 Touch Screen Replacement, Turn of the Phone: шаг 1, изображение 1 из 3 Sony Xperia E3 Touch Screen Replacement, Turn of the Phone: шаг 1, изображение 2 из 3 Sony Xperia E3 Touch Screen Replacement, Turn of the Phone: шаг 1, изображение 3 из 3
    • Turn off the device

    • Remove the SIM and the memory cards.

    • Remove 4x rubber corners.

    • There are 6x black screws Torx T4, remove them.

  2. Sony Xperia E3 Touch Screen Replacement, Rear Cover Removal: шаг 2, изображение 1 из 3 Sony Xperia E3 Touch Screen Replacement, Rear Cover Removal: шаг 2, изображение 2 из 3 Sony Xperia E3 Touch Screen Replacement, Rear Cover Removal: шаг 2, изображение 3 из 3
    • Use a plastic tool and separate the rear bezel.

    • Be careful for the side buttons.

  3. Sony Xperia E3 Touch Screen Replacement, Touch Screen Flex Cable: шаг 3, изображение 1 из 3 Sony Xperia E3 Touch Screen Replacement, Touch Screen Flex Cable: шаг 3, изображение 2 из 3 Sony Xperia E3 Touch Screen Replacement, Touch Screen Flex Cable: шаг 3, изображение 3 из 3
    • Disconnect the touch screen flex cable.

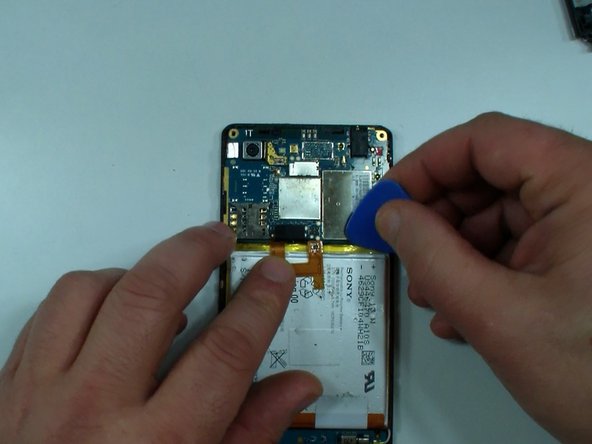
    • Disconnect the battery flex cable.

  4. Sony Xperia E3 Touch Screen Replacement: шаг 4, изображение 1 из 3 Sony Xperia E3 Touch Screen Replacement: шаг 4, изображение 2 из 3 Sony Xperia E3 Touch Screen Replacement: шаг 4, изображение 3 из 3
    • With a hair dryer or heat gun warm the glass, at first for about 2-3 minutes.

    • Use a thin plastic tool, like a plastic pick and start the separation from the underside.

    • Do this very slow and periodically warm the glass!

    • At the beginning you have to separate the touch screen glass from the main frame.

  5. Sony Xperia E3 Touch Screen Replacement: шаг 5, изображение 1 из 3 Sony Xperia E3 Touch Screen Replacement: шаг 5, изображение 2 из 3 Sony Xperia E3 Touch Screen Replacement: шаг 5, изображение 3 из 3
    Инструмент, используемый на этом этапе:
    Plastic Cards
    $2.99
    Купить
    • Now continue with a plastic card.

    • AGAIN!!! Very slowly and periodically worm the glass.

    • The LCD is thin less than a millimeter!

    • Remove the touch screen.

  6. Sony Xperia E3 Touch Screen Replacement: шаг 6, изображение 1 из 3 Sony Xperia E3 Touch Screen Replacement: шаг 6, изображение 2 из 3 Sony Xperia E3 Touch Screen Replacement: шаг 6, изображение 3 из 3
    • Now is time to test the phone.

    • If the LCD is OK you can order only a touch screen, if no, then you need display assembly - touch screen & LCD

    • With a plastic pick gently scrape the glue.

    • With a cloth and isopropyl alcohol clean the LCD.

    • Don't use a lot of alcohol. if the liquid passes behind the LCD, will appear spots that you can't remove.

  7. Sony Xperia E3 Touch Screen Replacement: шаг 7, изображение 1 из 3 Sony Xperia E3 Touch Screen Replacement: шаг 7, изображение 2 из 3 Sony Xperia E3 Touch Screen Replacement: шаг 7, изображение 3 из 3
    • On the new touch screen or on the main frame put adhesive sticker 3mm.

    • Be careful not to cover the the places for the camera, sensor, earpiece, etc.

    • Lift the logic board a little bit, so that the touch screen flex cable can pass.

    • It's easier if you can order the touch screen together with adhesive which is cut off specifically for model.

  8. Sony Xperia E3 Touch Screen Replacement: шаг 8, изображение 1 из 1
    • Reassemble the device.

    • That's all.

Заключение

To reassemble your device, follow these instructions in reverse order.

6 участников успешно повторили данное руководство.

ZFix

Участник с: 12/09/13

191 368 Репутация

Автор 330 руководств

Команда

Master Techs Участник Master Techs

Community

322 членов

Автор 2 542 руководств

0 Комментариев

Добавить комментарий

Просмотр статистики:

За последние 24часов: 0

За последние 7 дней: 8

За последние 30 дней: 19

За всё время: 7,980