Перейти к основному содержанию

Sony Xperia M4 Aqua Front Camera Replacement

Выберете то, что вам нужно

  1. Sony Xperia M4 Aqua Front Camera Replacement, Back Cover: шаг 1, изображение 1 из 1
    • Place the phone face-down, and use a heat gun or hair dryer to evenly heat the back surface until to soften the adhesive.

  2. Sony Xperia M4 Aqua Front Camera Replacement: шаг 2, изображение 1 из 1
    • Attach a suction cup to the back of the M4 Aqua by carefully pushing down on it near the top of the phone.

  3. Sony Xperia M4 Aqua Front Camera Replacement: шаг 3, изображение 1 из 2 Sony Xperia M4 Aqua Front Camera Replacement: шаг 3, изображение 2 из 2
    • While Pulling on the suction cup, slide a thin plastic spacer (guitar picks work well) between the back cover and the phone. Slide it around the edges to break the adhesive seal. Be careful, but don't be afraid to use some force. You should hear a sticky breaking sound.

  4. Sony Xperia M4 Aqua Front Camera Replacement: шаг 4, изображение 1 из 1
    • Remove the back cover by pulling it from the chassis. it is flexible and can be bent, be careful.

  5. Sony Xperia M4 Aqua Front Camera Replacement, Battery: шаг 5, изображение 1 из 1
    • Remove copper plated tape and any other securing adhesive with a nylon spudger. Remove carefully, as it has the potential or tear if too much force is used.

  6. Sony Xperia M4 Aqua Front Camera Replacement: шаг 6, изображение 1 из 1
    • Unhook the battery connector carefully. It is possible to damage the battery if too much force is used.

  7. Sony Xperia M4 Aqua Front Camera Replacement: шаг 7, изображение 1 из 1
    • Pry the battery from the phone with the nylon spudger. There is a small amount of adhesive underneath the battery, so a bit of force is required. The battery is malleable, so it is possible to dent the battery if too much force is applied in one spot.

  8. Sony Xperia M4 Aqua Front Camera Replacement: шаг 8, изображение 1 из 1
    • Remove the battery once all of the adhesive is broken, and the connector is unplugged.

  9. Sony Xperia M4 Aqua Front Camera Replacement, Rear Camera: шаг 9, изображение 1 из 1
    • Remove the four hex head 3mm screws at each corner of the motherboard with a screwdriver.

  10. Sony Xperia M4 Aqua Front Camera Replacement: шаг 10, изображение 1 из 2 Sony Xperia M4 Aqua Front Camera Replacement: шаг 10, изображение 2 из 2
    • Remove three pieces of the securing bracket using tweezers

  11. Sony Xperia M4 Aqua Front Camera Replacement: шаг 11, изображение 1 из 2 Sony Xperia M4 Aqua Front Camera Replacement: шаг 11, изображение 2 из 2
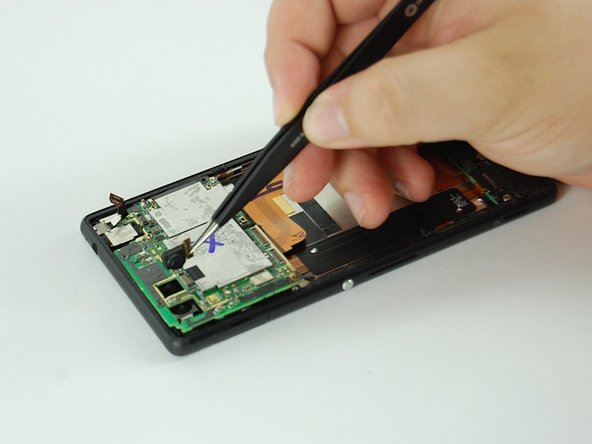
    • Detach the rear camera connector from the front of the motherboard.

    • Remove the rear camera with your fingers or tweezers.

  12. Sony Xperia M4 Aqua Front Camera Replacement, Front Camera: шаг 12, изображение 1 из 1
    • Release all connectors connecting to the motherboard.

    • Pry the motherboard up from the left side with the plastic pry tool and remove it.

    • Be very careful as the motherboard is tightly bound.

  13. Sony Xperia M4 Aqua Front Camera Replacement: шаг 13, изображение 1 из 1
    • With your fingers, detach front camera connector from the back of motherboard.

    • Remove the front camera.

Заключение

To reassemble your device, follow these instructions in reverse order.

4 участников успешно повторили данное руководство.

Sarah Wetzler

Участник с: 02/10/16

487 Репутация

Автор 2 руководств

Команда

USF Tampa, Team 4-5, Lacy Spring 2016 Участник USF Tampa, Team 4-5, Lacy Spring 2016

USFT-LACY-S16S4G5

3 членов

Автор 8 руководств

Один комментарий

Das ist kein Xperia Z3

Das ist eine Anleitung vom M4 Aqua

Faruk - Ответить

Добавить комментарий

Просмотр статистики:

За последние 24часов: 0

За последние 7 дней: 1

За последние 30 дней: 1

За всё время: 5,548