Перейти к основному содержанию

Sony Xperia Sola Battery Replacement

Архивированное руководство
Это руководство сохранено для исторических целей. Используйте его обновлённую версию, чтобы выполнить ремонт.

Выберете то, что вам нужно

  1. Sony Xperia Sola Battery Replacement, Lay the phone as shown.: шаг 1, изображение 1 из 1
    • Place phone down with screen side down and camera side facing up as shown.

  2. Sony Xperia Sola Battery Replacement, Remove the back cover.: шаг 2, изображение 1 из 1
    • Push on cover away from you. You should hear a snap or pop. This will let you view the battery and sim/sd card slots. Then lift the cover off.

  3. Sony Xperia Sola Battery Replacement, Remove the screws.: шаг 3, изображение 1 из 3 Sony Xperia Sola Battery Replacement, Remove the screws.: шаг 3, изображение 2 из 3 Sony Xperia Sola Battery Replacement, Remove the screws.: шаг 3, изображение 3 из 3
    • Locate and remove the five (5) screws on the phone, using the 26 Bit Kit. The screws are at the top and the bottom of the phone as shown.

  4. Sony Xperia Sola Battery Replacement, Remove bottom white cover.: шаг 4, изображение 1 из 2 Sony Xperia Sola Battery Replacement, Remove bottom white cover.: шаг 4, изображение 2 из 2
    • Pry off the bottom white cover by using the opening tool as a lever.

  5. Sony Xperia Sola Battery Replacement, Remove more screws.: шаг 5, изображение 1 из 2 Sony Xperia Sola Battery Replacement, Remove more screws.: шаг 5, изображение 2 из 2
    • Locate and remove the 2 additional screws, using the 26 Bit Kit, that are revealed. These are marked as shown.

  6. Sony Xperia Sola Battery Replacement, Remove black cover.: шаг 6, изображение 1 из 2 Sony Xperia Sola Battery Replacement, Remove black cover.: шаг 6, изображение 2 из 2
    • Locate the black cover on the bottom left of phone. Use an opening tool to pry up and remove the black cover.

  7. Sony Xperia Sola Battery Replacement, Disconnect the battery's circuit.: шаг 7, изображение 1 из 1
    Инструмент, используемый на этом этапе:
    Tweezers
    $4.99
    Купить
    • Disconnect the circuit by lifting the connector straight up as shown using the tweezers.

  8. Sony Xperia Sola Battery Replacement, Remove the phone's inner back cover.: шаг 8, изображение 1 из 3 Sony Xperia Sola Battery Replacement, Remove the phone's inner back cover.: шаг 8, изображение 2 из 3 Sony Xperia Sola Battery Replacement, Remove the phone's inner back cover.: шаг 8, изображение 3 из 3
    • Turn the phone onto its side, insert plastic opening tool into seam, and gently remove cover. You can also slide the spudger in from the top.

    • Once the cover is loose, lift it off the phone. The side buttons may feel a bit sticky, but this is normal.

  9. Sony Xperia Sola Battery Replacement, Remove the additional power circuit.: шаг 9, изображение 1 из 1
    • Locate the additional circuit at the bottom left. Using the tweezers, remove it gently by pulling up.

  10. Sony Xperia Sola Battery Replacement, Repeat for the circuit on the top end of the battery.: шаг 10, изображение 1 из 2 Sony Xperia Sola Battery Replacement, Repeat for the circuit on the top end of the battery.: шаг 10, изображение 2 из 2
    • Use the tweezers to lift up on the circuit located at the top left.

  11. Sony Xperia Sola Battery Replacement, Remove the motherboard.: шаг 11, изображение 1 из 1
    • Use the spudger and slide it under the top left of the board then lift the board straight up. The board should come up very easily.

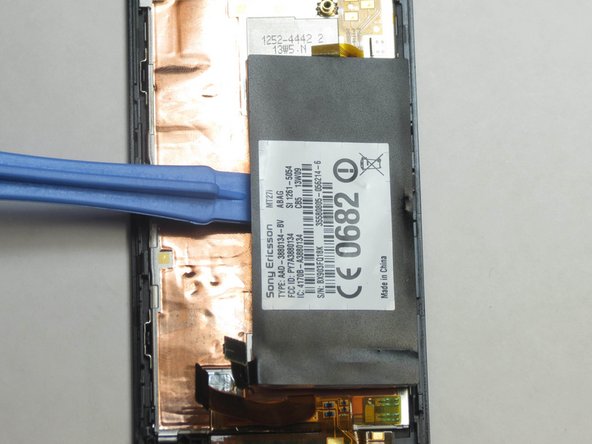
  12. Sony Xperia Sola Battery Replacement, Remove and replace the battery.: шаг 12, изображение 1 из 3 Sony Xperia Sola Battery Replacement, Remove and replace the battery.: шаг 12, изображение 2 из 3 Sony Xperia Sola Battery Replacement, Remove and replace the battery.: шаг 12, изображение 3 из 3
    • To remove battery, slide a flat object under the battery and lift. The plastic opening tool will be the best tool for this.

    • It is possible that the battery may be glued onto the phone. If this is the case, slightly heat the glue to allow removal without breaking the battery. To heat the glue, use a simple hair dryer, but be very careful as not to overheat the phone and damage any components.

Заключение

To reassemble your device, follow these instructions in reverse order.

3 участников успешно повторили данное руководство.

Cary Drew

Участник с: 09/25/14

866 Репутация

Автор 5 руководств

Команда

USF Tampa, Team 1-1, Brown Fall 2014 Участник USF Tampa, Team 1-1, Brown Fall 2014

USFT-BROWN-F14S1G1

4 членов

Автор 5 руководств

3 Комментариев

Thanks, battery successfully changed :-)

martinslunecko - Ответить

Thanx will do that when i get areplacement battery!

ndiwenijb - Ответить

hello where i can find a new battery ?

minigamer - Ответить

Добавить комментарий

Просмотр статистики:

За последние 24часов: 0

За последние 7 дней: 9

За последние 30 дней: 16

За всё время: 3,246