Перейти к основному содержанию

Sony Xperia XZ2 Rear Camera Replacement

Выберете то, что вам нужно

  1. Sony Xperia XZ2 Rear Camera Replacement, LCD Screen: шаг 1, изображение 1 из 3 Sony Xperia XZ2 Rear Camera Replacement, LCD Screen: шаг 1, изображение 2 из 3 Sony Xperia XZ2 Rear Camera Replacement, LCD Screen: шаг 1, изображение 3 из 3
    • Weaken the glue that is keeping the screen in place by heating up the edges of the phone with a hair dryer or heat gun.

    • The phone gets very hot and can hurt the user handling it.

  2. Sony Xperia XZ2 Rear Camera Replacement: шаг 2, изображение 1 из 3 Sony Xperia XZ2 Rear Camera Replacement: шаг 2, изображение 2 из 3 Sony Xperia XZ2 Rear Camera Replacement: шаг 2, изображение 3 из 3
    • Scrape all the glue from the inside edges by inserting opening picks into the bottom edge of the phone and working your way around the edges.

    • If the glue hardens and becomes difficult to move the plastic around the edges, reheat the phone.

  3. Sony Xperia XZ2 Rear Camera Replacement: шаг 3, изображение 1 из 2 Sony Xperia XZ2 Rear Camera Replacement: шаг 3, изображение 2 из 2
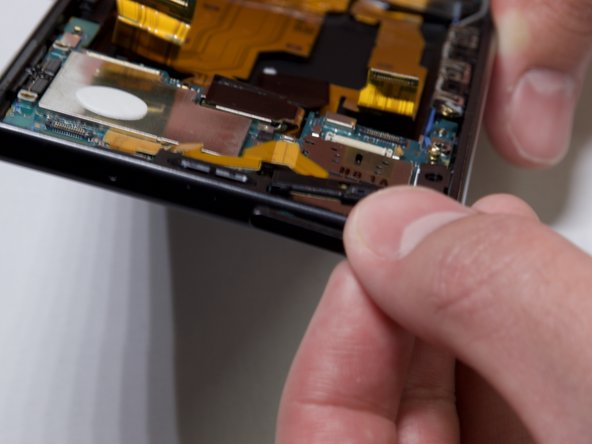
    • Pry open the phone by inserting an opening pick under one of the edges and removing the screen.

    • The screen is still attached by a connector, so do not pull the pieces apart.

  4. Sony Xperia XZ2 Rear Camera Replacement: шаг 4, изображение 1 из 1
    Инструмент, используемый на этом этапе:
    Tweezers
    $4.99
    Купить
    • Remove the bracket covering the connector by grabbing one side of the bracket with angled tweezers and gently pulling it off.

  5. Sony Xperia XZ2 Rear Camera Replacement: шаг 5, изображение 1 из 1
    • Gently remove the connector by using a spudger to pop it off.

  6. Sony Xperia XZ2 Rear Camera Replacement, Battery: шаг 6, изображение 1 из 1
    • Take out the twelve 3.5mm screws using the Phillips #00 screwdriver.

    • Remove the one 3 mm Phillips #00 screws.

    • Remove the two 1mm Phillips #00 screws.

    • Fifteen screws should be removed in total in this step. (Not all the screws are visible in the picture.)

  7. Sony Xperia XZ2 Rear Camera Replacement: шаг 7, изображение 1 из 1
    • Lift the metal screen shield out of the phone.

  8. Sony Xperia XZ2 Rear Camera Replacement: шаг 8, изображение 1 из 3 Sony Xperia XZ2 Rear Camera Replacement: шаг 8, изображение 2 из 3 Sony Xperia XZ2 Rear Camera Replacement: шаг 8, изображение 3 из 3
    • Use the spudger to pry up the battery flex connector to pop the battery out.

  9. Sony Xperia XZ2 Rear Camera Replacement: шаг 9, изображение 1 из 1
    • Lift the battery out of the phone.

  10. Sony Xperia XZ2 Rear Camera Replacement, Rear Camera: шаг 10, изображение 1 из 1
    • Pry off the flex connector with a spudger.

  11. Sony Xperia XZ2 Rear Camera Replacement: шаг 11, изображение 1 из 1
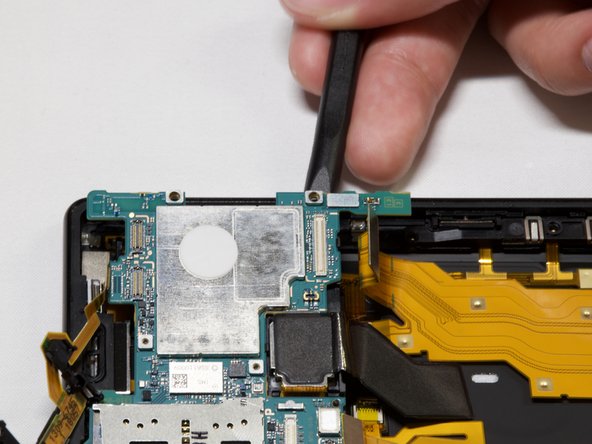
    • Take out the one 3mm screw on the motherboard with the Phillips #00 screwdriver.

  12. Sony Xperia XZ2 Rear Camera Replacement: шаг 12, изображение 1 из 1
    • Using a spudger, remove the antenna connector.

  13. Sony Xperia XZ2 Rear Camera Replacement: шаг 13, изображение 1 из 1
    • Gently lift the proximity sensor bracket by using a spudger.

  14. Sony Xperia XZ2 Rear Camera Replacement: шаг 14, изображение 1 из 2 Sony Xperia XZ2 Rear Camera Replacement: шаг 14, изображение 2 из 2
    • Remove the SIM card holder.

  15. Sony Xperia XZ2 Rear Camera Replacement: шаг 15, изображение 1 из 1
    • Pry off the flex connector using the spudger.

  16. Sony Xperia XZ2 Rear Camera Replacement: шаг 16, изображение 1 из 3 Sony Xperia XZ2 Rear Camera Replacement: шаг 16, изображение 2 из 3 Sony Xperia XZ2 Rear Camera Replacement: шаг 16, изображение 3 из 3
    • Use the spudger to lift the motherboard out of the phone.

  17. Sony Xperia XZ2 Rear Camera Replacement: шаг 17, изображение 1 из 3 Sony Xperia XZ2 Rear Camera Replacement: шаг 17, изображение 2 из 3 Sony Xperia XZ2 Rear Camera Replacement: шаг 17, изображение 3 из 3
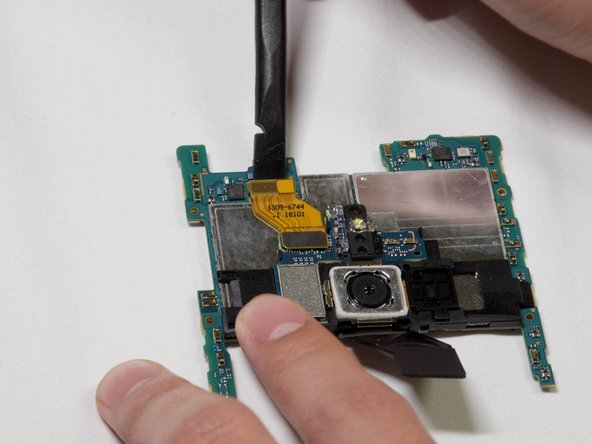
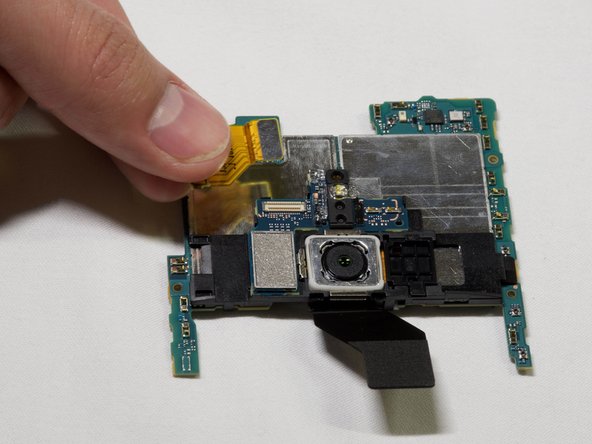
    • Disconnect the yellow connector by gently prying both sides of it using a spudger.

  18. Sony Xperia XZ2 Rear Camera Replacement: шаг 18, изображение 1 из 2 Sony Xperia XZ2 Rear Camera Replacement: шаг 18, изображение 2 из 2
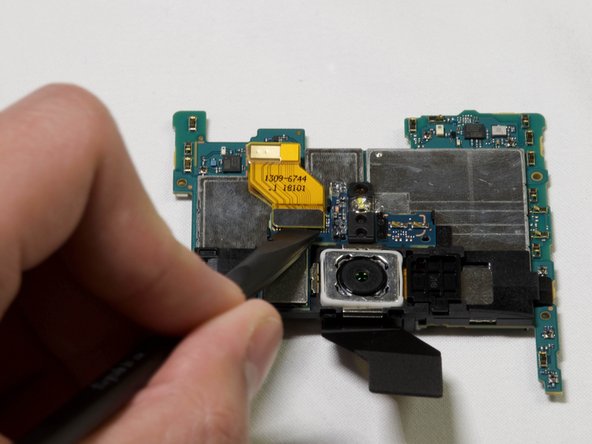
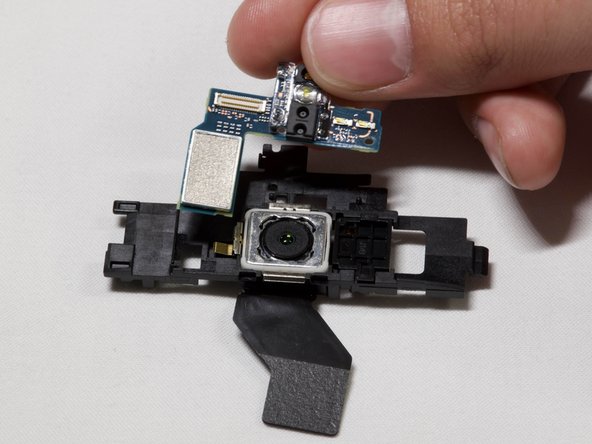
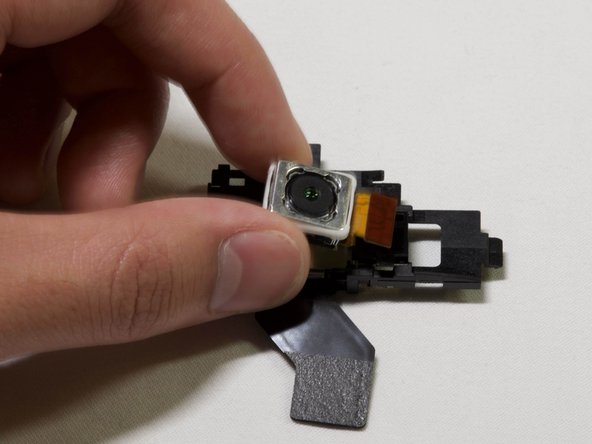
    • Disconnect the camera module from the motherboard by pulling the module up from the side using a spudger.

  19. Sony Xperia XZ2 Rear Camera Replacement: шаг 19, изображение 1 из 2 Sony Xperia XZ2 Rear Camera Replacement: шаг 19, изображение 2 из 2
    • Remove the upper module by gently lifting it with a spudger.

  20. Sony Xperia XZ2 Rear Camera Replacement: шаг 20, изображение 1 из 3 Sony Xperia XZ2 Rear Camera Replacement: шаг 20, изображение 2 из 3 Sony Xperia XZ2 Rear Camera Replacement: шаг 20, изображение 3 из 3
    • Gently lift up the rear camera by using a spudger under the rear camera.

Заключение

To reassemble your device, follow these instructions in reverse order.

2 участников успешно повторили данное руководство.

Dan Nguyen

Участник с: 01/24/19

338 Репутация

1 руководство автора

Команда

Cal Poly, Team S19-G5, White Winter 2019 Участник Cal Poly, Team S19-G5, White Winter 2019

CPSU-WHITE-W19S19G5

4 членов

Автор 10 руководств

0 Комментариев

Добавить комментарий

Просмотр статистики:

За последние 24часов: 5

За последние 7 дней: 16

За последние 30 дней: 49

За всё время: 2,514