Этот документ имеет более свежие изменения. Перейти к последней непроверенной версии.
Введение
This video shows how to replace and reassemble Sony Xperia Z5 LCD display.
Выберете то, что вам нужно
Видео обзор
-
-
Heat the back cover to soften the adhesive sticker.
-
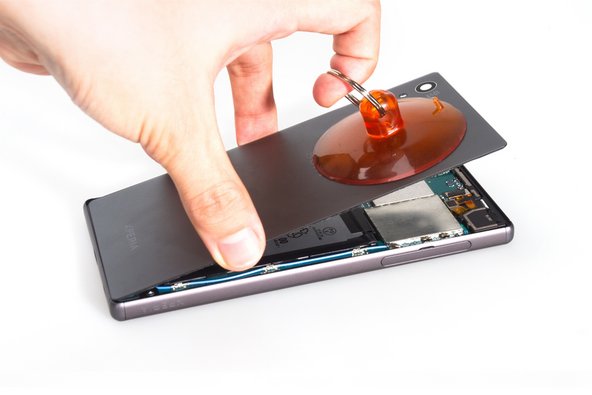
Place the suction cup and insert metal opening tool to open a gap from top side.
-
-
-
Insert the guitar pick and slide it to cut the adhesive sticker underneath.
-
Remove back cover.
-
-
-
Release battery connector.
-
Pull off the adhesive tape underneath the battery.
-
Pry up battery.
-
-
-
Release rear camera connector, front camera connector, audio jack connector and main flex connector on the motherboard.
-
Twist off screws there.
-
Remove that rubber securing bracket.
-
-
-
-
Remove metal cover and twist off two screws.
-
Loosen the bottom side of main flex assembly.
-
-
-
Loosen side button contactors ( Attention: the fingerprint sensor is here, be careful to loosen it), then remove the whole main flex assembly.
You can skip this step. Just fold over the bottom side from step 7 and you'll be fine. No need to take out the entire side part.
Thanks my friend!
Pedro -
-
-
-
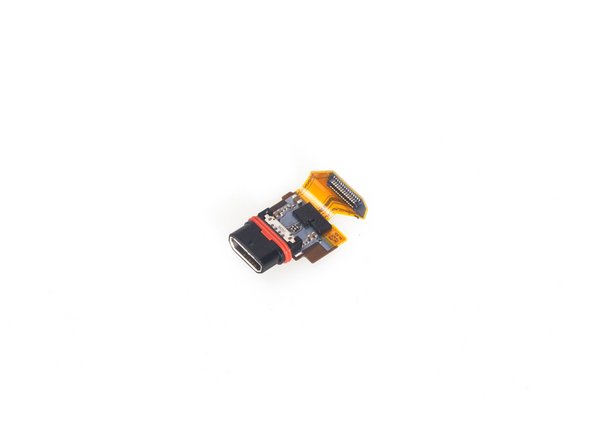
Release LCD screen flex connector, charging port connector, microphone connector here.
-
Remove motherboard.
-
-
-
The sticker underneath is strong, so use heat gun to soften it for a few minutes.
-
Remove LCD screen carefully.
-


To reassemble your device, follow these instructions in reverse order.
To reassemble your device, follow these instructions in reverse order.
Отменить: Я не выполнил это руководство.
46 участников успешно повторили данное руководство.
45 Комментариев
Awesome guide. Helped me alot. However i got blank screen after installing the new screen. Dont panic. You must replace the tape that covers the lcd filters. If you dont the metal plate will bridge the connections and the LCD will not display. I thought i broke the LCD however just replaced the tape off the original LCD and BOOM!
What are the filters? I have a repair shop and all screens are like these. Can't find them anywhere.
Johnny -
Hi, you need to reuse the black tape sticked on the original flex cable to cover the filters on the replacement part.
I would like also to know which tape you replaced.
Patrick -
What r the lcd filters as I have replaced a screen on Sony z5 on 2 phones now and the backlight isn't working on both phones but u can see that the screens r working any help would be great thanks
Barry -
Thank for the tip !
Have problem with coverage after replace screen . Signal is not stable. And is going to NO SERVIS what's can be wrong. What i should chcek.
hi Michal. I would check the antenna cable running down the right hand side of the phone. i think its blue on this model. Check the cable is intact and that the connectors on the boards top and bottom are secure and intact too.
Bev -
Hi. Would it be possible to show my what the lcd filters look like. A great guide but my phone screen switches off after about 2 seconds
This is a z5 premium screen repair and not a z5 screen repair.
Hola. Podrían decirme que hacer con mi Z5 que no hace caso a mi huella cuando lo manipulo, se ejecutan programas solos y se suele apagar sin la necesidad de hacerlo.
I just replaced the screen and the phones power up (back light on the screen) but no image. after a second will turn off the back light and blink red 4 times. I replaced lots of screens on sony Z phones, this is the first time that this happen. Any idea what 5 red blinks mean?
thanks!
theres a black fuse next to the lcd connector "V" written on it test it if theres no continuity then make a jumper, display will be back then...
guys my z5 had display but no backlight, I have bypassed the "V" and "A" both fuses still theres no backlight can anyone help?
hello friends please anyone send me the details of a good mobile repair shop in mumbai. i have a sony z5 premium and problem with mother board.
Does anybody know if the Z5 touchglass is compatible with the z5 premium touchglass. Cant seem to find a "touchglass only" for the z5 premium and every site i look at only sells the whole display assembly.
No. The Z5 has a 5.2” display whereas the Z5 Premium has a 5.5” display. Have you tried looking on eBay?
I successfully replaced the entire display assembly, microphone, battery and back cover on a Z5 using this guide. It took me just under an hour using a combination of the written guide and the embedded video (the video includes some helpful tips for reassembly). The Z5 in question was purchased in the UK and required a Phillips #0 screwdriver (not a Phillips #1) as mentioned in the tools section at the beginning of the guide. James mentions above that this is a repair guide for a Z5 Premium so perhaps that model uses a Phillips #1.
Thanks for pointing that out Daniel, yes I have and so far i have only seen one seller on Ebay.uk selling a Z5 premium touch glass. Not sure if i trust it. Im currently leaning towards replacing the whole LCD assembly but worried about the display quality with these 3rd party components. Has anyone noticed a difference between the original and replaced screens image quality?
My sony z5 display is broken.if i change my display will anything affects to mobile on waterproof..
Just attempted this last night. Here are some tips for first-timers that I learnt the hardway.
1. There are two white adhesive strips on either side of the battery pack, 1 pair adhering to back glass and another pair to the frame. Take extra time to heat these as they ARE VERY STRONG. I ended up shattering the back glass into millions of tiny shards trying to pry them up.
2. These white adhesives are similar to the 3M pull-down tapes where you pull it at a slight angle to remove everything cleanly. DO NOT BREAK IT or you'll have a !&&* of a time scraping it off.
3. I'm not sure about the adhesive strips from this site but the ones I bought off Ebay are terrible. Get several sets to be safe, some forums mention using double layer of adhesive to make sure the screen assembly and back glass fit nicely.
4. The video makes it look much easier than it actually is...
My Battery pack was wrapped with a yellow plastic which I damaged when scrapping adhesive off it. Does anyone know what its for? Can I remove it?
Hi, if you got blank screen after replacing you can check 2 components on the E6653
Both fuses, one has a V on it and most likely its for the back light (not sure about it) but after jumping that fuse had my back light fixed with no image still. Then I've jumped the fuse with L on it and got my image back.
Took me months to do this... I advice to buy a cheap microscope paid $20 AUD to help you with the process.
Follow this video for clear understanding of the procedure.
My screen is just black. Should i replace it ? I was just typing and then black screen. Its all working and i get notifications just nothing shows on the screen.
Can i know after reassamble my screen not fit and have a gap.. can u give me any suggestion?
This is a fairly easy repair to do. If you are skilled and have the right tools, you can do this in an hour easy. It took me an hour and I was eating food between steps :D
If you lose the LCD filters or tear them, kaption tape that is used on Apple devices will suffice. Also with replacement Xperia LCDs, if you use clamps to set the adhesive, make sure they're not too tight as you can permanently damage the screen. Good luck!
Hi there,
These are all really helpful comments, but I was wondering if anyone can help me? I’ve replaced the lcd screen and the touchscreen and phone itself are working fine but there is no display still when I turn the phone on. The little bit of black tape is missing from dissassembly (I take it the black tape is that seen near the motherboard connectors at step 11?) Is there an electrical tape that I can get to replace this? Normal insulation tape hasn’t worked so far. Hopefully this is the problem, unless anyone has any further suggestions as to why the screen image alone may not be working?
Thanks!
Great walkthrough. I successfully changed the LCD screen my brother’s in law Xperia Z5 following this guide. I had a rough removing the back panel has I didn’t have a heat gun but I finally succeeded. Doing the rest was pretty easy. Thanks a lot
Hello guys, i made a quick repair video. This guide is really good but this might help too, it helped me
Hello mates. Could anyone help me? I have successfully changed the LCD/digitizer assembly, but the touch screen is not working, though the display is working just fine. I thought it might have been the replacement screen, so I went through 5 different sets, and all of them were the same, touch ain’t working. So I think it might be a board-level problem, any advice on this? Since I don’t really fix board-related problems.
Ok , ben fatto ma elimina troppi componenti per sostituire il display senza cornice. Basta disconnettere il connettore display, scollqre e reincollare, riconnettere
I just need to replace the adhesive as the front screen keeps coming loose. This doesn't actually tell me how to do that
You probably want to take the screen off, remove the old adhesive and replace it with a pre-cut sheet or thin double sided adhesive tape (1 or 2 mm wide).
You are a life saver - or phone saver anyway. Yep, the new screen did not have insulation tape over the components on the kapton circuit flex board where it goes under a metal shield next to the speaker. Look on the genuine screen and you will see black tape covering all of the components on the brown kapton circuit board as it leaves the screen. These components short onto the metal plate if you don’t put tape over them.
I was just wondering what the technical name for the LCD displays connector is.
Hi, I replaced my Sony Xperia Z5 screen, but after replacement when I turn the phone on, I have just a blue screen! Do you know (by experience) why it happens and how can I fix that?