Введение
Usa questa guida per sostituire una batteria vecchia o difettosa e ridare la vita al tuo MacBook Pro. Se la tua batteria è gonfia, prendi adeguate precauzioni.
Выберете то, что вам нужно
-
-
Rimuovi le dieci viti seguenti, che fissano il case inferiore al MacBook Pro Unibody da 13":
-
Sette viti con testa a croce da 3 mm.
-
Tre viti con testa a croce da 13,5 mm.
-
-
-
Solleva leggermente il case inferiore e spingilo verso la parte posteriore del computer per liberare le linguette di montaggio.
-
-
-
-
Svita le seguenti viti tri-point che fissano la batteria al case posteriore:
-
Una vite tri-point da 5,5 mm
-
Una vite tri-point da 13,5 mm
-
-
-
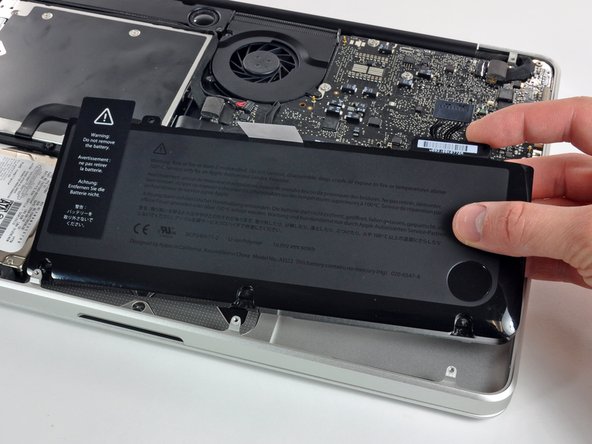
Solleva la batteria dal case superiore.
-
Carica al 100% e poi tieni sotto carica almeno altre due ore. Quindi stacca l'alimentazione e usa il laptop normalmente per farlo scaricare. All'avviso di batteria in esaurimento, salva il lavoro corrente e tieni acceso il MacBook finché non si iberna perché è scarico. Aspetta almeno altre 5 ore, poi carica il laptop ininterrottamente fino al 100%.
-
Se noti qualsiasi problema o comportamento inusuale dopo l'installazione di una nuova batteria, può essere necessario resettare l'SMC del tuo MacBook.
-


Per riassemblare il dispositivo, segui queste istruzioni in ordine inverso.
Per riassemblare il dispositivo, segui queste istruzioni in ordine inverso.
Отменить: Я не выполнил это руководство.
727 участников успешно повторили данное руководство.
Особая благодарность этим переводчикам:
100%


Эти переводчики помогают нам починить мир! Хотите внести свой вклад?
Начните переводить ›

50 Комментариев
My laptop wouldn't believe the battery was new until I reset the SMC as well ( http://support.apple.com/kb/HT3964 ).
Perfect! I didn't want to wait for the Tri-wing screwdriver to ship, so I gave it a try by wedging a FH 1 in between two of the wings. It worked well to unscrew, but you must be very careful when resetting the screws that hold the battery. If you get them started with your finger (a little pressure with your thumb pushing straight down will get the job done) then you can do a few final turns with the FH 1. If you try to start resetting the screws with the off-center-FH1-workaround, you will strip the screw! Keep the screws centered and don't force anything.
My local Apple Store wants $179 plus tax to change this battery, AND I have to leave my laptop for "a couple of days." This is one store that clearly doesn't get it (Cherry Creak Mall, Denver). Thus, a DIY fix is mandatory... but, they won't sell just the battery.
iFixit sells the battery you need for $119 ([связанный продукт отсутствует или отключен: IF163-019]), and once you get it, doing the replacement shouldn't take more than 30 minutes, even if you've never done a repair like this before.