Перейти к основному содержанию

Эта версия возможно содержит некорректные исправления. Переключить на последнюю проверенную версию.

Выберете то, что вам нужно

  1. Этот шаг не переведен. Помогите перевести

    : шаг 1, изображение 1 из 3 : шаг 1, изображение 2 из 3 : шаг 1, изображение 3 из 3
    • Turn on your Steam Deck and allow the battery to discharge below 25% before starting your repairs, as a charged lithium-ion polymer battery can be dangerous if accidentally punctured.

    • As an extra precaution, Valve recommends putting your Steam Deck into battery storage mode within the BIOS before starting any internal repairs. Read how to do that here.

    • Power down your Steam Deck and unplug any cables.

    • If you have a microSD card installed, make sure to remove it before opening the Steam Deck. If you attempt to remove the back cover with it still installed, it could snap right in half.

    • During your repair, it can be helpful at times to lay the Steam Deck face-down into its case to protect the thumbsticks and prevent wobble.

  2. Этот шаг не переведен. Помогите перевести

    : шаг 2, изображение 1 из 1
    Инструмент, используемый на этом этапе:
    FixMat
    $36.95
    Купить
    • Use a Phillips driver to remove the eight screws securing the back cover:

    • Four coarse thread 9.5 mm-long screws

    • Four fine thread 5.8 mm-long screws

    • Despite the standards, Phillips screwdrivers can vary in size and shape—two drivers labeled as the same size may fit differently in the same screw. Use the size that fits the snuggest into the screw head.

    • Throughout this repair, keep track of each screw and make sure it goes back exactly where it came from to avoid damaging your Steam Deck.

  3. Этот шаг не переведен. Помогите перевести

    : шаг 3, изображение 1 из 2 : шаг 3, изображение 2 из 2
    • Insert an opening pick into the thin gap between the back cover and the front shell, along the edge of the right grip.

    • If you're having trouble inserting your pick at the grip seam, try starting at either the top or bottom long edges first, then slide the pick towards the grip.

    • Pry up on the back cover to release it from the locking clips.

  4. Этот шаг не переведен. Помогите перевести

    : шаг 4, изображение 1 из 3 : шаг 4, изображение 2 из 3 : шаг 4, изображение 3 из 3
    • Once the clips are disconnected from one edge, the rest disconnect easily.

    • Grip the back cover at the opening you just created and pull it up and away from the device to unclip the long edges.

    • Remove the back cover.

  5. Этот шаг не переведен. Помогите перевести

    : шаг 5, изображение 1 из 2 : шаг 5, изображение 2 из 2
    • If you have a refreshed Steam Deck version with the black motherboard cover, skip this step.

    • Use a pair of tweezers to remove the piece of foil tape covering the hidden screw on the board shield.

    • If possible, try not to rip or tear this tape so it can be reused. If necessary, you can fashion a replacement by cutting a piece of aluminum foil tape to fit.

  6. Этот шаг не переведен. Помогите перевести

    : шаг 6, изображение 1 из 2 : шаг 6, изображение 2 из 2
    • Use a Phillips driver to remove the three screws securing the board shield:

    • One 3.4 mm screw

    • Two 3.7 mm screws

    • Only the two 3.7 mm screws along the left edge are present in refreshed Steam Decks.

  7. Этот шаг не переведен. Помогите перевести

    : шаг 7, изображение 1 из 3 : шаг 7, изображение 2 из 3 : шаг 7, изображение 3 из 3
    • Remove the board shield.

    • Depending on the age of your Steam Deck, this shield may stick to the thermal pads underneath.

    • During reassembly, ensure that the fan cable lays on the side of the board shield and isn't pinched underneath.

  8. Этот шаг не переведен. Помогите перевести

    : шаг 8, изображение 1 из 3 : шаг 8, изображение 2 из 3 : шаг 8, изображение 3 из 3
    • Grip the battery cable by its pull tab and pull it directly away from the motherboard to disconnect it.

    • Alternatively, use the flat end of a spudger or a clean fingernail to gently push the connector out of its socket, then disconnect it completely by hand.

  9. Этот шаг не переведен. Помогите перевести

    : шаг 9, изображение 1 из 3 : шаг 9, изображение 2 из 3 : шаг 9, изображение 3 из 3
    • Use a pair of tweezers to remove the sticker from the top edge of the fan.

    • If possible, try not to rip or tear this sticker so it can be reused. Use a little bit of heat if necessary to soften the adhesive.

    • If the sticker feels like it might tear, use tweezers to peel up one edge just until you can grip it with your fingers, then remove the rest by hand.

  10. Этот шаг не переведен. Помогите перевести

    : шаг 10, изображение 1 из 3 : шаг 10, изображение 2 из 3 : шаг 10, изображение 3 из 3
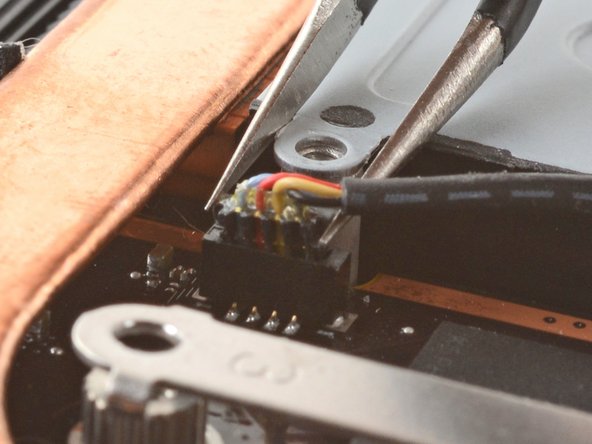
    • Use a pair of tweezers to grip the edges of the fan connector and pull up to disconnect it from the motherboard.

    • Pull the fan cable by its connector, not the wires themselves.

    • During reassembly, be gentle while plugging in the fan connector.

    • If the connector is misaligned, the use of too much force can damage the fragile internal pins.

  11. Этот шаг не переведен. Помогите перевести

    : шаг 11, изображение 1 из 1
    • Use a Phillips driver to remove the two 3.7 mm screws securing the fan.

    • No, your eyes don't deceive you! The other two fan screws were removed earlier in the disassembly: they double as two back cover screws.

  12. Этот шаг не переведен. Помогите перевести

    : шаг 12, изображение 1 из 1
    • Remove the fan.

    • When installing a replacement fan, peel off the plastic liner on the cable adhesive and adhere it to the fan body in the same location as the cable on the old fan, so it'll lay on the side of the board shield and not get pinched underneath.

Финишная черта

75 участников успешно повторили данное руководство.

Carsten Frauenheim

Участник с: 03/10/20

113 154 Репутация

Автор 338 руководств

Команда

iFixit Участник iFixit

Staff

135 членов

Автор 16 767 руководств

22 Комментариев

Hi ifixit Team, as the cooler seems to be a non factory one: how does it compare noise wise to the standard Steam Deck cooler, which is unbearably loud?

Peter Black - Ответить

I addition to Peter's comment, in would be helpful to know the manufacturer and model. It would seem that there are at least two, perhaps more models being used; one brand in particular being prone to the high-pitched "whining" issue.

Cameron - Ответить

To those asking, you want a huaying fan as opposed to a delta fan. The delta is terribly bad with its acoustics.

Christopher Stanton - Ответить

is this the delta or huaying?

Mono Chrome - Ответить

Добавить комментарий

Просмотр статистики:

За последние 24часов: 21

За последние 7 дней: 198

За последние 30 дней: 970

За всё время: 94,166