Выберете то, что вам нужно
-
-
To avoid electronically damaging either your computer or your mouse, unplug the usb cable from its socket.
-
-
-
The Rival 700 mouse is a non wireless mouse. The micro-USB cable end is an elbow socket, secured by a plastic clip.
-
To disconnect the cable from the mouse, firmly press the plastic clip using your thumb
-
-
-
The original nameplate is a soft rubber one that can be removed just by pulling it softly out of its socket.
-
WARNING: When reassembling, if you're using a custom nameplate that may not be as stretchable as the original one, insert it softly, and use a lime tool on the new part to avoid damaging the mouse socket.
-
-
-
You will be able to download the 3D files to design a custom nameplate on the Steelseries website. The link is also provided in the part description.
-
On this picture, the original "RIVAL" nameplate will be replaced with a new one on which i just had my Twitch ID printed.
-
Be creative, use colored plastic, put logos and drawings on your mouse.
-
-
-
-
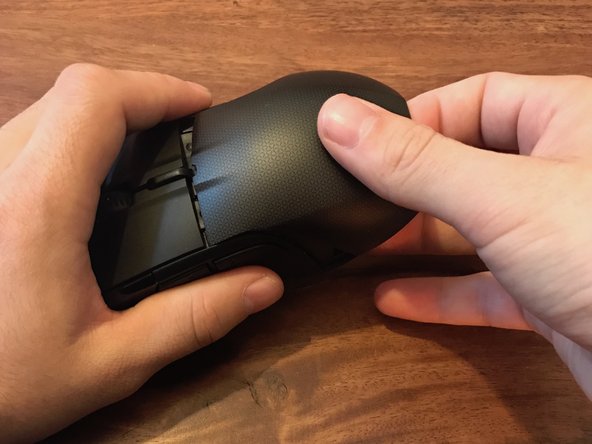
Use both your index and thumb to gently pry the top cover out from the mouse.
-
This part is a thin plastic one which needs a certain amount of strength to be removed. Be careful not to break it.
-
-
-
Steelseries sells a set of two different covers to replace the original one, with a sweat-resistant one f.e.
-
Check the parts section for the purchase link.
-
On the left, you can see on the wide led slot that is used to color the Steelseries logo on your mouse.
-
-
-
Use a Philips #0 screwdriver to remove the four screws that are keeping the mouse sensor assembly sealed.
-
-
-
Insert your thumb and index in the two mouse holes and gently pry the sensor assembly out from its socket.
-
-
-
The sensor assembly is linked to the mouse body with a 10-pin Steelseries custom connector.
-
-
-
Only four screws have to be removed to entirely re-design this gaming mouse, which is not that expensive regarding the high performance, features, and customizability.
-


To reassemble your device, follow these instructions in reverse order.
To reassemble your device, follow these instructions in reverse order.
Отменить: Я не выполнил это руководство.
7 участников успешно повторили данное руководство.

12 Комментариев
Is it possible to open it up so that you can see the mouse wheel? Mine needs some lubrication since it's making a squeaking sound as soon as I use the mouse wheel. Level of annoyance is over 9000!
Hi @andned,
Never gave it a try as long as mine doesn't need it. It is a pretty expensive mouse so I wouldn't like to damage it.
The purpose of this guide was to demonstrate how easy customizing the mouse is easy.
Give us your feedback if you managed to do it :)
You didn’t disassemble anything.
I actually did :) my purpose was to demonstrate how easy it was to customise the mouse.
I think that you meant “this isn’t deep repair”. Indeed, it isn’t :)
My usb connector doesnt work i dont know if what is the problem? Where will i go if? So they can check the problem. I buyed it from singapore but i now on Philippines
if you got sqeaking sounds from the mouse wheel. just RMA it. i did too. they will send a new one. and ask for a proof of destruction of your current mouse.
Well my warranty just ran out on the mouse and the left mouse button stopped working couple of weeks after it during play. Any idea if it´s possible to be repaired?
Isn’t the purpose of ifixit to show you how to open up things and *fix* it yourself? You’ve done neither in your useless article.
Do you have the pinout for the sensor? I want to use the laser sensor for a DIY trackball, this seems to be the cheapest route.
found this because I got a squeeky Mousewheel as well, and ifixeditI have everything together again and the only thing i wasnt able to disassamble was the Mousewheel”board” in wich the mousewheel is placed,Anyway I was able to lube the “Mousewheelbase” and it isnt making any sound since then beside the rumbling noice it should do.In order to do this, order some new glidepads. Remove glidepads and unscrew the 4 Screws under it. Remove the “Customize” plastic and rubber thing from the palm as seen as well.
Unclip the Cable from the big mousewheel board on the underleft when you view on top( led for mousewheel) for more view. unscrew the 4 silver screws from the big middleboard and unclip the LED for the backside (1 Clip for each side) and then lift the big board a but up, hold it tight and wiggle the cable under it out of it (backside, its for the vibration) and then lift it up completly. now you got a nice view on the Mousewheel as well of its componands.Lube the sides and you are done.
this doesn't help at all.... what about removing the button flaps without breaking them to clean the mouse wheel? I have a new Rival 710, and the past few months i can't scroll properly