Перейти к основному содержанию

Suzuki DR650 SE membrane and seal replacement

Выберете то, что вам нужно

  1. Suzuki DR650 SE membrane and seal replacement, Diaphragm and seal: шаг 1, изображение 1 из 1
    • The two screws, here quite funny with a large Phillips, or a 10-fork or ring spanner, unscrew.

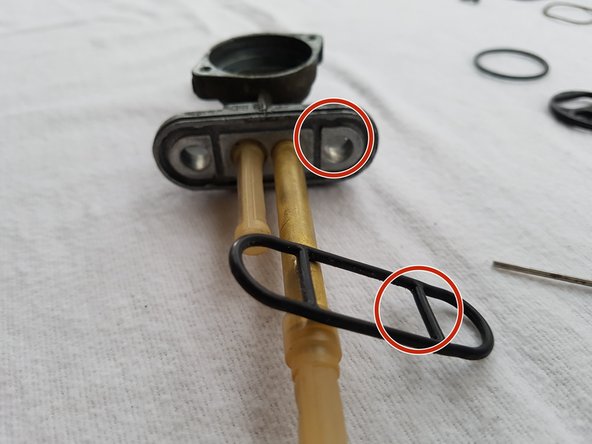
    • Very important: The tank should be at most 1/4 full so that it does not leak. Then you can put it upright.

  2. Suzuki DR650 SE membrane and seal replacement: шаг 2, изображение 1 из 3 Suzuki DR650 SE membrane and seal replacement: шаг 2, изображение 2 из 3 Suzuki DR650 SE membrane and seal replacement: шаг 2, изображение 3 из 3
    • Remove the 5 membrane cover screws with Phillips PH2 and carefully remove the cover. Caution here, the diaphragm spring pops out.

    • membrane

    • diaphragm spring

    • pellicle

    • Check the seal kit and clean if necessary.

    • Now remove the diaphragm with plate.

  3. Suzuki DR650 SE membrane and seal replacement: шаг 3, изображение 1 из 3 Suzuki DR650 SE membrane and seal replacement: шаг 3, изображение 2 из 3 Suzuki DR650 SE membrane and seal replacement: шаг 3, изображение 3 из 3
    • Unscrew the two Phillips screws with a phillips PH2. Then remove the actuator.

    • Remove sealing plate and O-ring.

    • Steller

    • spring washer

    • cover plate

    • Now remove the foot seal.

  4. Suzuki DR650 SE membrane and seal replacement: шаг 4, изображение 1 из 1
    • Remove the diaphragm. Now we would have split everything up.

  5. Suzuki DR650 SE membrane and seal replacement: шаг 5, изображение 1 из 1
    • membrane

    • Membrane intermediate plate

    • diaphragm cover

    • diaphragm spring

    • Fußdichtung

    • body

    • sealing plate

  6. Suzuki DR650 SE membrane and seal replacement: шаг 6, изображение 1 из 3 Suzuki DR650 SE membrane and seal replacement: шаг 6, изображение 2 из 3 Suzuki DR650 SE membrane and seal replacement: шаг 6, изображение 3 из 3
    • countersunk screws

    • Steller

    • spring washer

    • O-ring

    • cover plate

    • Head Screws

    • And here is a representation of how the fuel cock works.

  7. Suzuki DR650 SE membrane and seal replacement: шаг 7, изображение 1 из 2 Suzuki DR650 SE membrane and seal replacement: шаг 7, изображение 2 из 2
    • Lightly grease the 3 gaskets. To remove the old seals, use the metal spudger. The new ones can be pressed in by hand.

    • sealing plate

    • and insert the O-ring into the body.

  8. Suzuki DR650 SE membrane and seal replacement: шаг 8, изображение 1 из 3 Suzuki DR650 SE membrane and seal replacement: шаг 8, изображение 2 из 3 Suzuki DR650 SE membrane and seal replacement: шаг 8, изображение 3 из 3
    • Thread the spring washer and the cover plate into the actuator and build it into the base body. Make sure that when screwing the spring ring is not pinched. One notices this when turning from "On" to "Res", when it comes to blocking, the spring washer is clamped. Then stop again.

  9. Suzuki DR650 SE membrane and seal replacement: шаг 9, изображение 1 из 3 Suzuki DR650 SE membrane and seal replacement: шаг 9, изображение 2 из 3 Suzuki DR650 SE membrane and seal replacement: шаг 9, изображение 3 из 3
    • Reinstall the new diaphragm in the intermediate plate.

  10. Suzuki DR650 SE membrane and seal replacement: шаг 10, изображение 1 из 3 Suzuki DR650 SE membrane and seal replacement: шаг 10, изображение 2 из 3 Suzuki DR650 SE membrane and seal replacement: шаг 10, изображение 3 из 3
    • Reinstall the diaphragm in the body.

    • Place the spring in the center of the plate.

    • When reassembling, make sure the spring is exactly in the ring on the inside of the diaphragm cover, as the lock on the other side may be misaligned.

  11. Suzuki DR650 SE membrane and seal replacement: шаг 11, изображение 1 из 3 Suzuki DR650 SE membrane and seal replacement: шаг 11, изображение 2 из 3 Suzuki DR650 SE membrane and seal replacement: шаг 11, изображение 3 из 3
    • Re-screw the 5 Phillips screws with a suitable Phillips screwdriver (PH2).
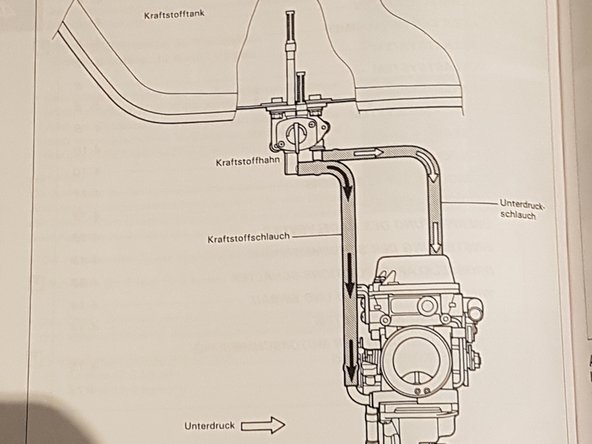
    • gasoline connection

    • Vacuum port

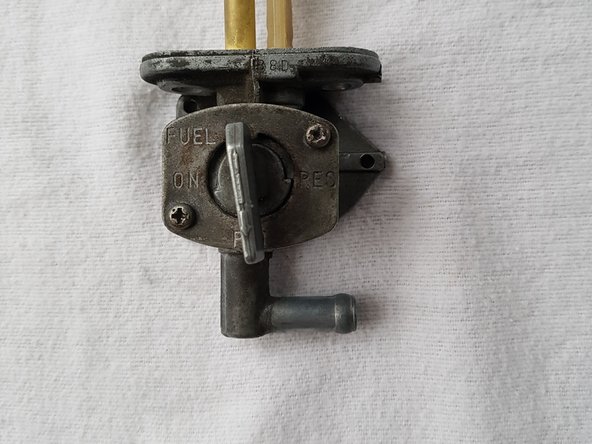
    • For functional testing, you must now apply a slight vacuum to the vacuum connection, which causes the cap to open. This can then be tested by blowing at the gasoline connection. When the vacuum drops, the shutter must close immediately.

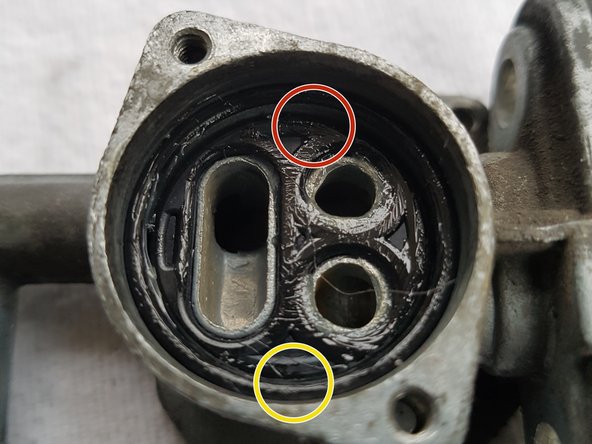
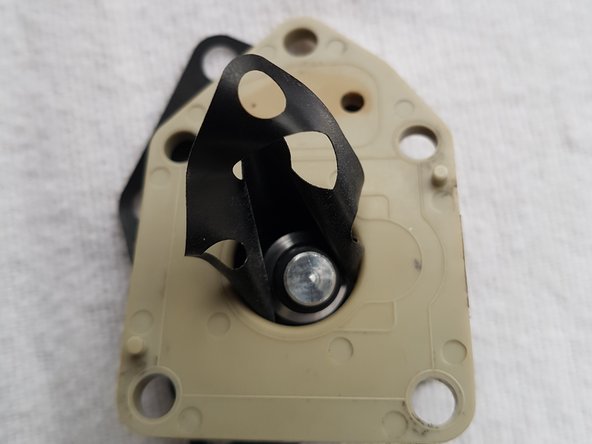
    • Now install the foot gasket.

  12. Suzuki DR650 SE membrane and seal replacement: шаг 12, изображение 1 из 2 Suzuki DR650 SE membrane and seal replacement: шаг 12, изображение 2 из 2
    • Now the fuel tap can be reinstalled.

    • Be sure to install the two sealing washers under the screws.

Финишная черта

Особая благодарность этим переводчикам:

de en

100%

irlandaпомогает нам починить мир! Хотите внести свой вклад?
Начните переводить ›

Sabrina

Участник с: 04/26/16

1 Репутация

1 руководство автора

Команда

iFixit EU Team Участник iFixit EU Team

Staff

46 членов

Автор 1 095 руководств

0 Комментариев

Добавить комментарий

Просмотр статистики:

За последние 24часов: 1

За последние 7 дней: 6

За последние 30 дней: 22

За всё время: 1,607