Перейти к основному содержанию

Tagital T7X Camera Replacement

Выберете то, что вам нужно

  1. Tagital T7X Camera  Replacement, Case: шаг 1, изображение 1 из 3 Tagital T7X Camera  Replacement, Case: шаг 1, изображение 2 из 3 Tagital T7X Camera  Replacement, Case: шаг 1, изображение 3 из 3
    • Place the Tagital T7X on a sturdy surface.

    • Insert the plastic opening tool into the crack and pry open the tablet. Move the tool along the edge, while continuing to pry up the casing.

  2. Tagital T7X Camera  Replacement, Camera: шаг 2, изображение 1 из 3 Tagital T7X Camera  Replacement, Camera: шаг 2, изображение 2 из 3 Tagital T7X Camera  Replacement, Camera: шаг 2, изображение 3 из 3
    • Use a spudger to hold the cameras in place.

    • Gently pull the black tape away using your finger.

  3. Tagital T7X Camera  Replacement: шаг 3, изображение 1 из 3 Tagital T7X Camera  Replacement: шаг 3, изображение 2 из 3 Tagital T7X Camera  Replacement: шаг 3, изображение 3 из 3
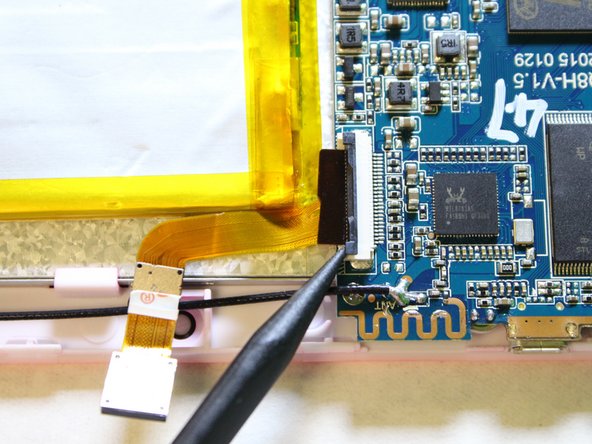
    • Remove the ribbon cable from the motherboard.

    • Use a spudger to lift the two tabs, freeing the ribbon cable from the socket.

  4. Tagital T7X Camera  Replacement: шаг 4, изображение 1 из 3 Tagital T7X Camera  Replacement: шаг 4, изображение 2 из 3 Tagital T7X Camera  Replacement: шаг 4, изображение 3 из 3
    • Gently pull the ribbon cable away from the motherboard.

    • Don't be afraid to use some force to pull the ribbon cable.

Заключение

To reassemble your device, follow these instructions in reverse order.

Еще один человек закончил это руководство.

Hanlong Chen

Участник с: 02/10/16

265 Репутация

Автор 2 руководств

Команда

USF Tampa, Team 2-1, Sullivan Spring 2016 Участник USF Tampa, Team 2-1, Sullivan Spring 2016

USFT-SULLIVAN-S16S2G1

4 членов

Автор 12 руководств

0 Комментариев

Добавить комментарий

Просмотр статистики:

За последние 24часов: 0

За последние 7 дней: 4

За последние 30 дней: 5

За всё время: 175