Перейти к основному содержанию

Tatung TAC-6G Light Element Replacement

Выберете то, что вам нужно

  1. Tatung TAC-6G Light Element Replacement, Light Element: шаг 1, изображение 1 из 1
    • Start with the device standing upright.

  2. Tatung TAC-6G Light Element Replacement: шаг 2, изображение 1 из 1
    • Remove the 11mm Phillips screw from below the power component panel.

  3. Tatung TAC-6G Light Element Replacement: шаг 3, изображение 1 из 1
    • Pull the panel away from the rice cooker.

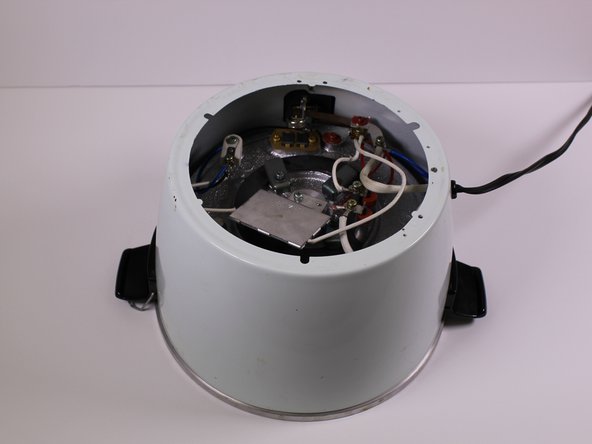
    • Remove the 9mm Phillips screw from behind the power component dashboard that is connected to the light plate.

  4. Tatung TAC-6G Light Element Replacement: шаг 4, изображение 1 из 1
    • Pull the light plate from the power component panel.

  5. Tatung TAC-6G Light Element Replacement: шаг 5, изображение 1 из 1
    • Flip the rice cooker device upside down.

  6. Tatung TAC-6G Light Element Replacement: шаг 6, изображение 1 из 2 Tatung TAC-6G Light Element Replacement: шаг 6, изображение 2 из 2
    • Remove the one 7mm Phillips screw from the side of the brass panel

    • Lift the brass plate off of the device and set it aside.

  7. Tatung TAC-6G Light Element Replacement: шаг 7, изображение 1 из 1
    • Remove the 7mm Phillips screw holding the white and maroon colored wires that are connected to the heating element.

  8. Tatung TAC-6G Light Element Replacement: шаг 8, изображение 1 из 1
    • Remove the 10mm Phillips screw that connects the white, blue and black wires to the white plastic piece in the corner of the device.

  9. Tatung TAC-6G Light Element Replacement: шаг 9, изображение 1 из 1
    • Remove the 7mm Phillips screw that connects two white wires and one red wire to the heating "warm" switch.

  10. Tatung TAC-6G Light Element Replacement: шаг 10, изображение 1 из 1
    • Using your hand, pull out the light plate with the maroon red and black wires.

  11. Tatung TAC-6G Light Element Replacement: шаг 11, изображение 1 из 1
    • Replace the light plate dashboard.

Заключение

To reassemble your device, follow these instructions in reverse order.

Erin Charles

Участник с: 01/28/16

215 Репутация

1 руководство автора

Команда

University of Alabama, Team 1-6, Sydow campbell Spring 2016 Участник University of Alabama, Team 1-6, Sydow campbell Spring 2016

UA-SYDOW CAMPBELL-S16S1G6

4 членов

Автор 3 руководств

Один комментарий

Reverse the steps for reassembly.

Tom Anderson - Ответить

Добавить комментарий

Просмотр статистики:

За последние 24часов: 0

За последние 7 дней: 4

За последние 30 дней: 14

За всё время: 633