Перейти к основному содержанию

TiVo Series 2 TCD540080 Cooling Fan Replacement

Выберете то, что вам нужно

  1. TiVo Series 2 TCD540080 Cooling Fan Replacement, Removal of TiVo Series 2 TCD540080 Case: шаг 1, изображение 1 из 1
    • Power down the TiVo and detach the power cable from the rear of the unit.

    • Wait 5 minutes for the unit to fully discharge before proceeding to the next step.

  2. TiVo Series 2 TCD540080 Cooling Fan Replacement: шаг 2, изображение 1 из 1
    • Remove the five T10 screws from the rear of the case using the Torx screwdriver.

  3. TiVo Series 2 TCD540080 Cooling Fan Replacement: шаг 3, изображение 1 из 2 TiVo Series 2 TCD540080 Cooling Fan Replacement: шаг 3, изображение 2 из 2
    • Lift up and pull back the outer casing towards the rear of the unit.

  4. TiVo Series 2 TCD540080 Cooling Fan Replacement, Cooling Fan: шаг 4, изображение 1 из 1
    • The fan is held in by four T15 screws on the rear of the device.

  5. TiVo Series 2 TCD540080 Cooling Fan Replacement: шаг 5, изображение 1 из 2 TiVo Series 2 TCD540080 Cooling Fan Replacement: шаг 5, изображение 2 из 2
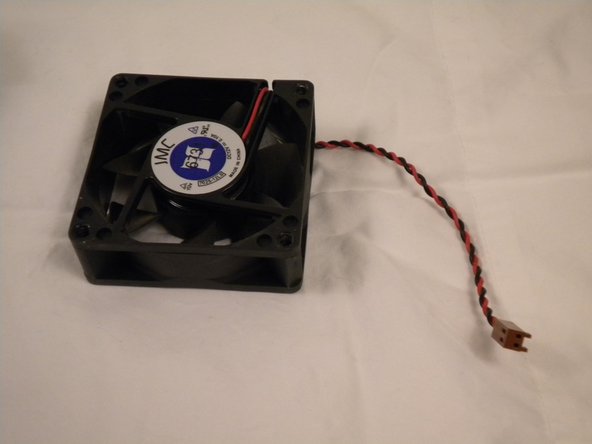
    • Take the wound red and black wires coming from the fan and follow them back to the logic board.

    • Unplug the connector from the motherboard.

  6. TiVo Series 2 TCD540080 Cooling Fan Replacement: шаг 6, изображение 1 из 2 TiVo Series 2 TCD540080 Cooling Fan Replacement: шаг 6, изображение 2 из 2
    • Pull the fan towards the front and out of the TiVo unit.

Заключение

To reassemble your device, follow these instructions in reverse order.

Svyatoslav Markeyev

Участник с: 04/16/10

135 Репутация

Автор 5 руководств

Команда

Cal Poly, Team 33-79, Johann Spring 2010 Участник Cal Poly, Team 33-79, Johann Spring 2010

CPSU-JOHANN-S10S33G79

4 членов

Автор 5 руководств

0 Комментариев

Добавить комментарий

Просмотр статистики:

За последние 24часов: 0

За последние 7 дней: 0

За последние 30 дней: 0

За всё время: 5,237