Введение
In this guide users will be walked through the process of removing both of the hard drives located in the Toshiba Dynabook AX 53D. This includes removing the drive cover panels, pulling out the drive, and removing the drive from its metal retaining plate.
Выберете то, что вам нужно
-
-
The battery is now easily removed by pulling up from the notched tab on the inside edge.
-
-
-
-
Start by using the #J1 screw bit to unscrew the the two 4.6 mm hard drive bay screws located on the underside of the laptop. They are located next to the Windows license sticker.
-
-
-
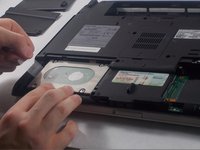
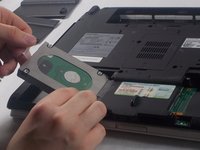
The drive can now be removed from the metal drive retainer by unscrewing the four exposed 4.1 mm #J1 screws on either side of the drive.
-
-
-
The secondary hard drive can be removed following the same process on the right drive bay.
-


To reassemble your device, follow these instructions in reverse order.
To reassemble your device, follow these instructions in reverse order.
Команду

UMass Dartmouth, Team S2-G7, Isaacson Spring 2017 Участник UMass Dartmouth, Team S2-G7, Isaacson Spring 2017
UMASSD-ISAACSON-S17S2G7
3 членов
Автор 15 руководств