Перейти к основному содержанию
Присоединяйся к сообществу ремонтников - Создай аккаунт

Toshiba Excite 10 AT300 Rear-Facing Camera Replacement

Выберете то, что вам нужно

  1. Toshiba Excite 10 AT300 Rear-Facing Camera Replacement, Remove SD Card: шаг 1, изображение 1 из 1
    • Remove the SD card from the SD card slot.

    Спросите у FixBot

    Добавить комментарий

  2. Toshiba Excite 10 AT300 Rear-Facing Camera Replacement, Open the Tablet: шаг 2, изображение 1 из 3 Toshiba Excite 10 AT300 Rear-Facing Camera Replacement, Open the Tablet: шаг 2, изображение 2 из 3 Toshiba Excite 10 AT300 Rear-Facing Camera Replacement, Open the Tablet: шаг 2, изображение 3 из 3
    • Use the opening tool to separate the front and rear panels by slipping the tool underneath the screen edge and sliding it around the entire device.

    • Make sure you unclip all of the clips on the back panel, or pulling it off will be difficult and may damage the tablet.

    Спросите у FixBot

    Добавить комментарий

  3. Toshiba Excite 10 AT300 Rear-Facing Camera Replacement, Disconnect Speaker Wires: шаг 3, изображение 1 из 3 Toshiba Excite 10 AT300 Rear-Facing Camera Replacement, Disconnect Speaker Wires: шаг 3, изображение 2 из 3 Toshiba Excite 10 AT300 Rear-Facing Camera Replacement, Disconnect Speaker Wires: шаг 3, изображение 3 из 3
    Инструмент, используемый на этом этапе:
    Tweezers
    $4.99
    • Remove the speaker cable from its socket by gripping both sides of the white connector piece with tweezers and pulling straight out.

    • Be careful not to rip the wires out of the white connector piece.

    Спросите у FixBot

    Добавить комментарий

  4. Toshiba Excite 10 AT300 Rear-Facing Camera Replacement, Remove Screws: шаг 4, изображение 1 из 2 Toshiba Excite 10 AT300 Rear-Facing Camera Replacement, Remove Screws: шаг 4, изображение 2 из 2
    • Using a #00 Phillips screwdriver, remove the following screws:

    • Five 3mm Phillips #00 screws

    Спросите у FixBot

    Добавить комментарий

  5. Toshiba Excite 10 AT300 Rear-Facing Camera Replacement, Remove Battery Cable: шаг 5, изображение 1 из 3 Toshiba Excite 10 AT300 Rear-Facing Camera Replacement, Remove Battery Cable: шаг 5, изображение 2 из 3 Toshiba Excite 10 AT300 Rear-Facing Camera Replacement, Remove Battery Cable: шаг 5, изображение 3 из 3
    Инструмент, используемый на этом этапе:
    Tweezers
    $4.99
    • Gently lift the battery, pulling away from the tab holding it in place at the bottom.

    • While holding the battery up, use a pair of tweezers to remove the battery cable from its connector.

    Спросите у FixBot

    Добавить комментарий

  6. Toshiba Excite 10 AT300 Rear-Facing Camera Replacement, Remove screw and yellow tape: шаг 6, изображение 1 из 1
    Инструмент, используемый на этом этапе:
    Tweezers
    $4.99
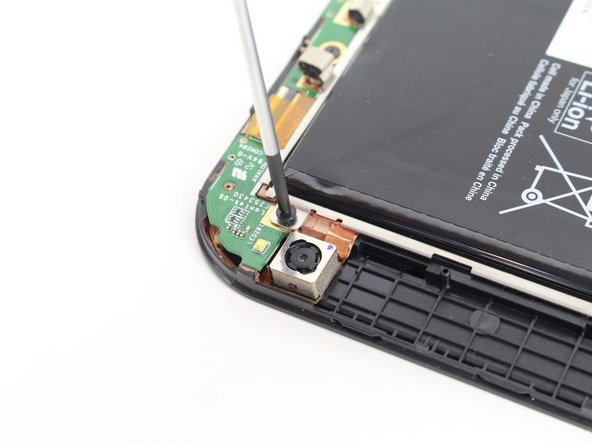
    • Using a #00 Philips screwdriver, remove the screw attaching daughter board.

    • Remove the yellow tape using a pair of tweezers.

    Спросите у FixBot

    Добавить комментарий

  7. Toshiba Excite 10 AT300 Rear-Facing Camera Replacement, Remove Ribbon Cable: шаг 7, изображение 1 из 3 Toshiba Excite 10 AT300 Rear-Facing Camera Replacement, Remove Ribbon Cable: шаг 7, изображение 2 из 3 Toshiba Excite 10 AT300 Rear-Facing Camera Replacement, Remove Ribbon Cable: шаг 7, изображение 3 из 3
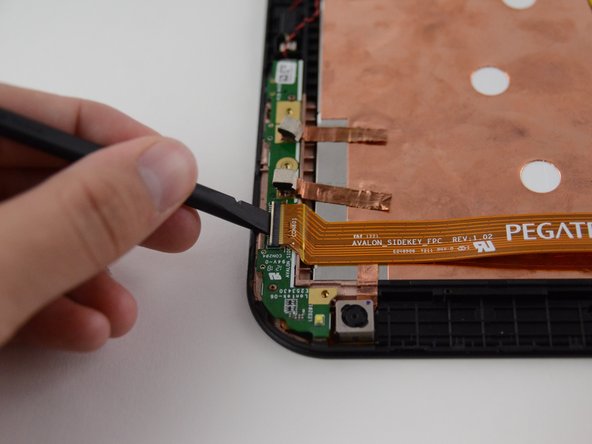
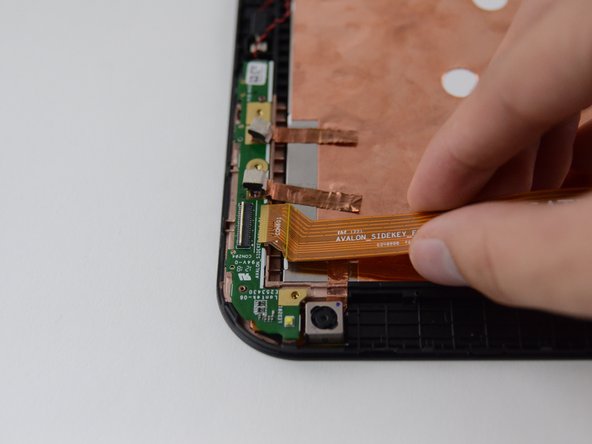
    • Unlock the ribbon cable housing using tweezers and/or a spudger.

    • Gently pull the ribbon cable out of its housing using the tweezers or your hands.

    Спросите у FixBot

    Добавить комментарий

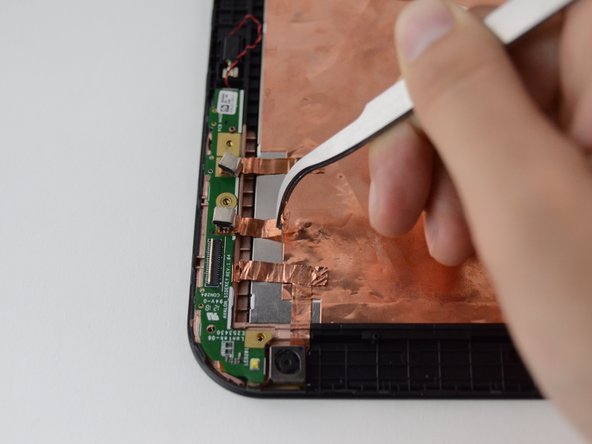
  8. Toshiba Excite 10 AT300 Rear-Facing Camera Replacement, Remove copper foil wires: шаг 8, изображение 1 из 3 Toshiba Excite 10 AT300 Rear-Facing Camera Replacement, Remove copper foil wires: шаг 8, изображение 2 из 3 Toshiba Excite 10 AT300 Rear-Facing Camera Replacement, Remove copper foil wires: шаг 8, изображение 3 из 3
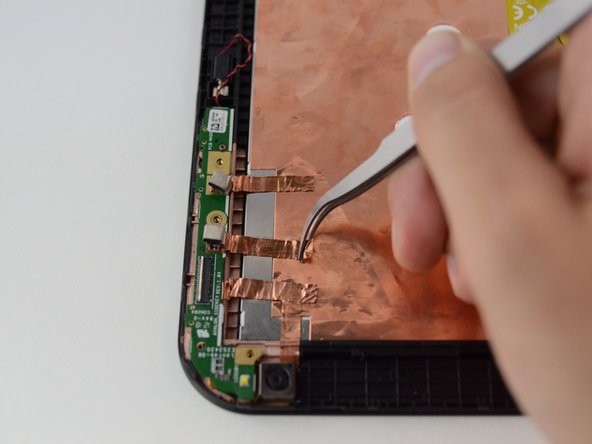
    • Pull copper tape away from the back, keeping it connected to the green rear camera board.

    • Be careful not to rip the copper tape.

    Спросите у FixBot

    Добавить комментарий

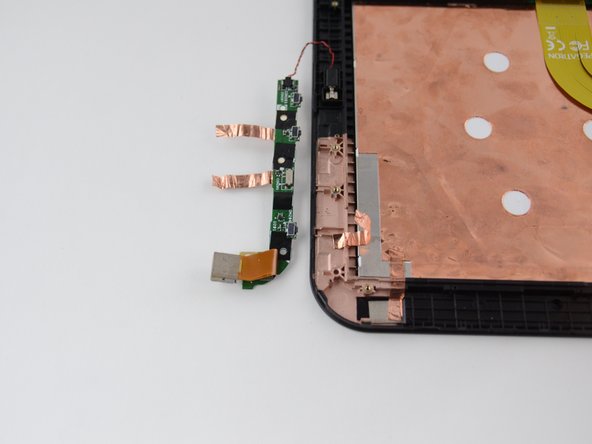
  9. Toshiba Excite 10 AT300 Rear-Facing Camera Replacement, Remove the daughter board: шаг 9, изображение 1 из 2 Toshiba Excite 10 AT300 Rear-Facing Camera Replacement, Remove the daughter board: шаг 9, изображение 2 из 2
    • Using your hands remove daughter board by lifting it off of the tablet chassis. Flip it over and place it next to the tablet face-down.

    • Do not disconnect the red and black wires connecting it to the vibrating mechanism.

    Спросите у FixBot

    Добавить комментарий

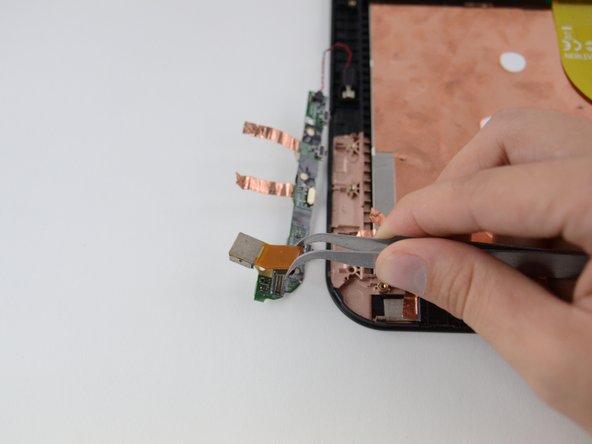
  10. Toshiba Excite 10 AT300 Rear-Facing Camera Replacement: шаг 10, изображение 1 из 2 Toshiba Excite 10 AT300 Rear-Facing Camera Replacement: шаг 10, изображение 2 из 2
    • Gently pinch the ribbon cable connector between two fingers or with tweezers and pull it straight outwards. The ribbon cable connector should disconnect and the camera can now be replaced.

    Спросите у FixBot

    Добавить комментарий

Заключение

To reassemble your device, follow these instructions in reverse order.

Отменить: Я не выполнил это руководство.

Gus Holz

Участник с: 10/09/14

297 Репутация

Автор 2 руководств

Команда

Cal Poly, Team 14-26, Maness Fall 2014 Участник Cal Poly, Team 14-26, Maness Fall 2014

CPSU-MANESS-F14S14G26

4 членов

Автор 12 руководств

0 Комментарии к руководству

Добавить комментарий

Статистика просмотров:

За последние 24 часов: 0

За последние 7 дней: 5

За последние 30 дней: 29

За всё время: 794