Перейти к основному содержанию

Toshiba Satellite A75-S226 Motherboard Replacement

Выберете то, что вам нужно

  1. Toshiba Satellite A75-S226 Motherboard Replacement, Battery: шаг 1, изображение 1 из 1
    • Make sure battery-lock is in the unlock position.

    • Slide button to the left.

  2. Toshiba Satellite A75-S226 Motherboard Replacement: шаг 2, изображение 1 из 1
    • Lift battery out of the computer.

  3. Toshiba Satellite A75-S226 Motherboard Replacement, Optical Drive: шаг 3, изображение 1 из 2 Toshiba Satellite A75-S226 Motherboard Replacement, Optical Drive: шаг 3, изображение 2 из 2
    • Remove the two 5.62 mm screws from the optical drive cover.

  4. Toshiba Satellite A75-S226 Motherboard Replacement: шаг 4, изображение 1 из 2 Toshiba Satellite A75-S226 Motherboard Replacement: шаг 4, изображение 2 из 2
    • Remove the optical drive cover.

    • A plastic opening tool or a fingernail may be helpful in lifting it from its groove.

  5. Toshiba Satellite A75-S226 Motherboard Replacement: шаг 5, изображение 1 из 1
    • Using the inset divot, push the optical drive out of the laptop to remove.

  6. Toshiba Satellite A75-S226 Motherboard Replacement, CD Drive: шаг 6, изображение 1 из 3 Toshiba Satellite A75-S226 Motherboard Replacement, CD Drive: шаг 6, изображение 2 из 3 Toshiba Satellite A75-S226 Motherboard Replacement, CD Drive: шаг 6, изображение 3 из 3
    • Remove the 8.6 mm screw.

  7. Toshiba Satellite A75-S226 Motherboard Replacement: шаг 7, изображение 1 из 3 Toshiba Satellite A75-S226 Motherboard Replacement: шаг 7, изображение 2 из 3 Toshiba Satellite A75-S226 Motherboard Replacement: шаг 7, изображение 3 из 3
    • Push the bottom left corner of the CD Drive until the drive protrudes from the case.

    • When a good amount of the CD Drive is showing on the right side, gently pull it out completely.

  8. Toshiba Satellite A75-S226 Motherboard Replacement, Wi-Fi/Memory Cover: шаг 8, изображение 1 из 2 Toshiba Satellite A75-S226 Motherboard Replacement, Wi-Fi/Memory Cover: шаг 8, изображение 2 из 2
    • Remove the 5.75 mm screw from the cover panel.

    • Turn the laptop over with the screen facing down.

  9. Toshiba Satellite A75-S226 Motherboard Replacement: шаг 9, изображение 1 из 1
    • Lift up the cover panel using a plastic opening tool.

  10. Toshiba Satellite A75-S226 Motherboard Replacement, Wi-Fi Card: шаг 10, изображение 1 из 2 Toshiba Satellite A75-S226 Motherboard Replacement, Wi-Fi Card: шаг 10, изображение 2 из 2
    • Remove the 5.64 mm screw from the bottom of the crossing bar.

    • Remove the crossing bar.

  11. Toshiba Satellite A75-S226 Motherboard Replacement: шаг 11, изображение 1 из 2 Toshiba Satellite A75-S226 Motherboard Replacement: шаг 11, изображение 2 из 2
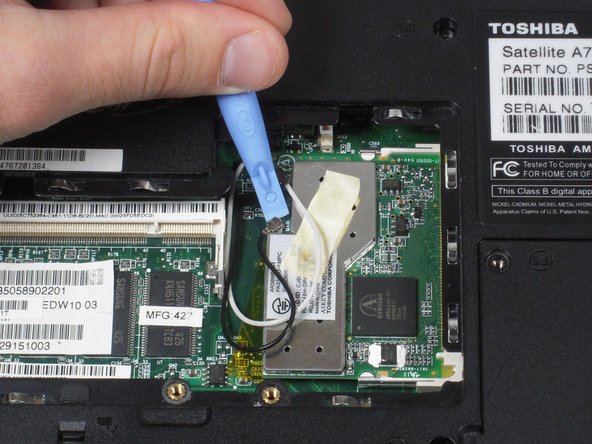
    • Use a plastic opening tool to disconnect the black and white antenna cable's connectors from the Wi-Fi card.

    • Note that the black wire is connected to the port that is labeled main.

  12. Toshiba Satellite A75-S226 Motherboard Replacement: шаг 12, изображение 1 из 2 Toshiba Satellite A75-S226 Motherboard Replacement: шаг 12, изображение 2 из 2
    • Use fingers to push the clips away from memory card.

  13. Toshiba Satellite A75-S226 Motherboard Replacement: шаг 13, изображение 1 из 1
    • Use fingers to remove the Wi-Fi card.

  14. Toshiba Satellite A75-S226 Motherboard Replacement, Keyboard: шаг 14, изображение 1 из 3 Toshiba Satellite A75-S226 Motherboard Replacement, Keyboard: шаг 14, изображение 2 из 3 Toshiba Satellite A75-S226 Motherboard Replacement, Keyboard: шаг 14, изображение 3 из 3
    • Use the plastic opening tool to lift up the top panel all the way along the keyboard until it loosens.

    • It may be helpful to first pry at the rear of the hinge covers (not shown) to release them. Then Insert the plastic opening tool underneath the top panel's sides and then front edge.

  15. Toshiba Satellite A75-S226 Motherboard Replacement: шаг 15, изображение 1 из 2 Toshiba Satellite A75-S226 Motherboard Replacement: шаг 15, изображение 2 из 2
    • Remove the top panel by popping the panel out the top left socket, then do the same with the right side.

  16. Toshiba Satellite A75-S226 Motherboard Replacement: шаг 16, изображение 1 из 3 Toshiba Satellite A75-S226 Motherboard Replacement: шаг 16, изображение 2 из 3 Toshiba Satellite A75-S226 Motherboard Replacement: шаг 16, изображение 3 из 3
    • Remove the two 3.67 mm screws from the top corners of the keyboard.

  17. Toshiba Satellite A75-S226 Motherboard Replacement: шаг 17, изображение 1 из 1
    • Use fingers to lift up the keyboard from the top.

    • Do not try to remove the keyboard completely because it is still attached to the motherboard.

  18. Toshiba Satellite A75-S226 Motherboard Replacement: шаг 18, изображение 1 из 3 Toshiba Satellite A75-S226 Motherboard Replacement: шаг 18, изображение 2 из 3 Toshiba Satellite A75-S226 Motherboard Replacement: шаг 18, изображение 3 из 3
    • Remove the cable connecting the keyboard with the motherboard.

    • Be aware of the locking tabs on each side of the ribbon-cable connector—they slide back about 2mm to free the cable.

    • Lift up and remove the keyboard.

  19. Toshiba Satellite A75-S226 Motherboard Replacement, Display Assembly: шаг 19, изображение 1 из 2 Toshiba Satellite A75-S226 Motherboard Replacement, Display Assembly: шаг 19, изображение 2 из 2
    • Remove the 3.76mm screw from the ground wire.

  20. Toshiba Satellite A75-S226 Motherboard Replacement: шаг 20, изображение 1 из 2 Toshiba Satellite A75-S226 Motherboard Replacement: шаг 20, изображение 2 из 2
    • Use the plastic opening tool to remove the wire.

  21. Toshiba Satellite A75-S226 Motherboard Replacement: шаг 21, изображение 1 из 2 Toshiba Satellite A75-S226 Motherboard Replacement: шаг 21, изображение 2 из 2
    • Gently pull the black and white wires out of the upper case.

    • Do not pull the wire too much, or you can damage the wire.

  22. Toshiba Satellite A75-S226 Motherboard Replacement: шаг 22, изображение 1 из 1
    • Remove the 8.6 mm screw on left side of upper case.

  23. Toshiba Satellite A75-S226 Motherboard Replacement: шаг 23, изображение 1 из 2 Toshiba Satellite A75-S226 Motherboard Replacement: шаг 23, изображение 2 из 2
    • Remove two 8.6 mm screws on the back corners of the laptop.

  24. Toshiba Satellite A75-S226 Motherboard Replacement: шаг 24, изображение 1 из 1
    • Lift up the display assembly to remove it.

  25. Toshiba Satellite A75-S226 Motherboard Replacement, Upper Case: шаг 25, изображение 1 из 2 Toshiba Satellite A75-S226 Motherboard Replacement, Upper Case: шаг 25, изображение 2 из 2
    • Use the Phillips screwdriver to remove the two 3.7 mm screws from the battery compartment.

    • Then remove the fourteen 8.6 mm screws from the bottom of the case.

  26. Toshiba Satellite A75-S226 Motherboard Replacement: шаг 26, изображение 1 из 1
    • Use the screwdriver to remove six 8.6 mm screws from the top of the case.

  27. Toshiba Satellite A75-S226 Motherboard Replacement: шаг 27, изображение 1 из 2 Toshiba Satellite A75-S226 Motherboard Replacement: шаг 27, изображение 2 из 2
    • Use the plastic opening tool to remove the two speaker wire connectors and the trackpad connector from the motherboard.

  28. Toshiba Satellite A75-S226 Motherboard Replacement: шаг 28, изображение 1 из 1
    • With the plastic opening tool, pry around the entire laptop to separate the upper case.

  29. Toshiba Satellite A75-S226 Motherboard Replacement: шаг 29, изображение 1 из 1
    • Lift up the upper case to remove.

  30. Toshiba Satellite A75-S226 Motherboard Replacement, Motherboard: шаг 30, изображение 1 из 1
    • Using the Phillips Screwdriver, remove the two 8.6 mm screws from the front edge of the motherboard.

  31. Toshiba Satellite A75-S226 Motherboard Replacement: шаг 31, изображение 1 из 1
    • Remove the four screws holding the ports to the rear panel using the 3/16" Wrench.

  32. Toshiba Satellite A75-S226 Motherboard Replacement: шаг 32, изображение 1 из 2 Toshiba Satellite A75-S226 Motherboard Replacement: шаг 32, изображение 2 из 2
    • Lift up on the front edge of the motherboard while gently prying the case away from the ports on the right side of the computer.

    • Repeat with the left side.

    • There is a button for the card slot on the left side of the computer that may pop out if pressed. This button must be held in place while removing the motherboard.

  33. Toshiba Satellite A75-S226 Motherboard Replacement: шаг 33, изображение 1 из 1
    • Lift the motherboard's front edge up and then slide it forward.

Заключение

To reassemble your device, follow these instructions in reverse order.

3 участников успешно повторили данное руководство.

Garrett Gudgel

Участник с: 10/05/10

763 Репутация

Автор 13 руководств

Команда

Cal Poly, Team 4-43, Amido Fall 2010 Участник Cal Poly, Team 4-43, Amido Fall 2010

CPSU-AMIDO-F10S4G43

5 членов

Автор 39 руководств

0 Комментариев

Добавить комментарий

Просмотр статистики:

За последние 24часов: 0

За последние 7 дней: 1

За последние 30 дней: 7

За всё время: 9,725