Перейти к основному содержанию

Toshiba Satellite C55D-B5206 Screen Replacement

Выберете то, что вам нужно

  1. Toshiba Satellite C55D-B5206 Screen Replacement, Battery: шаг 1, изображение 1 из 2 Toshiba Satellite C55D-B5206 Screen Replacement, Battery: шаг 1, изображение 2 из 2
    • Turn the laptop upside down so the battery faces upwards.

    • Remove the two 7 mm Phillips screws that secure the battery.

  2. Toshiba Satellite C55D-B5206 Screen Replacement: шаг 2, изображение 1 из 2 Toshiba Satellite C55D-B5206 Screen Replacement: шаг 2, изображение 2 из 2
    • Place both thumbs on the outside edges of the battery that meet the device.

    • Push the battery out and away from the laptop.

    • The battery should slide out with little resistance.

  3. Toshiba Satellite C55D-B5206 Screen Replacement, Screen: шаг 3, изображение 1 из 2 Toshiba Satellite C55D-B5206 Screen Replacement, Screen: шаг 3, изображение 2 из 2
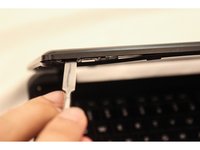
    • Use a spudger to pry the top corner of the casing by performing an upward motion.

    • You will hear a loud click sound. Do not worry, this is the casing's clip.

    • The metal spudger could scratch your device. For the cautious fixers, use a plastic opening tool or black nylon spudger to pry the device instead.

    • Continue to remove the casing using your hands.

  4. Toshiba Satellite C55D-B5206 Screen Replacement: шаг 4, изображение 1 из 1
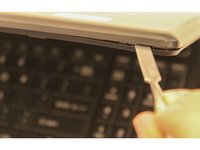
    • Slide the spudger down the side of the plastic screen casing until you hit a clip.

    • Use the spudger and release the screen clips.

    • The clips will unlatch making a clicking sound each time you release one.

  5. Toshiba Satellite C55D-B5206 Screen Replacement: шаг 5, изображение 1 из 2 Toshiba Satellite C55D-B5206 Screen Replacement: шаг 5, изображение 2 из 2
    • Repeat steps 1 and 2 on the other side of the casing.

    • The top and sides of the casing should now be un-clipped from the monitor.

  6. Toshiba Satellite C55D-B5206 Screen Replacement: шаг 6, изображение 1 из 1
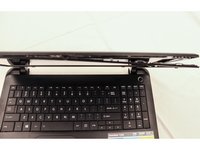
    • Gently close the monitor.

    • Turn the device around so the missing battery port is facing you.

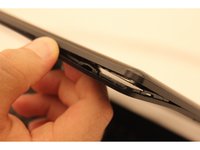
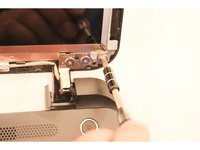
    • Use the spudger and pry upward towards yourself.

    • You will here a click when the clips are detached from the monitor.

  7. Toshiba Satellite C55D-B5206 Screen Replacement: шаг 7, изображение 1 из 1
    • Gently remove the plastic casing.

    • The casing should lift off with ease.

    • There are two hinge covers that you may need to maneuver off.

  8. Toshiba Satellite C55D-B5206 Screen Replacement: шаг 8, изображение 1 из 2 Toshiba Satellite C55D-B5206 Screen Replacement: шаг 8, изображение 2 из 2
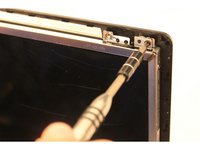
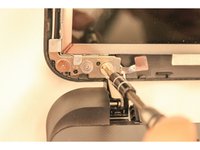
    • Use a Philips #1 screwdriver to remove the top left and right two 7 mm Phillips #1 screws by turning the screws counter clockwise.

  9. Toshiba Satellite C55D-B5206 Screen Replacement: шаг 9, изображение 1 из 2 Toshiba Satellite C55D-B5206 Screen Replacement: шаг 9, изображение 2 из 2
    • Gently pull the screen one inch towards yourself.

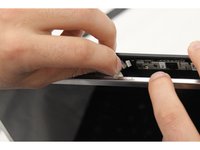
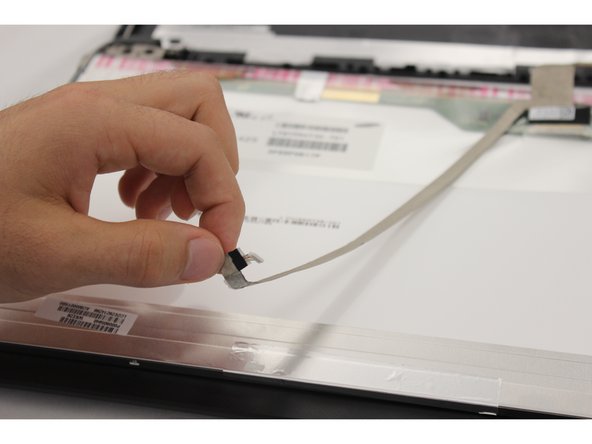
    • Detach the white cable from the camera in the center of the screen.

  10. Toshiba Satellite C55D-B5206 Screen Replacement: шаг 10, изображение 1 из 2 Toshiba Satellite C55D-B5206 Screen Replacement: шаг 10, изображение 2 из 2
    • Use Phillips #0 screwdriver to remove the six, 2.5 mm screws on the bottom left and right, by rotating the screwdriver counterclockwise.

    • You will need to hold the screen upright so that it does not fall while removing the final three screws.

  11. Toshiba Satellite C55D-B5206 Screen Replacement: шаг 11, изображение 1 из 2 Toshiba Satellite C55D-B5206 Screen Replacement: шаг 11, изображение 2 из 2
    • Gently pull the screen downward to separate the screen from the back screen casing.

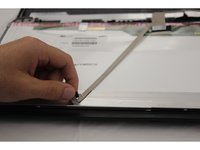
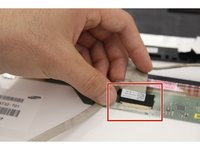
    • Gently grasp the cable that was removed from the camera and lift this cable upward.

    • There will be some tape that peels as you remove this cable from the back of the screen.

  12. Toshiba Satellite C55D-B5206 Screen Replacement: шаг 12, изображение 1 из 2 Toshiba Satellite C55D-B5206 Screen Replacement: шаг 12, изображение 2 из 2
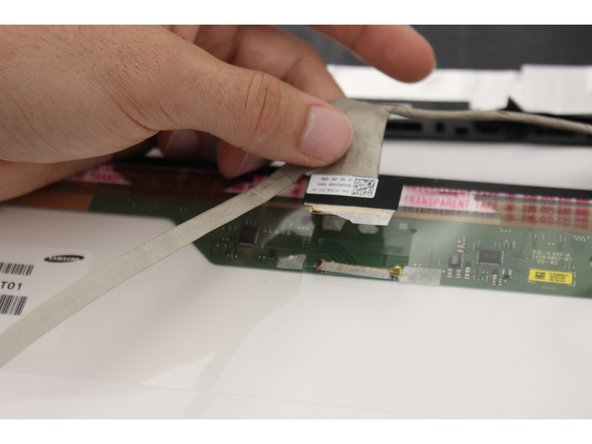
    • Grip the large end of the brown cable.

    • Peel off the beige colored tape. Do not worry about ripping this tape.

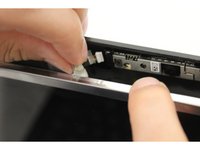
    • Detach the black connector from the screen.

  13. Toshiba Satellite C55D-B5206 Screen Replacement: шаг 13, изображение 1 из 2 Toshiba Satellite C55D-B5206 Screen Replacement: шаг 13, изображение 2 из 2
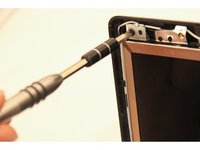
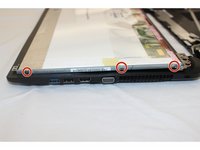
    • Use Phillips #0 screwdriver to remove three, 3 mm screws, on both side of the metal screen casing.

    • There are six total 3 mm screws. Three on each side.

  14. Toshiba Satellite C55D-B5206 Screen Replacement: шаг 14, изображение 1 из 1
    • Lift the screen free from the casing.

    • There is no need for any pulling or tugging, the screen should lift out of the casing easily.

Заключение

To reassemble your device, follow these instructions in reverse order.

3 участников успешно повторили данное руководство.

Adam Walder

Участник с: 09/17/15

333 Репутация

1 руководство автора

Команда

CSU Fullerton, Team 2-5, Bruce Fall 2015 Участник CSU Fullerton, Team 2-5, Bruce Fall 2015

CSUF-BRUCE-F15S2G5

4 членов

Автор 18 руководств

0 Комментариев

Добавить комментарий

Просмотр статистики:

За последние 24часов: 0

За последние 7 дней: 0

За последние 30 дней: 1

За всё время: 2,824