Введение
If your Toshiba Satellite C55D-B5206 laptop is no longer able to connect to wireless networks, a faulty Wi-Fi Card may be the cause. The following guide will help you remove your current Wi-Fi card so that a replacement may be installed.
Wi-Fi cards allow your device to communicate to a nearby Wi-Fi access point, usually a router. Before deciding to replace your Wi-Fi card, try restarting the access point or connecting different devices to ensure the fault is originating from your laptop.
Prior to proceeding with the guide, power down your laptop and disconnect it from any external power supply.
Выберете то, что вам нужно
-
-
Turn the laptop upside down so the battery faces upwards.
-
Use a Phillips #1 screwdriver to remove the two, 7 mm screws that secure the battery.
-
-
-
Place both of your thumbs on the outside edges of the battery and push the battery out to remove it.
-
-
-
Use the screwdriver to remove the thirteen, 7 mm Phillips#1 screws from the bottom of the chassis.
-
-
-
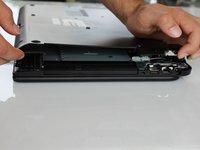
Insert a spudger at the center and into the crevice between the bottom casing and the keyboard and pry upwards.
-
Gently slide the spudger along the entire perimeter of the device and pry the casing loose to unhook 6 clips.
-
-
-
-
Unstick the silver tape from the area shown using a non-metallic tool.
-
-
-
Locate the gray clips at either side of the plug. Use a non-metallic tool to push the clips away from the plug.
-
-
-
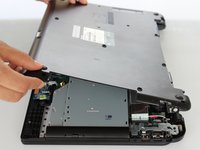
Unplug the large strip of wires. Lift the large strip of wires out of the way to reveal the Wi-Fi Card.
-
-
-
Use a non metallic item to pry up on the two metal clips holding the black and white wires. These should pop straight up and will be free from the Wifi Card.
-


To reassemble your device, follow these instructions in reverse order.
To reassemble your device, follow these instructions in reverse order.
Команду

IUPUI, Team 1-2, Beck Spring 2022 Участник IUPUI, Team 1-2, Beck Spring 2022
IUPUI-BECK-S22S1G2
4 членов
Автор 12 руководств