Перейти к основному содержанию

Toshiba Satellite C75D-A7370 Hard-Drive Replacement

Выберете то, что вам нужно

  1. Toshiba Satellite C75D-A7370 Hard-Drive Replacement, Battery: шаг 1, изображение 1 из 1
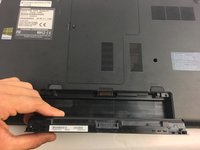
    • To begin replacing your battery, flip the laptop over so that the back is visible. Locate the battery at the bottom center of the laptop.

    • Before beginning battery removal, make sure that no power source is connected to the laptop. This will avoid electrical shock.

  2. Toshiba Satellite C75D-A7370 Hard-Drive Replacement: шаг 2, изображение 1 из 2 Toshiba Satellite C75D-A7370 Hard-Drive Replacement: шаг 2, изображение 2 из 2
    • On the right side of the battery there will be a locking switch. Slide the switch into the unlocked position.

  3. Toshiba Satellite C75D-A7370 Hard-Drive Replacement: шаг 3, изображение 1 из 3 Toshiba Satellite C75D-A7370 Hard-Drive Replacement: шаг 3, изображение 2 из 3 Toshiba Satellite C75D-A7370 Hard-Drive Replacement: шаг 3, изображение 3 из 3
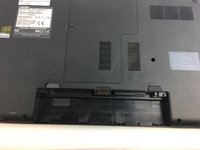
    • Using your left hand, move the switch on the left side of the battery towards the center of the laptop while simultaneously prying up on the center of the battery with a spudger. The battery will flip out and can be removed.

  4. Toshiba Satellite C75D-A7370 Hard-Drive Replacement, Back Access Panel: шаг 4, изображение 1 из 3 Toshiba Satellite C75D-A7370 Hard-Drive Replacement, Back Access Panel: шаг 4, изображение 2 из 3 Toshiba Satellite C75D-A7370 Hard-Drive Replacement, Back Access Panel: шаг 4, изображение 3 из 3
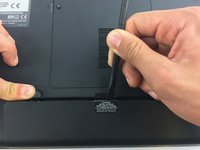
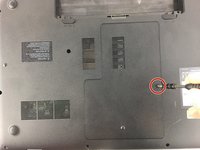
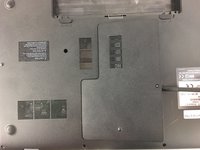
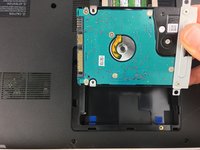
    • Remove the 7mm screw near the center of the back of the laptop with a P1 screwdriver and pry off the access panel with a nylon spudger.

  5. Toshiba Satellite C75D-A7370 Hard-Drive Replacement, Hard-Drive: шаг 5, изображение 1 из 1
    • Locate the hard-drive.

  6. Toshiba Satellite C75D-A7370 Hard-Drive Replacement: шаг 6, изображение 1 из 2 Toshiba Satellite C75D-A7370 Hard-Drive Replacement: шаг 6, изображение 2 из 2
    • Remove the two 7 mm screws holding the hard-drive in place with a P1 driver

  7. Toshiba Satellite C75D-A7370 Hard-Drive Replacement: шаг 7, изображение 1 из 2 Toshiba Satellite C75D-A7370 Hard-Drive Replacement: шаг 7, изображение 2 из 2
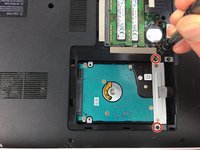
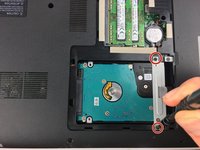
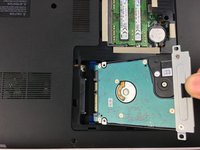
    • Then using the tab located on top of the hard-drive pull up towards you and then pull to the left to disconnect the hard-drive. Now you are ready to replace your hard-drive.

Заключение

To reassemble your device, follow these instructions in reverse order.

Basim Ismail

Участник с: 02/02/17

201 Репутация

Автор 2 руководств

Команду

USF Tampa, Team 16-1, Blackwell Spring 2017 Участник USF Tampa, Team 16-1, Blackwell Spring 2017

USFT-BLACKWELL-S17S16G1

3 членов

Автор 12 руководств

0 Комментариев

Добавить комментарий

Статистика просмотров:

За последние 24 час(ов): 2

За последние 7 дней: 2

За последние 30 дней: 5

За всё время: 2,110