Перейти к основному содержанию

Toshiba Satellite E45-B4100 Hard Drive Replacement

Выберете то, что вам нужно

  1. Toshiba Satellite E45-B4100 Hard Drive Replacement, Battery Replacement: шаг 1, изображение 1 из 1
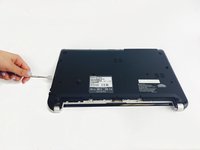
    • Remove the fourteen 3.75mm screws with a Phillips #0 Screwdriver as shown.

  2. Toshiba Satellite E45-B4100 Hard Drive Replacement: шаг 2, изображение 1 из 1
    • Gently pull out the battery.

  3. Toshiba Satellite E45-B4100 Hard Drive Replacement, Hard Drive: шаг 3, изображение 1 из 1
    • Using a spudger, poke the white tabs in by the battery until you hear a click.

  4. Toshiba Satellite E45-B4100 Hard Drive Replacement: шаг 4, изображение 1 из 2 Toshiba Satellite E45-B4100 Hard Drive Replacement: шаг 4, изображение 2 из 2
    Инструмент, используемый на этом этапе:
    Pro Tech Toolkit
    $74.95
    Купить
    • Using a spudger, poke the white tabs in by the battery until you hear a click.

    • Be sure to use ESD-safe tools, we recommend using the iFixit Pro Tech Toolkit

  5. Toshiba Satellite E45-B4100 Hard Drive Replacement: шаг 5, изображение 1 из 2 Toshiba Satellite E45-B4100 Hard Drive Replacement: шаг 5, изображение 2 из 2
    • Unplug the Hard Drive from the Motherboard.

  6. Toshiba Satellite E45-B4100 Hard Drive Replacement: шаг 6, изображение 1 из 2 Toshiba Satellite E45-B4100 Hard Drive Replacement: шаг 6, изображение 2 из 2
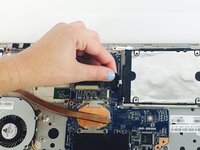
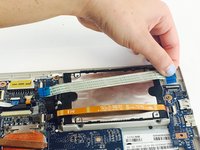
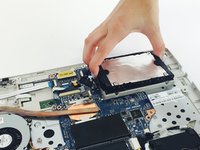
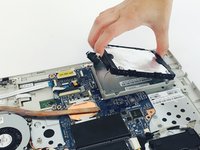
    • Unplug both ribbons by flipping back the white tabs on either end of the ribbons and gently pulling the ribbons out.

  7. Toshiba Satellite E45-B4100 Hard Drive Replacement: шаг 7, изображение 1 из 2 Toshiba Satellite E45-B4100 Hard Drive Replacement: шаг 7, изображение 2 из 2
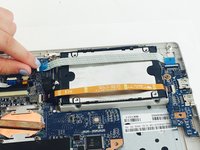
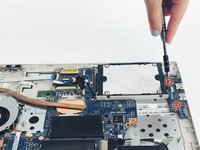
    • Using the 0 Phillips Head, unscrew the two 3.75mm screws connecting the USB Port Circuit Board to the hard drive.

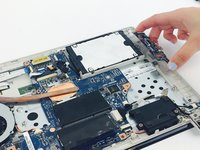
    • Remove the USB Port Circuit Board.

  8. Toshiba Satellite E45-B4100 Hard Drive Replacement: шаг 8, изображение 1 из 2 Toshiba Satellite E45-B4100 Hard Drive Replacement: шаг 8, изображение 2 из 2
    • Gently remove the hard drive.

Заключение

To reassemble your device, follow these instructions in reverse order.

4 участников успешно повторили данное руководство.

Delaney

Участник с: 10/11/16

104 Репутация

1 руководство автора

Команда

USF Tampa, Team 1-4, Leahy Fall 2016 Участник USF Tampa, Team 1-4, Leahy Fall 2016

USFT-LEAHY-F16S1G4

3 членов

Автор 10 руководств

Один комментарий

By and large this and the B4200 guide are interchangeable. I followed both when reviving my B4100, as the pictures the respective authors show the components from different angle. Good stuff; thank you!

Kntai - Ответить

Добавить комментарий

Просмотр статистики:

За последние 24часов: 1

За последние 7 дней: 8

За последние 30 дней: 8

За всё время: 2,405