Введение
This tutorial will allow you to disassemble your Toshiba Satellite L50-B-2E2 in order to replace the keyboard and the palm rest it is attached to (see photo)
Выберете то, что вам нужно
-
-
Visually check that the replacement keyboard is similar to the existing one.
-
-
-
Unscrew the 2 upper screws using a PH1 Phillips screwdriver
-
Remove the battery by pulling it lengthwise
-
-
-
Take out the 9 screws with a PH1 Phillips screwdriver.
-
Using a Spudger or an iFixit Opening Tool available on the iFixit store, remove the cover, taking care at the various attachment points.
-
-
-
Take a look at the connector to the motherboard, then pull the disk drive straight out away from it to remove it.
-
Take the optical drive out.
-
-
-
Disconnect the ribbon cable that connects the SD card reader to the motherboard.
-
Unscrew the screw using a PH1 Phillips screwdriver.
-
Remove the SD Card Reader
-
-
-
Remove the plastic wedge that secures the hard drive in place.
-
Pull the hard drive away from the black connector to disconnect it from the motherboard.
-
Remove the hard drive.
-
-
-
Disconnect up the cable connecting the LED status board to the motherboard. It is a ZIF connector.
-
Remove the screw using a PH1 Phillips screwdriver.
-
Remove the LED Status Board.
-
-
-
-
Disconnect the cable connecting the Ethernet / USB card to the motherboard. It is a ZIF type connector.
-
Remove the screw using a PH1 Phillips screwdriver.
-
Remove the Ethernet / USB board.
-
-
-
Disconnect the DC power cable from the motherboard. The connector is of type Bundled Cable Connectors.
-
Remove the DC In plug from its notch.
-
-
-
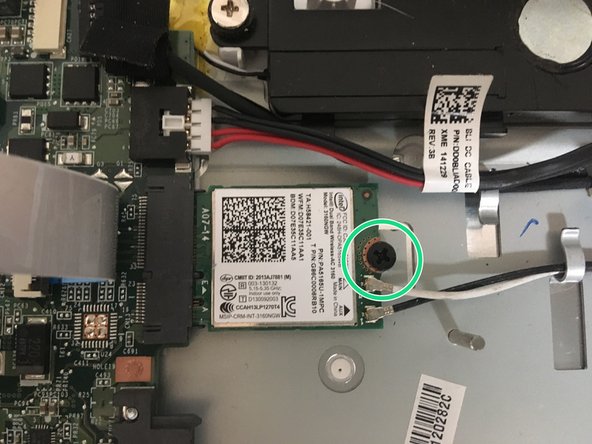
Remove the screw using a PH1 Phillips screwdriver.
-
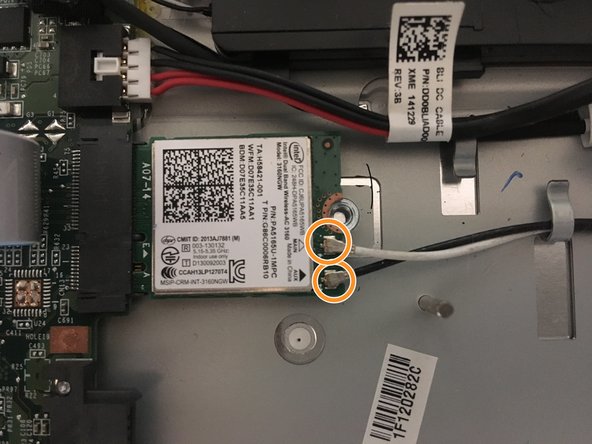
Disconnect the 2 antenna cables.
-
-
-
Pull the card straight out away from the motherboard to remove it.
-
-
-
Unplug the ZIF connector on the trackpad securing the ribbon cable to the motherboard.
-
-
-
Disconnect the ZIF connector on the power button board.
-
Unplug the LCD screen video cable.
-
Disconnect the two plugs indicated:
-
The speaker cable (left)
-
The fan cable (right)
-
-
-
Using a PH1 Phillips screwdriver, remove the two screws securing the CPU fan.
-
Remove the four screws holding the heat sink to the processor with a PH1 Phillips screwdriver.
-
Remove the fan and heatsink.
-
-
-
Remove the 4 screws securing the speakers with a PH1 Phillips screwdriver.
-
-
-
Using a PH1 Phillips screwdriver, remove the four screws securing the motherboard to the chassis.
-
Remove the cable connecting the keyboard to the motherboard. Lift the tape holding the cable to the connector, then use a spudger to press out the two small tabs on either side of the cable side connector in a walking motion, alternating one side then the other.
-
-
-
Remove the motherboard, taking care with the speaker cables, the various cables, and any fasteners bordering the sides of the motherboard.
-
-
-
Remove the speakers, taking care with the cable retainers, and any Scotch tape securing the cables to the chassis.
-
-
-
Unscrew the two screws on each hinge using a PH1 Phillips screwdriver.
-
To easily remove the hinges, raise the them by hand as if you were opening the screen in order to remove the them from the upper case.
-
-
-
Use a hair dryer, heat gun or iOpener to soften the adhesive that attaches the Trackpad to the upper case.
-
Press on the trackpad to unstick it and separate it from the case.
-


Congratulations! You have completed the disassembly!
To reassemble your device, follow the instructions in reverse, using the new keyboard assembly instead of the old one.
Congratulations! You have completed the disassembly!
To reassemble your device, follow the instructions in reverse, using the new keyboard assembly instead of the old one.
Особая благодарность этим переводчикам:
100%


Эти переводчики помогают нам починить мир! Хотите внести свой вклад?
Начните переводить ›