Введение
This guide will show you how to remove and replace the laptop fan.
Выберете то, что вам нужно
-
-
Make sure the laptop is unplugged and powered off.
-
Locate the battery latches on the underside of the laptop.
-
-
-
Slide the right latch to the right until you hear it lock into place.
-
Slide the left latch to the left and hold it.
-
-
-
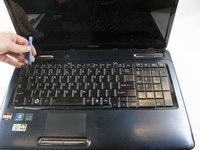
Pry up the thin narrow strip of facing above the keyboard using the opening tool.
-
-
-
-
The ribbon is attached by a white clip. Wedge the white clip up carefully using the spudger. This will release the connector ribbon and you can now remove the keyboard.
-
-
-
Remove the twelve screws from the underside of the laptop using the Philips #1 screwdriver.
-
-
-
Remove the three screws from the underside of the laptop using a Phillips #1 screwdriver.
-
-
-
Remove the two screws from the underside of the laptop where the battery was located using the Philips #1 screwdriver.
-
-
-
Remove the four screws securing the keyboard using the Philips #1 screwdriver .
-
-
-
Detach the ribbon cable carefully using the spudger to gently pry up on the clip until it releases the ribbon cable or lift up on the blue tab gently until the clip releases the ribbon cable.
-
-
-
Disconnect the wire connector by using the flat end of spudger to gently pry it apart from the connection point.
-
-
-
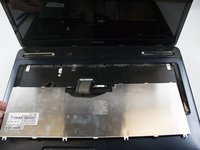
Remove the top plastic cover by lifting from one of the corners it should be easy to removed.
-
-
-
Disconnect the fan wire connector using the flat end of spudger to gently pry it apart from the connection point, then remove the fan.
-


To reassemble your device, follow these instructions in reverse order.
To reassemble your device, follow these instructions in reverse order.
Команду

Washington State, Team S4-G120, Phelps-Hillen Fall 2017 Участник Washington State, Team S4-G120, Phelps-Hillen Fall 2017
WSU-PHELPS-HILLEN-F17S4G120
6 членов
Автор 7 руководств
3 Комментариев
Is the “keyboard” reference in step 11 correct? Wasn’t the “keyboard” removed in step 7?
You are correct. It should say to remove the plastic tray as it does in other manuals for this laptop. Thank you.
I just discovered “IFixit” a couple of days ago. You provide the most clear and useful “How to” that I have seen, either in print or on the Internet. The ability to enlarge the photos is extremely helpful when attempting a repair on an unfamiliar system. The difficulty rating and project time estimate allowed me to decide whether to attempt the replacement myself, or to use the “Geek Squad”. Keep up the good work!
jb