Перейти к основному содержанию

Toshiba Satellite M305D-S4829 Fan Replacement

Выберете то, что вам нужно

  1. Toshiba Satellite M305D-S4829 Fan Replacement, Battery: шаг 1, изображение 1 из 1
    • Unlatch the battery by pushing outward on both latches.

  2. Toshiba Satellite M305D-S4829 Fan Replacement: шаг 2, изображение 1 из 1
    • Slide battery out.

  3. Toshiba Satellite M305D-S4829 Fan Replacement, Keyboard: шаг 3, изображение 1 из 1
    • Remove the five "F2" screws with a Phillips #0 screwdriver.

  4. Toshiba Satellite M305D-S4829 Fan Replacement: шаг 4, изображение 1 из 2 Toshiba Satellite M305D-S4829 Fan Replacement: шаг 4, изображение 2 из 2
    • Insert the plastic opening tool above the F1 key.

    • Apply upward pressure until the black plastic strip snaps off. The entire strip will easily come off from left to right.

  5. Toshiba Satellite M305D-S4829 Fan Replacement: шаг 5, изображение 1 из 2 Toshiba Satellite M305D-S4829 Fan Replacement: шаг 5, изображение 2 из 2
    • Find the screws above the F1 and INS keys.

    • Unscrew both screws with a Phillips #0 screwdriver.

  6. Toshiba Satellite M305D-S4829 Fan Replacement: шаг 6, изображение 1 из 2 Toshiba Satellite M305D-S4829 Fan Replacement: шаг 6, изображение 2 из 2
    • Slowly lift the top edge of the keyboard out with your fingers.

    • The ribbon cable located on the back of the keyboard will become accessible.

  7. Toshiba Satellite M305D-S4829 Fan Replacement: шаг 7, изображение 1 из 2 Toshiba Satellite M305D-S4829 Fan Replacement: шаг 7, изображение 2 из 2
    • Locate the black ribbon cable flap.

    • Detach flap with plastic opening tool. The ribbon cable will become free.

  8. Toshiba Satellite M305D-S4829 Fan Replacement: шаг 8, изображение 1 из 1
    • Your keyboard has now been successfully removed.

  9. Toshiba Satellite M305D-S4829 Fan Replacement, CD/DVD Drive: шаг 9, изображение 1 из 1
    • Remove the back panel by removing the three labeled screws with a Phillips #0 screwdriver.

  10. Toshiba Satellite M305D-S4829 Fan Replacement: шаг 10, изображение 1 из 2 Toshiba Satellite M305D-S4829 Fan Replacement: шаг 10, изображение 2 из 2
    • Locate and remove the circled screw with a Phillips #0 screwdriver.

  11. Toshiba Satellite M305D-S4829 Fan Replacement: шаг 11, изображение 1 из 1
    • Use the plastic opening tool to pry the CD/DVD drive out of the frame.

  12. Toshiba Satellite M305D-S4829 Fan Replacement: шаг 12, изображение 1 из 1
    • Gently remove the CD/DVD drive from the laptop body.

  13. Toshiba Satellite M305D-S4829 Fan Replacement, also remove these two screws: шаг 13, изображение 1 из 2 Toshiba Satellite M305D-S4829 Fan Replacement, also remove these two screws: шаг 13, изображение 2 из 2
    • Remove the circled screws with Phillips #0 screwdriver.

  14. Toshiba Satellite M305D-S4829 Fan Replacement: шаг 14, изображение 1 из 1
    • Remove these screws from the underside of the laptop with Phillips #0 screwdriver.

  15. Toshiba Satellite M305D-S4829 Fan Replacement: шаг 15, изображение 1 из 1
    • Disconnect the three circled antennas by lightly pulling upward with your fingers. They should detach easily.

    • Note: Yours may only have two (2) antennas. Pay attention to the Orientation of the Aluminum bracket with the pads for reinstallation.

  16. Toshiba Satellite M305D-S4829 Fan Replacement: шаг 16, изображение 1 из 1
    • Remove the circled screw with a Phillips #0 screwdriver.

  17. Toshiba Satellite M305D-S4829 Fan Replacement: шаг 17, изображение 1 из 1
    • Detach the 3 marked cables by pulling them out with you fingers as shown.

    • This may require some force. They do not come out easily.

  18. Toshiba Satellite M305D-S4829 Fan Replacement: шаг 18, изображение 1 из 1
    • Detach the four blue ribbon cables carefully with tweezers. Some of the ribbons may require a flap to be raised because it secures the ribbon in.

  19. Toshiba Satellite M305D-S4829 Fan Replacement: шаг 19, изображение 1 из 1
    • Remove the top plastic cover by lifting upward from the bottom left-hand corner as shown. The cover will come off easily.

  20. Toshiba Satellite M305D-S4829 Fan Replacement: шаг 20, изображение 1 из 1
    • Remove the circled motherboard screws with a Phillips #0 Scewdriver.

    • Disconnect this ribbon cable.

  21. Toshiba Satellite M305D-S4829 Fan Replacement: шаг 21, изображение 1 из 1
    • Remove these screws with a Phillips #0 screwdriver.

  22. Toshiba Satellite M305D-S4829 Fan Replacement: шаг 22, изображение 1 из 1
    • Detach the display cable by gently pulling it out with your fingers.

  23. Toshiba Satellite M305D-S4829 Fan Replacement: шаг 23, изображение 1 из 2 Toshiba Satellite M305D-S4829 Fan Replacement: шаг 23, изображение 2 из 2
    • Remove the motherboard from the left side by gently lifting the left side upward.

    • The boxed volume control may snag on the laptop frame when pulling the motherboard out.

  24. Toshiba Satellite M305D-S4829 Fan Replacement: шаг 24, изображение 1 из 1
    • The motherboard has now been removed from laptop.

  25. Toshiba Satellite M305D-S4829 Fan Replacement, Fan: шаг 25, изображение 1 из 1
    • Detach the fan power cord by pulling it out with your fingers.

    • Carefully lift up the tape on the fan by peeling the right edge to the left. It can remain attached to the heatsink but should be removed from the fan.

  26. Toshiba Satellite M305D-S4829 Fan Replacement: шаг 26, изображение 1 из 1
    • Remove the circled screws with a Phillips #0 screwdriver.

  27. Toshiba Satellite M305D-S4829 Fan Replacement: шаг 27, изображение 1 из 3 Toshiba Satellite M305D-S4829 Fan Replacement: шаг 27, изображение 2 из 3 Toshiba Satellite M305D-S4829 Fan Replacement: шаг 27, изображение 3 из 3
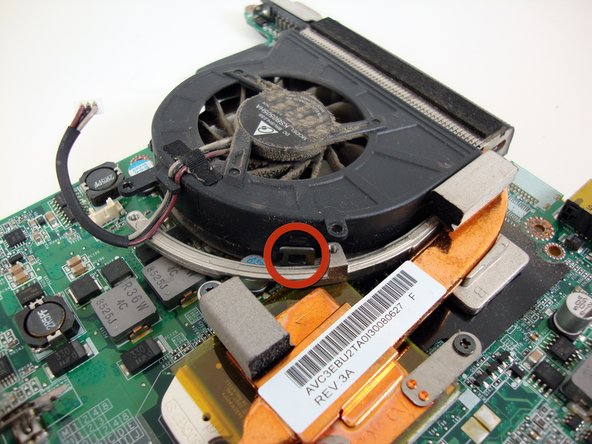
    • Locate the 3 circled clips holding the fan to the motherboard.

    • Pry each clip outward while applying upward force on the fan as shown.

  28. Toshiba Satellite M305D-S4829 Fan Replacement: шаг 28, изображение 1 из 2 Toshiba Satellite M305D-S4829 Fan Replacement: шаг 28, изображение 2 из 2
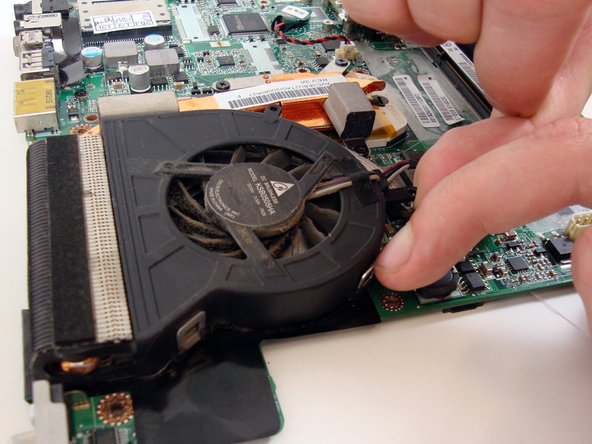
    • Carefully pull out the fan.

    • Note: replacing the fan is highly reccomended

    • Optionally you may clean the fan with Air + Q-Tips. To remove the blade turn the fan over and gently pull the fan blade from the housing.

    • If the fan is no longer operational, it may be possible to temporarily repair it by removing the fan blade and put a small amount of WD-40 on the pinion shaft hole the fan rotates in. A toothpick is a good applicator. Do NOT contaminate the motor area with any of the dust/grime that has accumulated.

    • Insert the fan blade and move the blades with your finger. It should spin freely and cog to a stop. Again this is a temporary fix!

Заключение

To reassemble your device, follow these instructions in reverse order.

Еще один человек закончил это руководство.

Michael Jensen

Участник с: 04/18/11

425 Репутация

Автор 6 руководств

Команда

Cal Poly, Team 4-3, Regan Spring 2011 Участник Cal Poly, Team 4-3, Regan Spring 2011

CPSU-REGAN-S11S4G3

5 членов

Автор 6 руководств

0 Комментариев

Добавить комментарий

Просмотр статистики:

За последние 24часов: 0

За последние 7 дней: 0

За последние 30 дней: 0

За всё время: 5,887