Перейти к основному содержанию

Toshiba Satellite U405D-S2902 Faceplate Replacement

Выберете то, что вам нужно

  1. Toshiba Satellite U405D-S2902 Faceplate Replacement, Battery: шаг 1, изображение 1 из 1
    • Make sure that the laptop is off and unplugged.

    • Turn the laptop over.

    • Slide back the left lock, and you should hear a click when it is successfully locked back in.

  2. Toshiba Satellite U405D-S2902 Faceplate Replacement: шаг 2, изображение 1 из 1
    • Rotate the laptop 180 degrees so that the battery is near you.

    • Hold back the spring slide and pull the battery out.

  3. Toshiba Satellite U405D-S2902 Faceplate Replacement, Keyboard: шаг 3, изображение 1 из 3 Toshiba Satellite U405D-S2902 Faceplate Replacement, Keyboard: шаг 3, изображение 2 из 3 Toshiba Satellite U405D-S2902 Faceplate Replacement, Keyboard: шаг 3, изображение 3 из 3
    • Situate the laptop so that it is open and the display is facing you.

    • Use the plastic opening tool to pry the black plastic insert upward. The insert can be found at the top of the keyboard.

    • Once the insert is loose, carefully remove it from the device.

  4. Toshiba Satellite U405D-S2902 Faceplate Replacement: шаг 4, изображение 1 из 2 Toshiba Satellite U405D-S2902 Faceplate Replacement: шаг 4, изображение 2 из 2
    • Using #1 Phillips Screwdriver, remove both of the 5 mm screws that are located beneath the insert.

  5. Toshiba Satellite U405D-S2902 Faceplate Replacement: шаг 5, изображение 1 из 2 Toshiba Satellite U405D-S2902 Faceplate Replacement: шаг 5, изображение 2 из 2
    • Use the plastic opening tool to begin removing the keys off of the device.

    • Once the keys are off, gently remove the keyboard. Be careful of the ribbon cable that still connects the keyboard to motherboard.

  6. Toshiba Satellite U405D-S2902 Faceplate Replacement: шаг 6, изображение 1 из 2 Toshiba Satellite U405D-S2902 Faceplate Replacement: шаг 6, изображение 2 из 2
    • Lift up the gate on the ZIF socket to release the ribbon.

    • Ease the ribbon connecting the keyboard to the motherboard out of the ZIF socket.

  7. Toshiba Satellite U405D-S2902 Faceplate Replacement, Faceplate: шаг 7, изображение 1 из 2 Toshiba Satellite U405D-S2902 Faceplate Replacement, Faceplate: шаг 7, изображение 2 из 2
    • With the keyboard removed, locate the marked screws.

    • Remove the marked, 5mm screws using the #1 Phillips Screwdriver.

  8. Toshiba Satellite U405D-S2902 Faceplate Replacement: шаг 8, изображение 1 из 2 Toshiba Satellite U405D-S2902 Faceplate Replacement: шаг 8, изображение 2 из 2
    • In the opening above the mouse pad, use the plastic opening tool to push up the black gate of the ZIF socket.

    • Remove the ribbon from the ZIF socket.

  9. Toshiba Satellite U405D-S2902 Faceplate Replacement: шаг 9, изображение 1 из 3 Toshiba Satellite U405D-S2902 Faceplate Replacement: шаг 9, изображение 2 из 3 Toshiba Satellite U405D-S2902 Faceplate Replacement: шаг 9, изображение 3 из 3
    • Locate the wide opening at the top near the screen.

    • Use the plastic opening tool to open the black ZIF socket.

    • Remove the blue ribbon.

  10. Toshiba Satellite U405D-S2902 Faceplate Replacement: шаг 10, изображение 1 из 2 Toshiba Satellite U405D-S2902 Faceplate Replacement: шаг 10, изображение 2 из 2
    • After removing the screw in step 3, carefully close the laptop and put it face down. Locate the center panel.

    • Remove the three, 3 mm screws using the #1 Phillips Screwdriver.

  11. Toshiba Satellite U405D-S2902 Faceplate Replacement: шаг 11, изображение 1 из 2 Toshiba Satellite U405D-S2902 Faceplate Replacement: шаг 11, изображение 2 из 2
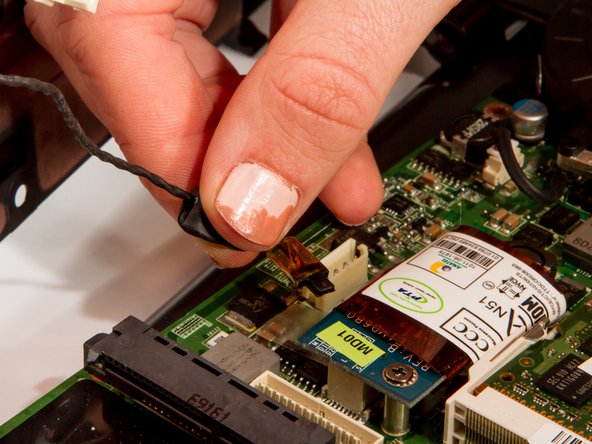
    • Grasp the power cable with your tweezers and remove it from the wireless antenna.

  12. Toshiba Satellite U405D-S2902 Faceplate Replacement: шаг 12, изображение 1 из 2 Toshiba Satellite U405D-S2902 Faceplate Replacement: шаг 12, изображение 2 из 2
    • Locate and remove both the white and black antenna leads with the tweezers.

  13. Toshiba Satellite U405D-S2902 Faceplate Replacement: шаг 13, изображение 1 из 3 Toshiba Satellite U405D-S2902 Faceplate Replacement: шаг 13, изображение 2 из 3 Toshiba Satellite U405D-S2902 Faceplate Replacement: шаг 13, изображение 3 из 3
    • Remove screws for back assembly.

    • 11 x F5 (5 mm #1 Phillips)

    • 6 x F2 (2 mm #0 Phillips)

    • 4 x F8 (8 mm #1 Phillips)

    • 1 x F3 (3 mm #1 Phillips

  14. Toshiba Satellite U405D-S2902 Faceplate Replacement: шаг 14, изображение 1 из 1
    • Use the plastic opening tool to release the back panel from the laptop.

    • If all of the screws are removed it should come off with very little effort. Do not force it. If it still feels attached, check that you didn't miss a screw or two.

  15. Toshiba Satellite U405D-S2902 Faceplate Replacement: шаг 15, изображение 1 из 2 Toshiba Satellite U405D-S2902 Faceplate Replacement: шаг 15, изображение 2 из 2
    • Use the plastic opening tool to separate the top faceplate.

    • The faceplate is the plastic surface and the metal piece under the keyboard.

    • Carefully lift the faceplate off of the base by sliding the plastic opening tool around the outside of the device. You'll hear clicks as you do this.

    • Prying apart the faceplate will be a little hard, but try not to bend it too much - you do not want to crack it.

  16. Toshiba Satellite U405D-S2902 Faceplate Replacement: шаг 16, изображение 1 из 1
    • Lift the back panel and carefully disconnect the main power cable.

  17. Toshiba Satellite U405D-S2902 Faceplate Replacement: шаг 17, изображение 1 из 2 Toshiba Satellite U405D-S2902 Faceplate Replacement: шаг 17, изображение 2 из 2
    • Remove the black signal cable attached at the blue circuit board.

  18. Toshiba Satellite U405D-S2902 Faceplate Replacement: шаг 18, изображение 1 из 2 Toshiba Satellite U405D-S2902 Faceplate Replacement: шаг 18, изображение 2 из 2
    • Remove auxiliary power cable attached to the blue board at the back of the laptop.

Заключение

To reassemble your device, follow these instructions in reverse order.

Еще один человек закончил это руководство.

Brandon Kirklen

Участник с: 01/11/13

311 Репутация

Автор 8 руководств

Команда

Cal Poly, Team 7-8, Maness Winter 2013 Участник Cal Poly, Team 7-8, Maness Winter 2013

CPSU-MANESS-W13S7G8

4 членов

Автор 8 руководств

0 Комментариев

Добавить комментарий

Просмотр статистики:

За последние 24часов: 0

За последние 7 дней: 0

За последние 30 дней: 0

За всё время: 903