Перейти к основному содержанию

Toshiba Satellite e205 Motherboard Replacement

Выберете то, что вам нужно

  1. Toshiba Satellite e205 Motherboard Replacement, Battery: шаг 1, изображение 1 из 2 Toshiba Satellite e205 Motherboard Replacement, Battery: шаг 1, изображение 2 из 2
    • With the battery away from you, slide the locking clips out.

    • The left clip stays, the right clip is spring loaded.

    • Slide the battery away from you.

  2. Toshiba Satellite e205 Motherboard Replacement, Keyboard: шаг 2, изображение 1 из 1
    • Use a spudger to carefully pry up the keyboard screw cover.

  3. Toshiba Satellite e205 Motherboard Replacement: шаг 3, изображение 1 из 1
    • Remove the two screws securing the keyboard to the chassis.

  4. Toshiba Satellite e205 Motherboard Replacement: шаг 4, изображение 1 из 1
    • Carefully tilt the keyboard towards you and release the ribbon cables.

    • Use a spudger if needed to release the latch. The latch slides out.

    • The keyboard is now free and can be set aside.

  5. Toshiba Satellite e205 Motherboard Replacement, Bottom Cover: шаг 5, изображение 1 из 1
    • Remove the five black screws

    • Remove the one silver screw

  6. Toshiba Satellite e205 Motherboard Replacement: шаг 6, изображение 1 из 1
    • Flip the laptop over so the bottom is facing up.

    • Using a spudger, remove the seven rubber inserts.

    • The feet only go in one location on the bottom of the laptop, so save yourself some time and track where they go.

  7. Toshiba Satellite e205 Motherboard Replacement: шаг 7, изображение 1 из 1
    • Remove the six silver screws.

    • Remove the one black screw.

  8. Toshiba Satellite e205 Motherboard Replacement: шаг 8, изображение 1 из 2 Toshiba Satellite e205 Motherboard Replacement: шаг 8, изображение 2 из 2
    • Stand the laptop up on end.

    • Remove the two rubber inserts from the back of the laptop. One insert is on each side of the laptop.

  9. Toshiba Satellite e205 Motherboard Replacement: шаг 9, изображение 1 из 2 Toshiba Satellite e205 Motherboard Replacement: шаг 9, изображение 2 из 2
    • Remove the two screews.

  10. Toshiba Satellite e205 Motherboard Replacement: шаг 10, изображение 1 из 1
    • Carefully work a spudger in the crack at the back of the laptop and separate the small rubberized section from the bottom of the laptop.

  11. Toshiba Satellite e205 Motherboard Replacement: шаг 11, изображение 1 из 1
    • Remove the four screws.

    • Disconnect the black wireless antenna lead.

  12. Toshiba Satellite e205 Motherboard Replacement: шаг 12, изображение 1 из 1
    • The bottom of the laptop is now ready to lift off.

    • Carefully work a spudger around the seam of the laptop separating the bottom from the rest of the laptop.

    • There is a data connection at the front of the laptop that needs to be disconnected.

    • Use a spuder to carefully disconnect the wire from the motherboard. Once this is free the bottom will come off.

  13. Toshiba Satellite e205 Motherboard Replacement, Hard Drive: шаг 13, изображение 1 из 2 Toshiba Satellite e205 Motherboard Replacement, Hard Drive: шаг 13, изображение 2 из 2
    • Locate the hard drive.

    • Remove the three screws.

    • Slide the hard drive out away from the motherboard connector.

    • Once the hard drive is disconnected it lifts out.

  14. Toshiba Satellite e205 Motherboard Replacement, Wireless Card: шаг 14, изображение 1 из 2 Toshiba Satellite e205 Motherboard Replacement, Wireless Card: шаг 14, изображение 2 из 2
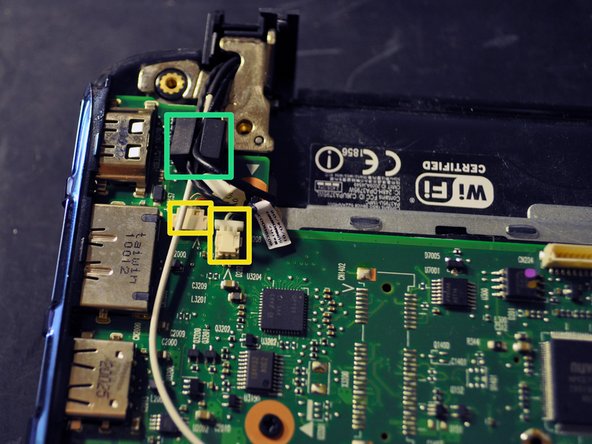
    • Locate the wireless card.

    • Remove the white antenna lead.

    • Remove the single screw.

    • Lift the card up from the edge with the screw, and pull out.

  15. Toshiba Satellite e205 Motherboard Replacement, Optical Drive: шаг 15, изображение 1 из 2 Toshiba Satellite e205 Motherboard Replacement, Optical Drive: шаг 15, изображение 2 из 2
    • Locate optical drive

    • Remove the three screws securing the optical drive.

    • Slide the optical drive away from the motherboard, and carefully lift up.

  16. Toshiba Satellite e205 Motherboard Replacement, Motherboard: шаг 16, изображение 1 из 1
    • Carefully flip the laptop rightside up and open the lid.

    • Disconnect the cables from the motherboard.

  17. Toshiba Satellite e205 Motherboard Replacement: шаг 17, изображение 1 из 2 Toshiba Satellite e205 Motherboard Replacement: шаг 17, изображение 2 из 2
    • Close the laptop lid, and flip back over so you see the motherboard.

    • Disconnect all cables from the motherboard.

    • This wire holder is stuck on with a little glue and should lift right off.

  18. Toshiba Satellite e205 Motherboard Replacement: шаг 18, изображение 1 из 1
    • Remove the heatsink screws. And lift up the heatsink.

    • The screws remain attached to the heatsink.

    • Remove the three screws holding the motherboard to the chasis.

  19. Toshiba Satellite e205 Motherboard Replacement: шаг 19, изображение 1 из 1
    • Lift up on ribbon cable latch.

    • Gently disconnect ribbon cable from motherboard.

    • The motherboard should lift out.

Заключение

To reassemble your device, follow these instructions in reverse order.

Tyler

Участник с: 06/19/12

4 920 Репутация

Автор 16 руководств

Команда

TechForce Участник TechForce

Business

2 членов

Автор 25 руководств

3 Комментариев

This guide could really use an explanation of how to disconnect the different types of cables from the motherboard. In particular, the descriptions for steps 16 and 17 are completely inadequate to me.

gitm - Ответить

Also, to replace the motherboard you must remove the CPU and RAM from the motherboard, so they can be connected to the new one. This guide does not cover that.

gitm -

Anther important omission is the data connection to the card reader, which needs to be disconnected in Step 11 (this is one of two connections between the motherboard and the bottom of the case).

gitm -

Добавить комментарий

Просмотр статистики:

За последние 24часов: 0

За последние 7 дней: 0

За последние 30 дней: 4

За всё время: 886