Перейти к основному содержанию

UF55 Smart Projector DMD Chip Replacement

Выберете то, что вам нужно

  1. UF55 Smart Projector DMD Chip Replacement, DMD Chip: шаг 1, изображение 1 из 2 UF55 Smart Projector DMD Chip Replacement, DMD Chip: шаг 1, изображение 2 из 2
    • Remove bulb and screws in the bulb compartment.

  2. UF55 Smart Projector DMD Chip Replacement, Remove trim piece: шаг 2, изображение 1 из 1
    • Pry grey ring off from the top or bottom.

  3. UF55 Smart Projector DMD Chip Replacement, Remove main screws: шаг 3, изображение 1 из 1
    • Remove

    • Hole is 3.5" deep. A standard screwdriver will not reach. You need a PH0 or PH1 with a 4" neck.

  4. UF55 Smart Projector DMD Chip Replacement, Remove more screws: шаг 4, изображение 1 из 1
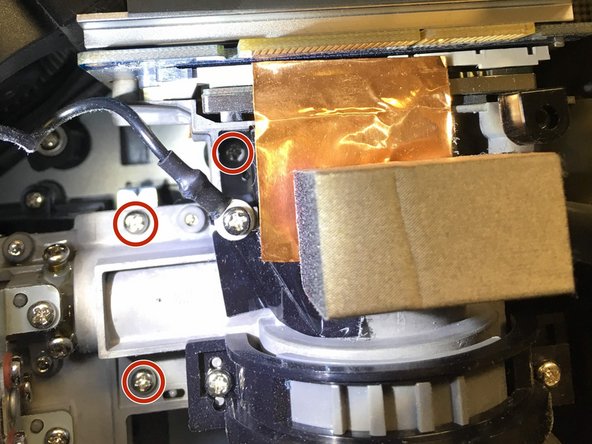
    • There are only 2 screws showing in the photo there will be 3.

  5. UF55 Smart Projector DMD Chip Replacement, Lift top off carefully: шаг 5, изображение 1 из 1
    • Remove these connectors. There is plenty of slack so it's easy.

  6. UF55 Smart Projector DMD Chip Replacement, Remove shielding screws: шаг 6, изображение 1 из 1
    • Remove 8 screws

  7. UF55 Smart Projector DMD Chip Replacement, Remove connectors: шаг 7, изображение 1 из 2 UF55 Smart Projector DMD Chip Replacement, Remove connectors: шаг 7, изображение 2 из 2
    • Squeeze to release.

    • Pull to release.

    • Slide tabs open to release

  8. UF55 Smart Projector DMD Chip Replacement, Remove screws for control board: шаг 8, изображение 1 из 2 UF55 Smart Projector DMD Chip Replacement, Remove screws for control board: шаг 8, изображение 2 из 2
    • Remove

    • Lift out from this side. Some jiggling may be in order.

    • Power & Ground can be disconnected, but it's not necessary.

  9. UF55 Smart Projector DMD Chip Replacement, Remove screws for optics: шаг 9, изображение 1 из 3 UF55 Smart Projector DMD Chip Replacement, Remove screws for optics: шаг 9, изображение 2 из 3 UF55 Smart Projector DMD Chip Replacement, Remove screws for optics: шаг 9, изображение 3 из 3
    • Remove 6 screws

    • Rotate counter clockwise and lift simultaneously.

    • Color Wheel is glass.

  10. UF55 Smart Projector DMD Chip Replacement, Remove DMD chip & heat sink: шаг 11, изображение 1 из 3 UF55 Smart Projector DMD Chip Replacement, Remove DMD chip & heat sink: шаг 11, изображение 2 из 3 UF55 Smart Projector DMD Chip Replacement, Remove DMD chip & heat sink: шаг 11, изображение 3 из 3
    • Remove 2 screws. Lift chip and heatsink away from the main optics unit.

    • Don't lose the spacer and gasket

  11. UF55 Smart Projector DMD Chip Replacement: шаг 12, изображение 1 из 2 UF55 Smart Projector DMD Chip Replacement: шаг 12, изображение 2 из 2
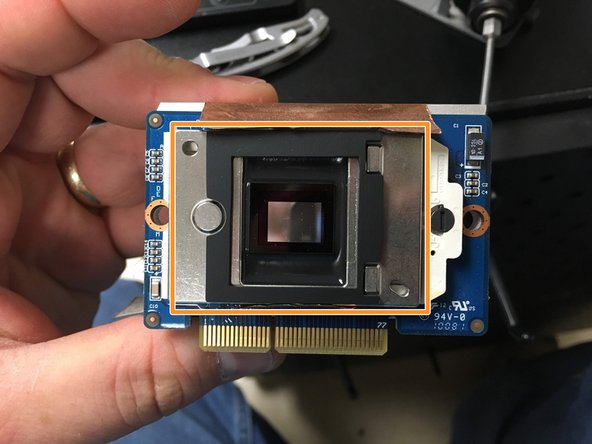
    • Rotate ZIF Lock cam to remove chip.

    • You can see the mirrors that have seized up.

  12. UF55 Smart Projector DMD Chip Replacement, Replace DMD Chip: шаг 13, изображение 1 из 3 UF55 Smart Projector DMD Chip Replacement, Replace DMD Chip: шаг 13, изображение 2 из 3 UF55 Smart Projector DMD Chip Replacement, Replace DMD Chip: шаг 13, изображение 3 из 3
    • Pins are keyed so you it's hard to screw up.

    • Rotate cam lock back to locked position.

    • Put the spacer and then the rubber gasket on top of the optic unit and sit the chip and heat sink on top. That makes it easier to keep everything inline while reassembling.

    • Snug up your screws.

Заключение

To reassemble your device, follow these instructions in reverse order.

Tim Wellington

Участник с: 11/21/14

217 Репутация

1 руководство автора

0 Комментариев

Добавить комментарий

Просмотр статистики:

За последние 24часов: 0

За последние 7 дней: 3

За последние 30 дней: 13

За всё время: 1,333