Введение
The Belkin Micro Auto Charger USB F8Z445 is rated at 1 amp. However, many devices will not know there is more than 500 mA available, and only charge at a low rate. This is because the Belkin adapter does not provide a 200 ohm resistor between the -D/+D pins, which would tell the device of its higher current capability. Connecting a resistor between the data pins will convince the charging device that there is full power available, and it will charge its battery more quickly, at up to a 1 amp rate.
Steps involve opening the adapter case, soldering a 200 ohm resistor in place, and closing the case.
Please note that this mod could conceivably lead to damage of the adapter or any device plugged into it. Even though it claims to be rated for 1 amp, the Belkin adapter gets very hot when running at this current. It's possible this might lead to premature failure, which in some cases could cause a fire, and/or send the full automotive 12 volts into any attached USB device. The author does not advocate performing these procedures, and is not responsible for any damages caused.
Выберете то, что вам нужно
-
-
Pry space between ground contact and plastic casing, using a large flat blade screwdriver. Alternate prying on both ground contacts on either side of the case. The case should begin separating at the USB side of the adapter.
-
-
-
Use a smaller flat blade screwdriver to pry on the gap created between the side and the USB "front" of the adapter. Eventually you can use your hands to pull the two casing halves apart.
-
-
-
-
Identify where the four pins of the USB socket connect to the circuit board. They are the largest connections on the board, are all aligned in a row, and are located on the other side of the board from the back of the USB socket.
-
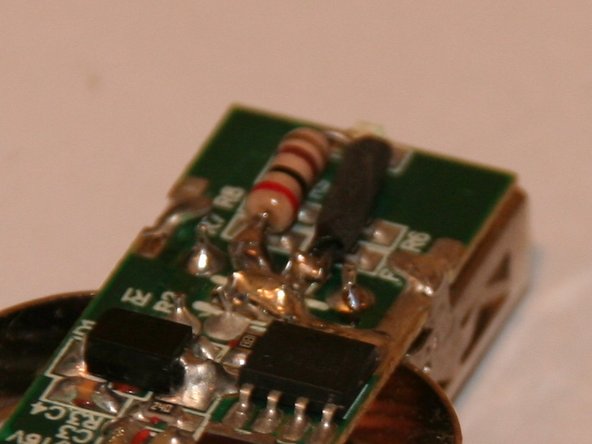
Prepare a 200 ohm 1/4 watt resistor that will connect between the two center pins of the 4 pin USB connector. Make a loop of one lead of the resistor, as shown in the photo. Use heat shrink or other insulated tubing to keep the longer, looped side of the resistor from shorting to the board. In the photo this is the black shape to the right of the resistor.
-
Solder the resistor to the two center pins of the four USB pins. Use a small soldering iron and a modest amount of solder. Be careful not to bridge to the outer USB pins, or the nearby, large solder point that attached the ground contact.
-
-
-
Reassemble the components into the case. Make sure the 12V pin and the ground contacts are all pushed in enough as you close the case, or the case will not close.
-
-
-
Apply a small dab of epoxy or cyanoacrylate glue to four spots where the two halves come together, and hold or clamp until dry. You could also just use a rubber band near the USB side of the case. I would not use electrical tape to hold the halves together, as it eventually would leak adhesive and make a sticky mess of things.
-
-
-
Before using with a device, test the unit in a cigarette lighter, and make sure its green LED is still lighting correctly. You can also measure between the two outer USB pins with a voltmeter, and make sure there is from 4.75 to 5.25 volts there.
-


Отменить: Я не выполнил это руководство.
Еще один человек закончил это руководство.
