Перейти к основному содержанию

Uwell Crown III Coil Replacement

Выберете то, что вам нужно

  1. Uwell Crown III Coil Replacement, Coil: шаг 1, изображение 1 из 3 Uwell Crown III Coil Replacement, Coil: шаг 1, изображение 2 из 3 Uwell Crown III Coil Replacement, Coil: шаг 1, изображение 3 из 3
    • Remove the tank from the E-cigarette by gently unscrewing it by hand.

  2. Uwell Crown III Coil Replacement: шаг 2, изображение 1 из 3 Uwell Crown III Coil Replacement: шаг 2, изображение 2 из 3 Uwell Crown III Coil Replacement: шаг 2, изображение 3 из 3
    • Take-off the upper lid. This is necessary as the lid will go through cleaning process.

  3. Uwell Crown III Coil Replacement: шаг 3, изображение 1 из 2 Uwell Crown III Coil Replacement: шаг 3, изображение 2 из 2
    • Remove the bottom lid from the tank. The bottom lid holds the coil inside the tank. By removing the bottom lid, you are able to take out the coil.

  4. Uwell Crown III Coil Replacement: шаг 4, изображение 1 из 3 Uwell Crown III Coil Replacement: шаг 4, изображение 2 из 3 Uwell Crown III Coil Replacement: шаг 4, изображение 3 из 3
    • Remove the old coil from the tank.

    • In the third picture, you can see the difference between the new coil on the left and the burnt coil on the right.

  5. Uwell Crown III Coil Replacement: шаг 5, изображение 1 из 1
    • This is the tank and both upper and bottom lids after the disassembly process.

  6. Uwell Crown III Coil Replacement: шаг 6, изображение 1 из 2 Uwell Crown III Coil Replacement: шаг 6, изображение 2 из 2
    • To clean the tank and the lids, you need to submerge them in a glass of water for approximately 3-4 minutes to make sure they are cleaned properly.

  7. Uwell Crown III Coil Replacement: шаг 7, изображение 1 из 3 Uwell Crown III Coil Replacement: шаг 7, изображение 2 из 3 Uwell Crown III Coil Replacement: шаг 7, изображение 3 из 3
    • After the tank and the lids are cleaned, use the towel to dry them as much possible before the next step.

  8. Uwell Crown III Coil Replacement: шаг 8, изображение 1 из 1
    • Use the hair dryer with medium heat to make sure no water drops exist.

    • Any water drops might affect the function of the coil which will result into a flavor change.

  9. Uwell Crown III Coil Replacement: шаг 9, изображение 1 из 3 Uwell Crown III Coil Replacement: шаг 9, изображение 2 из 3 Uwell Crown III Coil Replacement: шаг 9, изображение 3 из 3
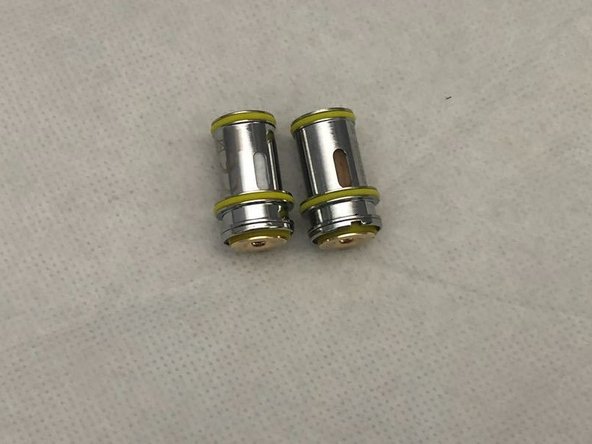
    • Place the new coil inside the tank. Make sure the coil is stable and not moving.

    • Using the two lids, close the tank from both sides and make sure that the lids are perfectly sealed.

Заключение

To reassemble your device, follow step 2 in reverse order.

Еще один человек закончил это руководство.

Abdulrahman Aldossary

Участник с: 06/20/18

187 Репутация

1 руководство автора

Команда

Washington State, Team S1-G1, Hope Summer 2018 Участник Washington State, Team S1-G1, Hope Summer 2018

WSU-HOPE-SU18S1G1

3 членов

Автор 1 руководств

0 Комментариев

Добавить комментарий

Просмотр статистики:

За последние 24часов: 0

За последние 7 дней: 4

За последние 30 дней: 25

За всё время: 5,492