Перейти к основному содержанию

Visual Land Prestige 7L Front Facing Camera Replacement

Выберете то, что вам нужно

  1. Visual Land Prestige 7L Front Facing Camera Replacement, Back Panel: шаг 1, изображение 1 из 2 Visual Land Prestige 7L Front Facing Camera Replacement, Back Panel: шаг 1, изображение 2 из 2
    • Remove the two 8mm Phillips Head screws located at the bottom of your device.

  2. Visual Land Prestige 7L Front Facing Camera Replacement: шаг 2, изображение 1 из 3 Visual Land Prestige 7L Front Facing Camera Replacement: шаг 2, изображение 2 из 3 Visual Land Prestige 7L Front Facing Camera Replacement: шаг 2, изображение 3 из 3
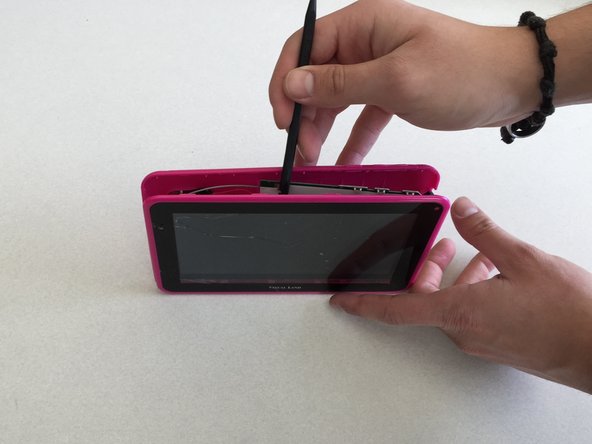
    • Insert the spudger between the two pieces of the case around the media ports and pry them apart.

    • We found the best way to get the spudger inside the case was to insert in into the SD card slot. Be sure to only insert the spudger a shallow amount and be careful not to damage any of the inside of the device.

    • Finish unsnapping each plastic piece holding the device together along the bottom.

  3. Visual Land Prestige 7L Front Facing Camera Replacement: шаг 3, изображение 1 из 3 Visual Land Prestige 7L Front Facing Camera Replacement: шаг 3, изображение 2 из 3 Visual Land Prestige 7L Front Facing Camera Replacement: шаг 3, изображение 3 из 3
    • Move the spudger down the rest of the case, separating each side, and finally the top.

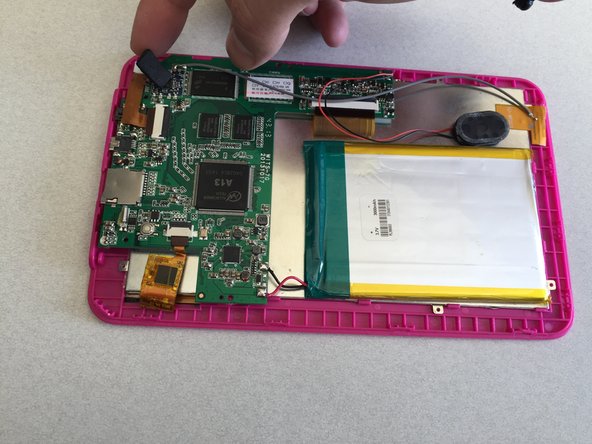
    • Pull the back off and place it to the side.

    • Without a back panel for protection, be sure place your device on the table screen-side down to avoid damaging the internal circuitry.

  4. Visual Land Prestige 7L Front Facing Camera Replacement, Front Facing Camera: шаг 4, изображение 1 из 2 Visual Land Prestige 7L Front Facing Camera Replacement, Front Facing Camera: шаг 4, изображение 2 из 2
    • Remove the adhesive padding.

  5. Visual Land Prestige 7L Front Facing Camera Replacement: шаг 5, изображение 1 из 2 Visual Land Prestige 7L Front Facing Camera Replacement: шаг 5, изображение 2 из 2
    • Unclip the connector that attaches the camera to the motherboard.

    • For more information on unclipping connectors see this How To Guide

    • Do not pull on the camera until you're sure that it's unclipped, the gold connection will rip.

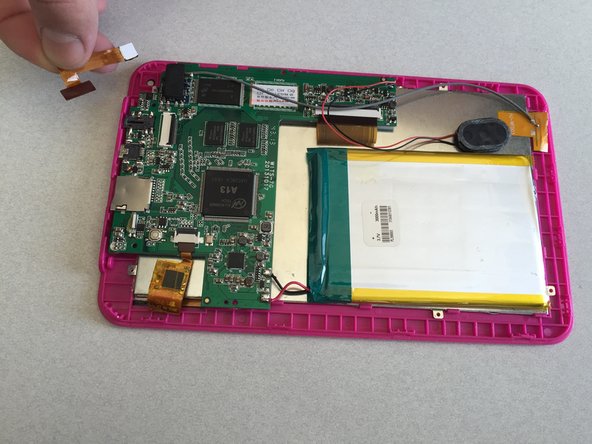
    • Gently pop the camera out of the connector and off the case.

Заключение

To reassemble your device, follow these instructions in reverse order.

Еще один человек закончил это руководство.

Greg Azzalina

Участник с: 01/28/15

263 Репутация

1 руководство автора

Команда

Penn State, Team 2-25, Kaschak Winter 2015 Участник Penn State, Team 2-25, Kaschak Winter 2015

PSU-KASCHAK-W15S2G25

4 членов

Автор 4 руководств

0 Комментариев

Добавить комментарий

Просмотр статистики:

За последние 24часов: 1

За последние 7 дней: 4

За последние 30 дней: 4

За всё время: 277