Перейти к основному содержанию

Vulcan Venture II VNB14002IE I/O Board Replacement

Выберете то, что вам нужно

  1. Vulcan Venture II VNB14002IE I/O Board Replacement, Back Panel: шаг 1, изображение 1 из 1
    • Use a J00 screwdriver to unscrew the 10 back-plate screws.

  2. Vulcan Venture II VNB14002IE I/O Board Replacement: шаг 2, изображение 1 из 1
    • Gently separate the back panel from the laptop.

  3. Vulcan Venture II VNB14002IE I/O Board Replacement, I/O Board: шаг 3, изображение 1 из 1
    • Locate the IO board on the back panel.

  4. Vulcan Venture II VNB14002IE I/O Board Replacement: шаг 4, изображение 1 из 2 Vulcan Venture II VNB14002IE I/O Board Replacement: шаг 4, изображение 2 из 2
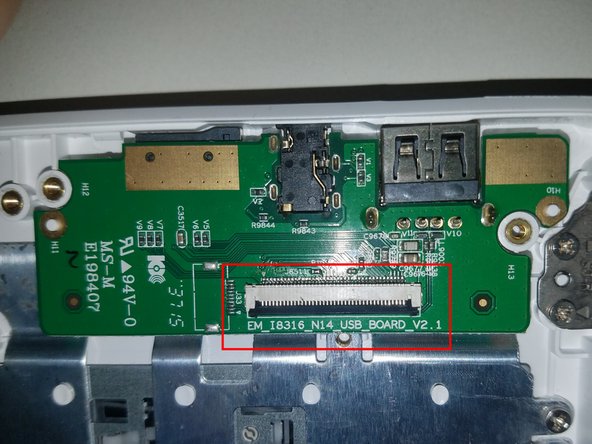
    • Locate the ribbon connector on the IO board, and lift the black bar closest the the ribbon.

    • Pull the ribbon cable away from the connector, releasing it.

  5. Vulcan Venture II VNB14002IE I/O Board Replacement: шаг 5, изображение 1 из 2 Vulcan Venture II VNB14002IE I/O Board Replacement: шаг 5, изображение 2 из 2
    • Locate the screws on the IO panel, and use the J00+ bit to unscrew them.

  6. Vulcan Venture II VNB14002IE I/O Board Replacement: шаг 6, изображение 1 из 1
    • The IO Board is now safe to remove from the computer.

Заключение

To reassemble your device, follow these instructions in reverse order.

Parish Brandt

Участник с: 09/21/18

615 Репутация

Автор 5 руководств

Команда

University of North Texas, Team S1-G5, Riccardelli Fall 2018 Участник University of North Texas, Team S1-G5, Riccardelli Fall 2018

UNT-RICCARDELLI-F18S1G5

4 членов

Автор 7 руководств

0 Комментариев

Добавить комментарий

Просмотр статистики:

За последние 24часов: 0

За последние 7 дней: 1

За последние 30 дней: 1

За всё время: 506