Перейти к основному содержанию

Wahl Professional Designer Motor Replacement

Выберете то, что вам нужно

  1. Wahl Professional Designer Motor Replacement, Motor: шаг 1, изображение 1 из 2 Wahl Professional Designer Motor Replacement, Motor: шаг 1, изображение 2 из 2
    • Unscrew the 12 mm Phillips head screws located at the top of the cover and at the bottom two corners, using a Phillips #1 Screwdriver.

  2. Wahl Professional Designer Motor Replacement: шаг 2, изображение 1 из 3 Wahl Professional Designer Motor Replacement: шаг 2, изображение 2 из 3 Wahl Professional Designer Motor Replacement: шаг 2, изображение 3 из 3
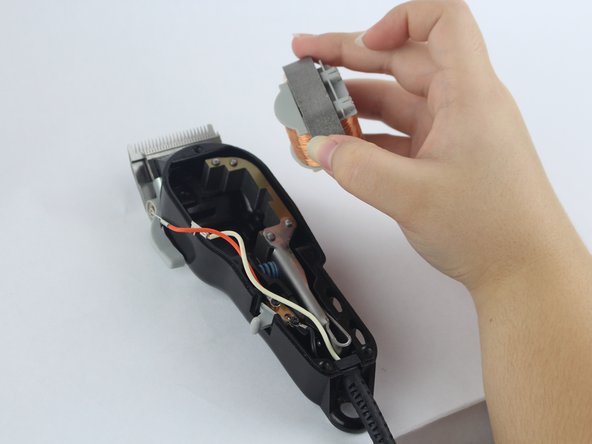
    • Remove the wires connected to the motor by firmly grasping both sides of a wire and wiggling until it is released.

  3. Wahl Professional Designer Motor Replacement: шаг 3, изображение 1 из 3 Wahl Professional Designer Motor Replacement: шаг 3, изображение 2 из 3 Wahl Professional Designer Motor Replacement: шаг 3, изображение 3 из 3
    • Unscrew the two 20.5 mm Phillip head screw located on the motor using a Phillip's #1 screwdriver.

  4. Wahl Professional Designer Motor Replacement: шаг 4, изображение 1 из 2 Wahl Professional Designer Motor Replacement: шаг 4, изображение 2 из 2
    • Gently remove the motor from the device.

Заключение

To reassemble your device, follow these instructions in reverse order.

Еще один человек закончил это руководство.

Sophia Swearengin

Участник с: 09/26/17

718 Репутация

Автор 5 руководств

Команда

USF Tampa, Team S14-G5, Boczar Fall 2017 Участник USF Tampa, Team S14-G5, Boczar Fall 2017

USFT-BOCZAR-F17S14G5

2 членов

Автор 5 руководств

0 Комментариев

Добавить комментарий

Просмотр статистики:

За последние 24часов: 1

За последние 7 дней: 5

За последние 30 дней: 12

За всё время: 1,178