Перейти к основному содержанию

Whirlpool Dryer Solenoid Valve Replacement

Выберете то, что вам нужно

  1. Whirlpool Dryer Solenoid Valve Replacement, Safety Precautions: шаг 1, изображение 1 из 1
    • Before you begin your repair, unplug your dryer.

    • Your power cord may have four prongs rather than three. The additional prong is a ground connection.

  2. Whirlpool Dryer Solenoid Valve Replacement, Unfasten the top panel: шаг 2, изображение 1 из 3 Whirlpool Dryer Solenoid Valve Replacement, Unfasten the top panel: шаг 2, изображение 2 из 3 Whirlpool Dryer Solenoid Valve Replacement, Unfasten the top panel: шаг 2, изображение 3 из 3
    Инструмент, используемый на этом этапе:
    FixMat
    $36.95
    Купить
    • Throughout this guide, keep track of each screw and reinstall it exactly where it came from.

    • Use a nut driver to remove the screws securing the top panel to the rear panel bracket.

  3. Whirlpool Dryer Solenoid Valve Replacement, Remove the top panel: шаг 3, изображение 1 из 2 Whirlpool Dryer Solenoid Valve Replacement, Remove the top panel: шаг 3, изображение 2 из 2
    • Grasp the top and slide it 1/2 to 1 inch toward the rear of the machine.

  4. Whirlpool Dryer Solenoid Valve Replacement: шаг 4, изображение 1 из 2 Whirlpool Dryer Solenoid Valve Replacement: шаг 4, изображение 2 из 2
    • Lift the top panel upward to separate it from the chassis.

    • Remove the top panel from the machine.

  5. Whirlpool Dryer Solenoid Valve Replacement, Unfasten the cover plate: шаг 5, изображение 1 из 1
    • Remove the cover plate screw.

  6. Whirlpool Dryer Solenoid Valve Replacement, Remove the cover plate: шаг 6, изображение 1 из 3 Whirlpool Dryer Solenoid Valve Replacement, Remove the cover plate: шаг 6, изображение 2 из 3 Whirlpool Dryer Solenoid Valve Replacement, Remove the cover plate: шаг 6, изображение 3 из 3
    • Remove the cover plate.

  7. Whirlpool Dryer Solenoid Valve Replacement, Disconnect the cord: шаг 7, изображение 1 из 1
    • Remove the screws securing the cord cables.

    • Mark the cables with a permanent marker if needed and take a picture or draw a diagram.

  8. Whirlpool Dryer Solenoid Valve Replacement, Remove the cord: шаг 8, изображение 1 из 3 Whirlpool Dryer Solenoid Valve Replacement, Remove the cord: шаг 8, изображение 2 из 3 Whirlpool Dryer Solenoid Valve Replacement, Remove the cord: шаг 8, изображение 3 из 3
    • Pull the cord carefully down through the round hole.

    • Make sure you replace the connections correctly when you reassemble.

  9. Whirlpool Dryer Solenoid Valve Replacement, Unfasten the cord terminal block: шаг 9, изображение 1 из 1
    • Remove the green ground screw.

    • Remove the cord terminal block screws.

  10. Whirlpool Dryer Solenoid Valve Replacement, Move the cord terminal block: шаг 10, изображение 1 из 3 Whirlpool Dryer Solenoid Valve Replacement, Move the cord terminal block: шаг 10, изображение 2 из 3 Whirlpool Dryer Solenoid Valve Replacement, Move the cord terminal block: шаг 10, изображение 3 из 3
    • Move the cord terminal block behind the rear panel.

  11. Whirlpool Dryer Solenoid Valve Replacement, Unfasten the rear panel: шаг 11, изображение 1 из 2 Whirlpool Dryer Solenoid Valve Replacement, Unfasten the rear panel: шаг 11, изображение 2 из 2
    Инструмент, используемый на этом этапе:
    FixMat
    $36.95
    Купить
    • Remove the rear panel screws.

    • Throughout this guide, keep track of each screw and reinstall it exactly where it came from.

  12. Whirlpool Dryer Solenoid Valve Replacement: шаг 12, изображение 1 из 2 Whirlpool Dryer Solenoid Valve Replacement: шаг 12, изображение 2 из 2
    • Remove the screw holding the main board bracket to the chassis.

    • Remove the screws from the top rear of the machine.

  13. Whirlpool Dryer Solenoid Valve Replacement, Remove the rear panel: шаг 13, изображение 1 из 3 Whirlpool Dryer Solenoid Valve Replacement, Remove the rear panel: шаг 13, изображение 2 из 3 Whirlpool Dryer Solenoid Valve Replacement, Remove the rear panel: шаг 13, изображение 3 из 3
    • Put on gloves before continuing, as the rear panel is sharp.

    • Lift the panel about 1/2 inch and tilt it to the rear to release it from the vent pipe.

    • Slide the panel off the vent pipe and remove it.

  14. Whirlpool Dryer Solenoid Valve Replacement, Reassembly information: шаг 14, изображение 1 из 2 Whirlpool Dryer Solenoid Valve Replacement, Reassembly information: шаг 14, изображение 2 из 2
    • During reassembly, perform the following:

    • Make sure that the vent pipe is fitted into the collar on the panel.

    • Make sure the tabs at the bottom are aligned to the bottom rim of the chassis.

    • Position the panel so its screw holes match with the chassis.

  15. Whirlpool Dryer Solenoid Valve Replacement, Disconnect the water tube: шаг 15, изображение 1 из 3 Whirlpool Dryer Solenoid Valve Replacement, Disconnect the water tube: шаг 15, изображение 2 из 3 Whirlpool Dryer Solenoid Valve Replacement, Disconnect the water tube: шаг 15, изображение 3 из 3
    • Push the retaining clip out with a small screwdriver or spudger.

    • Grab the retaining clip with your fingertips and remove it.

  16. Whirlpool Dryer Solenoid Valve Replacement: шаг 16, изображение 1 из 3 Whirlpool Dryer Solenoid Valve Replacement: шаг 16, изображение 2 из 3 Whirlpool Dryer Solenoid Valve Replacement: шаг 16, изображение 3 из 3
    • Press the yellow sleeve toward the valve to release the water tube.

    • While holding the sleeve in place, pull the water tube out of the sleeve

  17. Whirlpool Dryer Solenoid Valve Replacement, Disconnect the electrical connectors: шаг 17, изображение 1 из 3 Whirlpool Dryer Solenoid Valve Replacement, Disconnect the electrical connectors: шаг 17, изображение 2 из 3 Whirlpool Dryer Solenoid Valve Replacement, Disconnect the electrical connectors: шаг 17, изображение 3 из 3
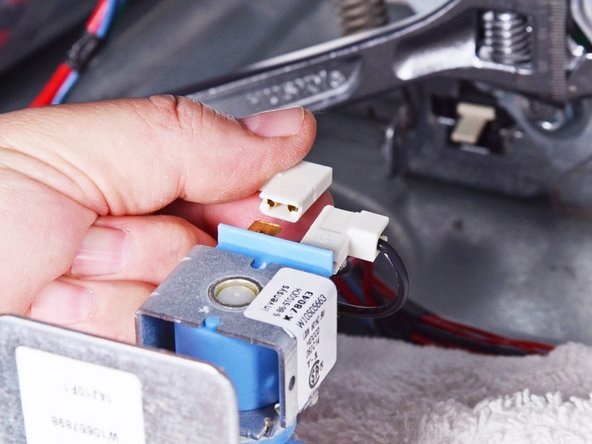
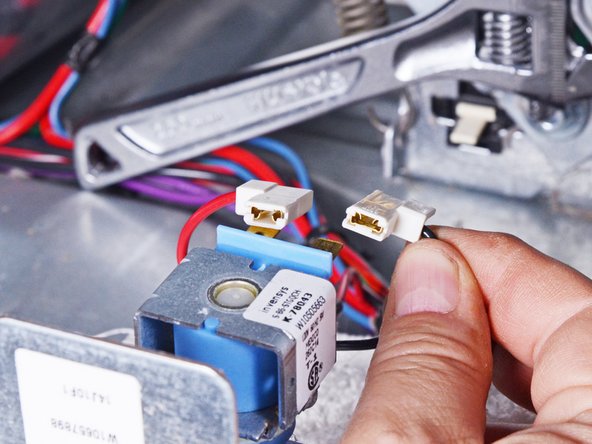
    • Pull the two solenoid valve electrical connectors straight off the valve to disconnect them.

    • Be sure to grip the connector and not the wire when disconnecting.

  18. Whirlpool Dryer Solenoid Valve Replacement, Unfasten the solenoid valve: шаг 18, изображение 1 из 1
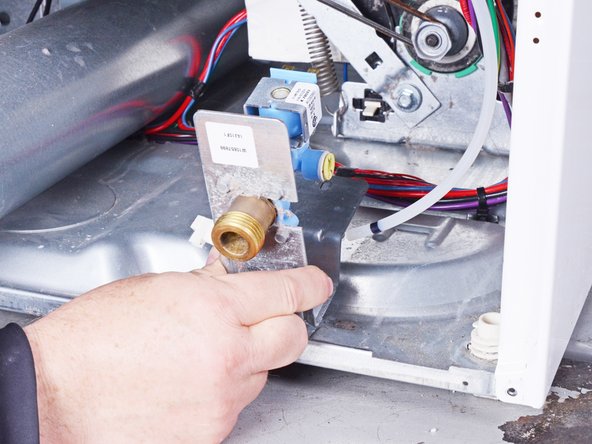
    • Remove the sheet metal screw securing the solenoid valve.

  19. Whirlpool Dryer Solenoid Valve Replacement, Remove the solenoid valve: шаг 19, изображение 1 из 3 Whirlpool Dryer Solenoid Valve Replacement, Remove the solenoid valve: шаг 19, изображение 2 из 3 Whirlpool Dryer Solenoid Valve Replacement, Remove the solenoid valve: шаг 19, изображение 3 из 3
    • Tilt the solenoid valve toward you to disengage the tab from under the rim of the dryer frame.

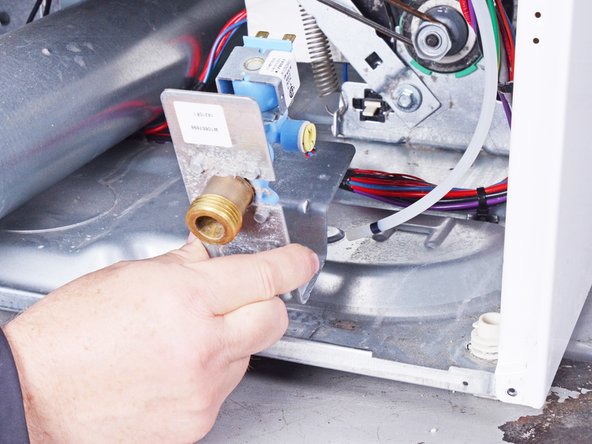
    • Lift the solenoid valve upward and remove it.

Заключение

To reassemble your device, follow these instructions in reverse order.

Repair didn’t go as planned? Ask our Answers community for help.

Bill Gilbert

Участник с: 06/30/22

30 088 Репутация

Автор 213 руководств

Команда

iFixit Участник iFixit

Staff

136 членов

Автор 17 410 руководств

0 Комментариев

Добавить комментарий

Просмотр статистики:

За последние 24часов: 0

За последние 7 дней: 0

За последние 30 дней: 5

За всё время: 81