Перейти к основному содержанию

Xbox 360 Wireless Controller Analog Stick Covers Replacement

Выберете то, что вам нужно

  1. Xbox 360 Wireless Controller Analog Stick Covers Replacement, Battery: шаг 1, изображение 1 из 2 Xbox 360 Wireless Controller Analog Stick Covers Replacement, Battery: шаг 1, изображение 2 из 2
    • Depress the battery release button on the top of the controller.

    • Remove the battery holder from the controller.

    • The standard option for Xbox 360 Wireless Controllers Battery Packs is AA batteries. A rechargeable battery is also available, but both battery options are removed from the controller in the same way.

  2. Xbox 360 Wireless Controller Analog Stick Covers Replacement, Rear Case: шаг 2, изображение 1 из 1
    • Use a pair of tweezers to peel the barcode sticker from the battery compartment.

  3. Xbox 360 Wireless Controller Analog Stick Covers Replacement: шаг 3, изображение 1 из 1
    • Remove the seven 9.3 mm T8 Security Torx screws securing the rear case to the front case.

  4. Xbox 360 Wireless Controller Analog Stick Covers Replacement: шаг 4, изображение 1 из 2 Xbox 360 Wireless Controller Analog Stick Covers Replacement: шаг 4, изображение 2 из 2
    Инструмент, используемый на этом этапе:
    Spudger
    $2.99
    Купить
    • Insert a Spudger between the front and rear cases along the left edge of the controller.

    • Rotate the spudger toward the front of the controller, prying the two cases apart.

  5. Xbox 360 Wireless Controller Analog Stick Covers Replacement: шаг 5, изображение 1 из 2 Xbox 360 Wireless Controller Analog Stick Covers Replacement: шаг 5, изображение 2 из 2
    • Insert a spudger between the front and rear cases, near the headphone jack.

    • Rotate the spudger toward the front of the controller to pry the two cases apart.

  6. Xbox 360 Wireless Controller Analog Stick Covers Replacement: шаг 6, изображение 1 из 2 Xbox 360 Wireless Controller Analog Stick Covers Replacement: шаг 6, изображение 2 из 2
    • Grasp the controller by the battery compartment and the headphone jack.

    • Lift the battery compartment away from the headphone jack, separating the rear case from the front case and logic board.

    • The battery contact springs are held in place by slots in the battery housing in the rear case. Be sure to realign them properly during reassembly.

  7. Xbox 360 Wireless Controller Analog Stick Covers Replacement, Vibration Motors: шаг 7, изображение 1 из 2 Xbox 360 Wireless Controller Analog Stick Covers Replacement, Vibration Motors: шаг 7, изображение 2 из 2
    • Use the flat end of a spudger to remove the vibration motor cable, moving it upward from its socket on the logic board.

    • Lift the vibration motor out of the front case.

  8. Xbox 360 Wireless Controller Analog Stick Covers Replacement: шаг 8, изображение 1 из 2 Xbox 360 Wireless Controller Analog Stick Covers Replacement: шаг 8, изображение 2 из 2
    • Remove the vibration motor from the other side of the controller using the same method previously described.

    • The left motor has significantly more counterweight than the right motor.

  9. Xbox 360 Wireless Controller Analog Stick Covers Replacement, Logic Board: шаг 9, изображение 1 из 2 Xbox 360 Wireless Controller Analog Stick Covers Replacement, Logic Board: шаг 9, изображение 2 из 2
    • Lifting from the headphone jack and power plug, remove the logic board from the front case.

  10. Xbox 360 Wireless Controller Analog Stick Covers Replacement, Analog Stick Covers: шаг 10, изображение 1 из 2 Xbox 360 Wireless Controller Analog Stick Covers Replacement, Analog Stick Covers: шаг 10, изображение 2 из 2
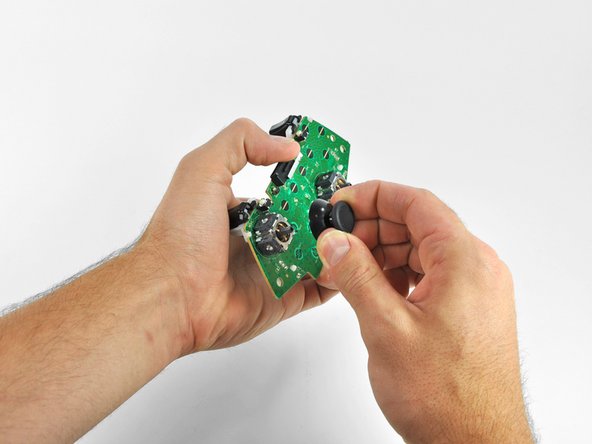
    • Grasp the right analog stick and pull the cover off its mount peg.

  11. Xbox 360 Wireless Controller Analog Stick Covers Replacement: шаг 11, изображение 1 из 2 Xbox 360 Wireless Controller Analog Stick Covers Replacement: шаг 11, изображение 2 из 2
    • Remove the left analog stick cover using the same procedure previously described.

Заключение

To reassemble your device, follow these instructions in reverse order.

97 участников успешно повторили данное руководство.

Brett Hartt

Участник с: 04/12/10

127 876 Репутация

Автор 143 руководств

Команда

iFixit Участник iFixit

Staff

135 членов

Автор 16 734 руководств

3 Комментариев

unnecessary steps.

3 steps:

remove all 7 screws.

flip upside down remove top plate

pull stick caps off

reinstall in reverse.

you may have to slide the vibration motors into the slots on the top half when putting back together.

zachharrizusnavy - Ответить

Hola buenas tardes feliz domingo. Es tan amable de contactarme co algún proveedor de respuestos para mando de la xbox 360. Como circuitos integrados gatillos chips de vinculación entre otros. Selo agradecería

Jose - Ответить

For the wired controller, the steps are the same, and you still have to lift a sticker on the back to get to that 7th screw. But the screws are Philips, not Torx.

Fristle - Ответить

Добавить комментарий

Просмотр статистики:

За последние 24часов: 8

За последние 7 дней: 49

За последние 30 дней: 233

За всё время: 101,867