Перейти к основному содержанию

Xbox One Wireless Controller Model 1537 (Left) Bumper Replacement

Выберете то, что вам нужно

  1. Xbox One Wireless Controller Model 1537 (Left) Bumper Replacement, Bumper: шаг 1, изображение 1 из 1
    • Remove the battery cover.

    • Remove batteries.

  2. Xbox One Wireless Controller Model 1537 (Left) Bumper Replacement: шаг 2, изображение 1 из 3 Xbox One Wireless Controller Model 1537 (Left) Bumper Replacement: шаг 2, изображение 2 из 3 Xbox One Wireless Controller Model 1537 (Left) Bumper Replacement: шаг 2, изображение 3 из 3
    • Grip the controller firmly to remove the side handle cover.

    • Use a flathead screwdriver or a spudger to wedge between the seams of the front to the side handle of the controller.

    • Move the flathead screwdriver all the way around the side plates seam and push the plate forward.

  3. Xbox One Wireless Controller Model 1537 (Left) Bumper Replacement: шаг 3, изображение 1 из 2 Xbox One Wireless Controller Model 1537 (Left) Bumper Replacement: шаг 3, изображение 2 из 2
    • Use a screwdriver and punch a hole directly in the center label. There you will find a hidden screw.

    • Remove the five 10mm screws located on the back of the controller using a T8 screwdriver.

  4. Xbox One Wireless Controller Model 1537 (Left) Bumper Replacement: шаг 4, изображение 1 из 2 Xbox One Wireless Controller Model 1537 (Left) Bumper Replacement: шаг 4, изображение 2 из 2
    • Remove the backplate.

  5. Xbox One Wireless Controller Model 1537 (Left) Bumper Replacement: шаг 5, изображение 1 из 2 Xbox One Wireless Controller Model 1537 (Left) Bumper Replacement: шаг 5, изображение 2 из 2
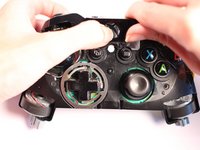
    • Remove the faceplate.

  6. Xbox One Wireless Controller Model 1537 (Left) Bumper Replacement: шаг 6, изображение 1 из 3 Xbox One Wireless Controller Model 1537 (Left) Bumper Replacement: шаг 6, изображение 2 из 3 Xbox One Wireless Controller Model 1537 (Left) Bumper Replacement: шаг 6, изображение 3 из 3
    • Remove the cover piece surrounding the Xbox button off of its pegs.

    • Firmly hold controller and push cover piece up from the pegs.

    • Press the Xbox button down to assist in the unclipping of the piece.

  7. Xbox One Wireless Controller Model 1537 (Left) Bumper Replacement: шаг 7, изображение 1 из 2 Xbox One Wireless Controller Model 1537 (Left) Bumper Replacement: шаг 7, изображение 2 из 2
    • Remove the broken bumper by unclipping it from its pegs.

    • Hold the controller firmly and push the bumper piece up from its pegs to unclip.

  8. Xbox One Wireless Controller Model 1537 (Left) Bumper Replacement: шаг 8, изображение 1 из 3 Xbox One Wireless Controller Model 1537 (Left) Bumper Replacement: шаг 8, изображение 2 из 3 Xbox One Wireless Controller Model 1537 (Left) Bumper Replacement: шаг 8, изображение 3 из 3
    • Align the replacement bumper onto the pegs, push gently and click into place.

Заключение

To reassemble your device, follow these instructions in reverse order.

19 участников успешно повторили данное руководство.

Cristyne Ramirez

Участник с: 01/24/18

571 Репутация

1 руководство автора

Команда

USF Sarasota-Manatee, Team S1-G1, Stewart Spring 2018 Участник USF Sarasota-Manatee, Team S1-G1, Stewart Spring 2018

USFSM-STEWART-S18S1G1

15 членов

Автор 25 руководств

2 Комментариев

On my controller the screws were T8 security type, so you'll need bits with a hole in the middle

Sean H - Ответить

Is there a way to do this without removing all of the front and grip.

Alan Marantos - Ответить

Добавить комментарий

Просмотр статистики:

За последние 24часов: 17

За последние 7 дней: 146

За последние 30 дней: 661

За всё время: 47,183