Введение
Follow this guide to replace the hard drive on your Xbox One X model 1787. You might do this if your hard drive has stopped working.
Turn off the console and unplug any cables before beginning this guide. Follow general electrostatic discharge (ESD) safety procedures while repairing the console.
These steps only describe how to replace the hard drive. You may need additional software tools to get the replacement hard drive to function.
Выберете то, что вам нужно
Видео обзор
-
-
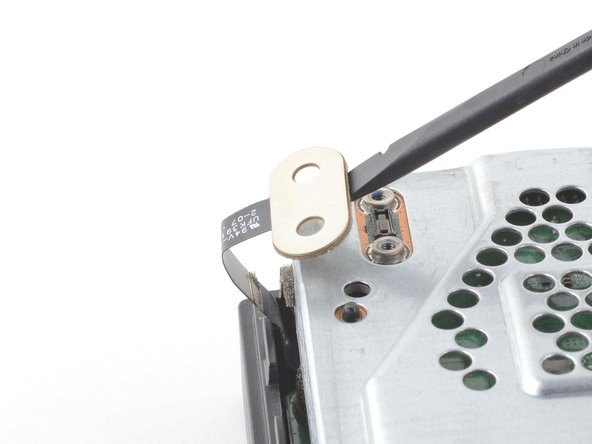
Use blunt tweezers to peel off the sticker covering the right-side screw on the back of the console.
-
-
-
Use a T10 Torx screwdriver to remove the two 12.6 mm–long screws located on the back of the console.
-
-
-
Rotate the console 90 degrees.
-
Pull the front of the upper plastic case horizontally toward the front of the console until it comes to a stop. This slides the clips out of the slots on the upper plastic case.
-
-
-
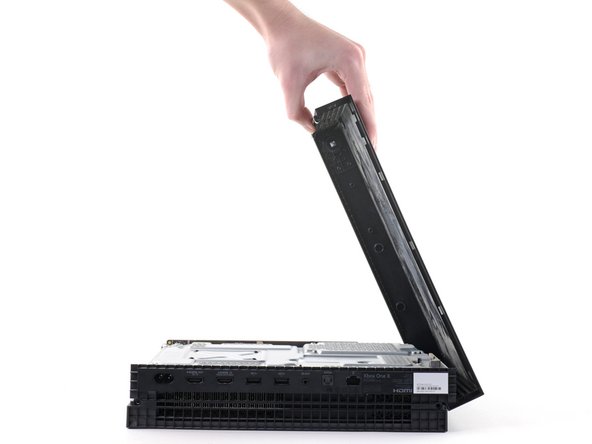
Rotate the console 90 degrees so that the back is facing you.
-
Lift up the left side of the upper plastic case (as viewed from the back of the console), stopping when it won’t lift any further.
-
-
-
While continuing to hold the left side of the upper plastic case, push up on the right side to move the right-side screw boss out of the way.
-
Swing the upper plastic case open to 75 degrees.
-
-
-
Push the upper plastic case down and away from the console to remove it completely.
-
-
-
Use the pointed end of a spudger, an opening tool, or your fingernail to flip down the small, hinged locking flap on the ribbon cable ZIF connector on the front circuit board.
-
-
-
Use blunt tweezers to pull the ribbon cable down out of the connector.
What happens if I broke the connector to the ribbon cable ?
If you broke the cable, then one Wifi module would be broken.
Why we dont remove at first the 3 screws and lift the board a little bit, before removing the cable completely?
-
-
-
-
Use a T8 Torx screwdriver to remove the three 13.3 mm screws securing the front circuit board to the upper metal case.
How crucial and important is this step? I ovwrlooked it when doing this. Will this mess it all up?
-
-
-
Pull the front circuit board straight out away from the upper metal case and set it aside.
During the reassembly process, I highly recommend that you reattach and lock the ribbon cable (steps 7 and 8) before you attach the circuit board. There is plenty of ribbon to work with, and once the circuit board is attached it is nearly impossible to get the ribbon flat and aligned and pushed up into the guide. Obviously be careful you don’t yank the ribbon as you maneuver the circuit board into place, but who’s not being careful while they are doing this?
-
-
-
Use a T10 Torx screwdriver to remove the six 47.7 mm screws securing the upper metal case to the lower plastic case.
-
Use a T8 Torx screwdriver to remove the two 7.5 mm screws securing the press connector to the upper metal case.
Must remove power supply screws as well
Hi, this step only includes the screws needed to remove the lower metal case. Guides that require removing the power supply screws will have a step later on with instructions on which screws to remove.
Why we dont't remove the hard drive screws in this step, please?
-
-
-
Insert the flat end of a spudger underneath the press connector on the side opposite of the ribbon cable.
-
Use the spudger to lift the press connector up and away from the upper metal case.
I need to know what it calls and I will purchase the one like press connector on the upper metal case.
-
-
-
Flip the console over.
-
Lift the lower plastic case up from the metal case and set it aside.
I had a hard time getting the bottom case back on by trying to slide it over the console. It was easier for me to place the case on the table and guide the hardware into it. There are four holes just above the disc drive that are tricky to line up if you try to slip the case back on.
-
-
-
Remove the two T10 Torx screws securing the lower metal case:
-
One 7.7 mm screw
-
One 11.4 mm screw
bei mir waren beide Schrauben identisch konnte sie auch komplett versenken
Evtl. fand vor mir schon ein Austausch statt
-
-
-
Lift the lower metal case up off the upper metal case and internal components.
-
Set the lower metal case aside.
-
-
-
Flip the console over.
-
Use a T10 Torx screwdriver to remove the four 11.4 mm screws securing the hard drive to the upper metal case.
-
-
-
Flip the console back over, keeping in mind the disc drive is loose.
-
Lift the disc drive up so that its metal tab is unhooked from the power supply.
-
Flip the disc drive over and place it on the power supply. The disc drive should end up facing the opposite direction it started in.
-
-
-
Unplug the bundled cable connector connecting the hard drive to the motherboard by pulling directly upward.
-
-
-
Unplug the SATA cable connecting the hard drive to the motherboard by pulling directly upward.
-
-
-
Lift the hard drive assembly up out of the upper metal case.
-
-
-
Flip the hard drive over so that the plastic mounting bracket is facing upward.
-
Use a T10 Torx screwdriver to remove the four 8.6 mm screws attaching the hard drive to the mounting bracket.
-
-
-
Unplug the hard drive connector from the hard drive by pulling parallel to the length of the drive.
-


To reassemble your device, follow these instructions in reverse order.
Take your e-waste to an R2 or e-Stewards certified recycler.
Repair didn’t go as planned? Try some basic troubleshooting, or ask our Xbox One X Answers community for help.
To reassemble your device, follow these instructions in reverse order.
Take your e-waste to an R2 or e-Stewards certified recycler.
Repair didn’t go as planned? Try some basic troubleshooting, or ask our Xbox One X Answers community for help.
Отменить: Я не выполнил это руководство.
100 участников успешно повторили данное руководство.

20 Комментариев
If I buy a new hard drive off of amazon, how do I install the Xbox OS back on? The offline usb?
The only way I found was to clone the disc sector-by-sector. I read online that you can expand it by making the “user content” partition larger.
Do an offline update for xbox one x. I posted a link in another comment.
Check out this video. It has a great step by step for putting the console into troubleshooting mode and downloading the correct software.
metric -
I read a post somewhere saying that if Microsoft detect non-standard hardware in your system you could be banned. Has anyone had any experience with this?
That was the case for the Xbox 360, these were very picky and only accepted certain models of Western Digital Hard Drives (if you didn't modify them with RGH/JTAG but then you would get banned if you tried to connect to Xbox Live).
The Xbox One is totally fine with other hard drives, I replaced my One X's HDD two years ago with a 2 TB Samsung 860 Evo SSD and had no problems, some people rather recommend using the SSD externally but IMHO it's worth the effort, because it also accelerates the Operating System drastically like in every PC/Mac (I don't want to use systems with the OS on an HDD anymore except some retro computers up to mid-2000s).
I didn’t remove the fragile connectors, that ribbon cable I just opened the lock and slowly slid out the ribbon cable, I finally just put it all back together it took me a day, I done it very slowly, I have a SSD in there, it’s blazing fast. After doing all that download OSU1, extract it and format your USB to NTFS, copy $systemupdate to the root of your NTFS formatted USB, the update will auto partition and script the hard drive, download OSU1 from Microsoft, specifically search for offline Xbox update, then good luck putting your Xbox back together. No need to run third part scripts anymore.
I have had no luck finding the xbox one x os im not sure if its general for all xbox ones or if there’s a specific one for each? Also I’ve had not luck finding a source for a link to the code to reformat the drive that I trust (except for the ifixit youtube video but that link is dead.) in summary I was wondering if there is a good source someone could lead me to?
This is the link for One X and One S models: https://support.xbox.com/en-US/help/hard...
The article says something about a different file for regular Xbox One. Idk what or where it is. But it’s on their site somewhere.
A couple of questions posted on installing the OS:
https://support.xbox.com/en-CA/help/hard...
*The download file is there too and you can see the link but you must right-click and save as. Regular left-click will not work.
This was exactly right. New Hard drive in, the trouble shooter auto-ran when the xbox was turned on. I installed the update from a formatted Flashdrive and it’s all up and running.
(Running a 2018 Xbox One X)
Good guide, thanks. There’s no need to unplug the sata cables from the main board, though, as there is enough play to reach the four screws holding the hdd to the plastic bracket.
Reinstalling the last part of the case can be tricky, the key is to locate the plastic lugs down one side of the base in their respective slots on the case. Once they’re in it all falls into place.
I purchased a 1 TB Samsung 870 QVO for my Xbox One X, I did not perform any formatting to the HDD prior to the install, it went straight from the packaging it came in and was installed in the console. I didn’t use any scripts or OSU files. I simply plugged the ethernet cable in and booted it up using the manual recovery button method. The Xbox immediately recognized the new SSD and automatically formatted and installed the OS. No special tools or hacks. The console is just like it was before just loads games a bit faster, I can play online, it updates when it needs to without hassle. Not sure why everyone is having such a hard time with finding so called software for the new hdd.
I had to download the software to a usb drive and install it manually. Not sure how yours automatically installed the new software.
metric -
I like to use the Powershell script from XFiX on this YouTube channel to do hard drive maintenance (format, partition, etc.) on the XBox Hard Drive. He also has some other helpful videos too.
Did you not read the last comment before yours? You don't need any of the formatting tools. Just stick the new drive in connect to the internet with Ethernet and when it boots up it will do all the work for you.
Honestly I am desperate, I tried to change with another SSD for my Xbox One X Scorpio Edition, which the original HDD is dead.
I purchased Kingston 480GB and another one Crucial 1TB, they didn't work and didn't start. Xbox One X is very weird, it don't want another any kind of SSD/HDD! Anyone experienced same way? Thanks in advance
The drive I ordered wasn't anything too special.
I followed the guide here and then the OS restore here.
XBox One X SSD Upgrade - LFC#268 - YouTube
Worked like a charm.
metric -
As much as I would want a faster SSD on mine, I'm not doing this one, if there's a risk of getting banned.