Перейти к основному содержанию

Xiaomi Air 12 Speaker Replacement

Выберете то, что вам нужно

  1. Xiaomi Air 12 Speaker Replacement, Rear Casing: шаг 1, изображение 1 из 1
    • Orient the computer so the Xiaomi logo is at the bottom of the device.

  2. Xiaomi Air 12 Speaker Replacement: шаг 2, изображение 1 из 3 Xiaomi Air 12 Speaker Replacement: шаг 2, изображение 2 из 3 Xiaomi Air 12 Speaker Replacement: шаг 2, изображение 3 из 3
    • Insert the plastic opening tool underneath the top-middle rubber covering and lift upwards to reveal the hidden screw.

  3. Xiaomi Air 12 Speaker Replacement: шаг 3, изображение 1 из 2 Xiaomi Air 12 Speaker Replacement: шаг 3, изображение 2 из 2
    • Remove the eight 3 mm screws using the Torx T5 driver by inserting the screwdriver into each screw and rotating counterclockwise.

  4. Xiaomi Air 12 Speaker Replacement: шаг 4, изображение 1 из 3 Xiaomi Air 12 Speaker Replacement: шаг 4, изображение 2 из 3 Xiaomi Air 12 Speaker Replacement: шаг 4, изображение 3 из 3
    • Insert the plastic opening tool into each side of the computer and push the tool downwards to pop open the back cover.

    • You will hear popping noises as you remove the cover.

  5. Xiaomi Air 12 Speaker Replacement: шаг 5, изображение 1 из 2 Xiaomi Air 12 Speaker Replacement: шаг 5, изображение 2 из 2
    • Remove the back of the laptop by gently lifting the casing upwards.

  6. Xiaomi Air 12 Speaker Replacement, Speaker: шаг 6, изображение 1 из 2 Xiaomi Air 12 Speaker Replacement, Speaker: шаг 6, изображение 2 из 2
    • Remove the white and black speaker wires from the black tabs by pulling upwards from the device.

  7. Xiaomi Air 12 Speaker Replacement: шаг 7, изображение 1 из 2 Xiaomi Air 12 Speaker Replacement: шаг 7, изображение 2 из 2
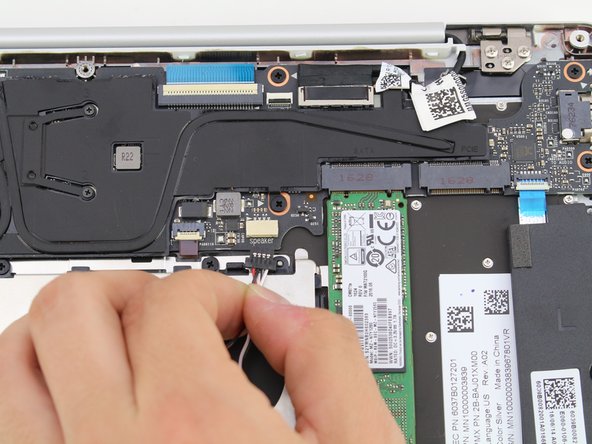
    • Gently pull the speaker connector out from the connection point using your hand.

  8. Xiaomi Air 12 Speaker Replacement: шаг 8, изображение 1 из 3 Xiaomi Air 12 Speaker Replacement: шаг 8, изображение 2 из 3 Xiaomi Air 12 Speaker Replacement: шаг 8, изображение 3 из 3
    • Remove the left speaker module by pulling the panel up from the device.

    • Repeat the same process for the right speaker module.

    • Left and Right speaker modules are denoted by an "L" and "R" respectively.

    • There will be a slight adhesive underneath the module.

Заключение

To reassemble your device, follow these instructions in reverse order.

2 участников успешно повторили данное руководство.

Hannah Kwan

Участник с: 04/18/18

839 Репутация

Автор 5 руководств

Команда

Cal Poly, Team S18-G4, Livingston Spring 2018 Участник Cal Poly, Team S18-G4, Livingston Spring 2018

CPSU-LIVINGSTON-S18S18G4

4 членов

Автор 20 руководств

6 Комментариев

Thanks for the tutorial! But where can i buy replacement speakers? My right speaker is overdriving all the time now, giving me a lot of loud buzz noises.

Nicolai - Ответить

The same for me. I’d like to replace the speakers because one of them is “crackling/vibrating”, but i don’t know where to buy them…

Maniac 45 - Ответить

same problem, mine at >50% vibrating very bad

isman87 - Ответить

have you found them? i need those too

Giorgio Pianesi -

Hello, i love this laptop and its been my companion for almost 3 years think the audio input jack got grounded because i heard a creaking sound when i inserted a metallic headset jack, the device was charging when it happened. Now the audio output from the audio jack port is like a minus one or somewhat instrumental. Any suggestions what to do?

James Prae Liclican - Ответить

Добавить комментарий

Просмотр статистики:

За последние 24часов: 2

За последние 7 дней: 8

За последние 30 дней: 24

За всё время: 1,028