Введение
Use this guide to replace a cracked or broken screen on your Xiaomi Redmi Note 8T.
If the frame is deformed, it's important to replace it to make sure the new screen will mount correctly and won’t suffer damage from uneven pressure.
Before disassembling your phone, discharge the battery below 25%. The battery can catch fire and/or explode if accidentally punctured, but the chances of that happening are much lower if discharged.
Note: This guide instructs you to replace only the screen while leaving the original frame and motherboard in place. However, some replacement screens for this phone come pre-installed in a new frame (a.k.a. chassis), which requires a very different procedure. Make sure you have the correct part before starting this guide.
You’ll need replacement adhesive to reattach components when reassembling the device.
Выберете то, что вам нужно
-
-
Before you begin, switch off your phone.
-
Apply a heated iOpener to the back of the phone to loosen the adhesive beneath the back cover. Apply the iOpener for at least two minutes.
-
-
-
Secure a suction handle to the bottom of the rear glass, as close to the edge as possible.
-
Lift the rear glass with the suction handle to create a small gap between the glass and the frame.
-
Insert an opening pick into the gap.
-
Slide the opening pick to the bottom right corner.
-
-
-
Insert a second opening pick and slide it to the bottom left corner to cut the adhesive.
-
Leave the opening picks in place to prevent the adhesive from resealing.
-
-
-
Insert a third opening pick at the bottom left corner.
-
Slide the tip of the opening pick from the bottom left corner along the side of the phone to cut the adhesive.
-
Leave the opening pick in its place at the top left corner to prevent the adhesive from resealing.
-
-
-
Insert a fourth opening pick under the top left corner of the rear glass.
-
Slide the opening pick along the top edge of the phone to cut the adhesive.
-
Leave the opening pick in the top right corner to prevent the adhesive from resealing.
-
-
-
Insert a fifth opening pick at the top right corner of the phone.
-
Slide the opening pick along the right side to cut the remaining adhesive.
-
-
-
Carefully fold the rear glass to the right side of the phone. Use the suction handle as a stand for the rear glass.
-
-
-
Use a spudger to pry up and disconnect the fingerprint flex cable.
-
Remove the rear glass.
-
-
-
Шаг 9 Xiaomi Redmi Note 8T Motherboard Cover Removal
Careful: steps 9-11 are sourced from a guide that's marked as in-progress.
-
Remove the eleven Phillips #00 screws (3.9 mm length).
-
-
-
Insert the tip of an opening pick underneath the bottom edge of the motherboard cover.
-
Use the opening pick to pry up the motherboard cover.
-
-
-
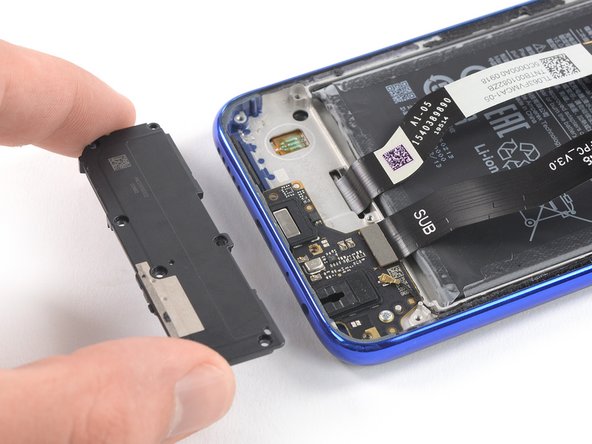
Remove the motherboard cover including the black protective foil that covers the battery.
-
-
Шаг 12 Xiaomi Redmi Note 8T Battery Disconnect
Careful: step 12 is sourced from a guide that's marked as in-progress.
-
Use a spudger to pry up and disconnect the battery flex cable.
-
-
-
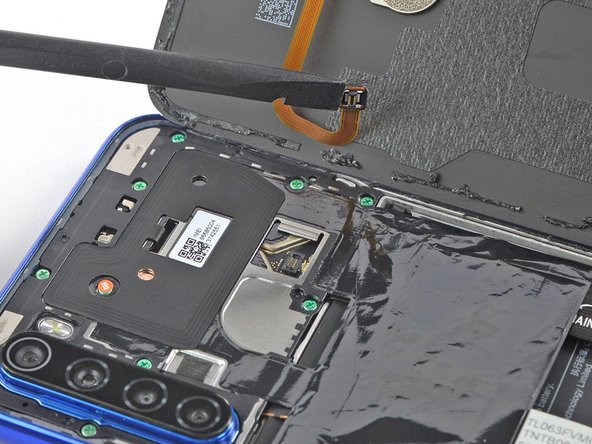
Use a spudger to pry up and disconnect the display flex cable.
-
-
-
Slide an opening pick underneath the top edge of the daughterboard cover.
-
Use the opening pick to pry up the daughterboard cover.
-
-
-
Apply a heated iOpener to the screen to loosen the adhesive underneath. Apply the iOpener for at least two minutes.
-
-
-
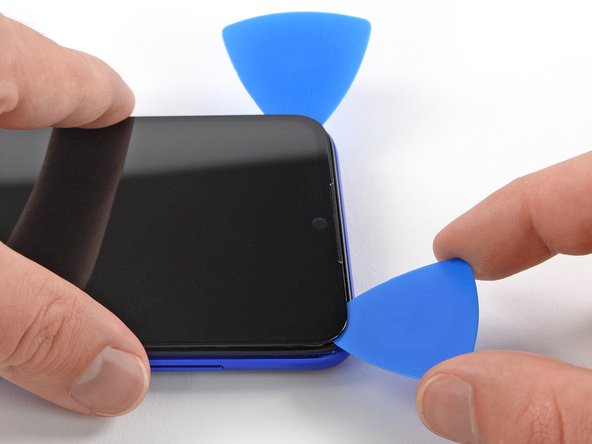
Once the screen is warm to the touch, apply a suction handle to the bottom edge of the phone.
-
Lift the screen with the suction handle to create a small gap between the cover and the frame.
-
Insert an iFlex between the midframe and the screen to create a bigger gap. Leave the iFlex in the gap to prevent the screen from resealing.
-
-
-
Insert an opening pick in the gap you createtd in the step before. You can remove the iFlex afterwards.
-
Start to cut the adhesive by sliding the opening pick to the bottom right corner.
-
-
-
Insert a second opening pick and slide it to the bottom left corner of the screen to cut the adhesive.
-
Leave the picks in their place to prevent the adhesive from resealing.
-
-
-
Insert a third opening pick under the bottom left corner of the phone.
-
Slide the opening pick up to the top left corner to cut the adhesive. Leave it there to prevent the adhesive from resealing.
-
-
-
Insert a fourth opening pick at the top left corner.
-
Slide the opening pick along the top edge of the phone to cut the adhesive. Leave the pick in the top right corner of the screen to prevent the adhesive from resealing.
-
-
-
Insert a fifth opening pick and slide it along the right edge of the phone to cut the remaining adhesive.
-
-
-
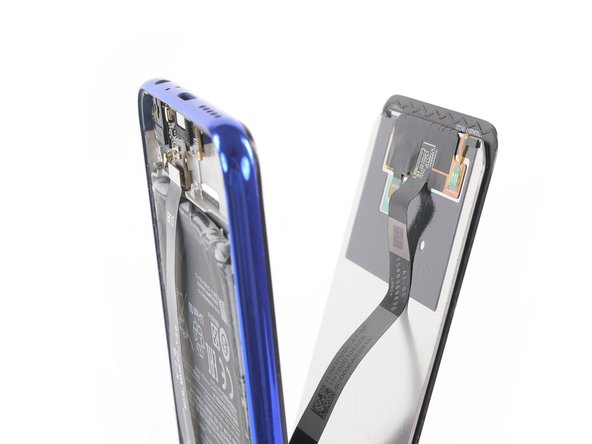
Thread the display flex cable through the gap in the midframe and remove the display.
-


If possible, turn on your device and test your repair before installing new adhesive and resealing.
Compare your new replacement part to the original part—you may need to transfer remaining components or remove adhesive backings from the new part before installing.
To reassemble your device, follow these instructions in reverse order. Apply new adhesive where necessary after cleaning the relevant areas with isopropyl alcohol (>90%).
The best way to secure the new screen is to apply a sheet of custom-cut double-sided tape to the back of the screen.
Take your e-waste to an R2 or e-Stewards certified recycler.
Repair didn’t go as planned? Try some basic troubleshooting, or ask our Answers community for help.
Отменить: Я не выполнил это руководство.
14 участников успешно повторили данное руководство.


6 Комментариев
Hervorande Anleitung !
Bonjour, c'est grâce à ce tuto que je suis fier de vous dire avoir réussi à changer mon écran seul sans payer un réparateur.
Pour enlever l ‘écran je n ai pas réussi à soulever l’écran avec une ventouse en chauffant avec un sèche cheveux ( alors que ça a bien fonctionné pour la vitre arrière).
J ai improvisé alors j ai du élargir une fissure avec un petit tournevis pour soulever l’écran du châssis et ainsi insérer le mediator comme prévu
Merci pour ce tuto…
After heating to take apart back glass and screen, both buttons power and volume are loose and dont stay on their place. they fall, even if i put them back. any idea why this happens?
ok i found why. buttons have a black thin plastic “lock" check it under microscope mine had “twisted
ifixthem -