Перейти к основному содержанию

Zenithink ZTPAD ZT280 C91 Camera Replacement

Выберете то, что вам нужно

  1. Zenithink ZTPAD ZT280 C91 Camera Replacement, Back Panel: шаг 1, изображение 1 из 1
    • Remove the two screws on the bottom using a Phillips #00 screwdriver.

    • For differentiation purposes, these screws are 4mm long.

  2. Zenithink ZTPAD ZT280 C91 Camera Replacement: шаг 2, изображение 1 из 3 Zenithink ZTPAD ZT280 C91 Camera Replacement: шаг 2, изображение 2 из 3 Zenithink ZTPAD ZT280 C91 Camera Replacement: шаг 2, изображение 3 из 3
    • Using a spudger, start prying the case apart by working around the edge slowly.

    • Be careful not to damage any of the latches that hold the back panel in place, especially if you are using a metal spudger.

    • While prying, be careful to not lose the power and volume buttons; the case is the only thing holding them in place so they will easily come out once the panel has been removed

    • Be careful to not damage the speaker cables, they will still be connecting both panels.

  3. Zenithink ZTPAD ZT280 C91 Camera Replacement, Motherboard: шаг 3, изображение 1 из 1
    • Peel back the touch interface chip (which is on the top right of the motherboard, covered in yellow tape.)

  4. Zenithink ZTPAD ZT280 C91 Camera Replacement: шаг 4, изображение 1 из 1
    • Flip up the small gate and unplug the ribbon cable shown.

  5. Zenithink ZTPAD ZT280 C91 Camera Replacement: шаг 5, изображение 1 из 1
    • Using a Phillips #00 screwdriver, remove the screws highlighted with the orange rings as shown in the picture.

    • For differentiation purposes, these screws are 3.5mm long.

  6. Zenithink ZTPAD ZT280 C91 Camera Replacement: шаг 6, изображение 1 из 1
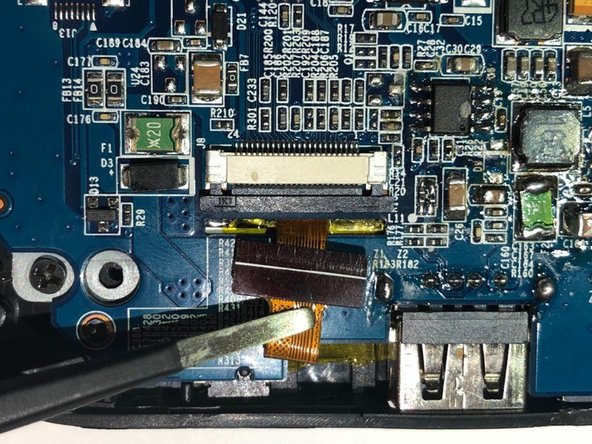
    • Slide back the plastic latch for the main display cable.

    • Carefully unplug the cable with tweezers.

  7. Zenithink ZTPAD ZT280 C91 Camera Replacement: шаг 7, изображение 1 из 2 Zenithink ZTPAD ZT280 C91 Camera Replacement: шаг 7, изображение 2 из 2
    • Slide back the plastic latch for the camera cable.

    • Carefully unplug the cable with tweezers.

  8. Zenithink ZTPAD ZT280 C91 Camera Replacement: шаг 8, изображение 1 из 1
    • Peel back the reflective tape.

  9. Zenithink ZTPAD ZT280 C91 Camera Replacement: шаг 9, изображение 1 из 2 Zenithink ZTPAD ZT280 C91 Camera Replacement: шаг 9, изображение 2 из 2
    • Lift up the motherboard assembly, starting by lifting up the top.

    • Be careful not to damage any of the ports on the underside of the tablet.

    • The camera cable will slide through a small notch and end up underneath the board.

  10. Zenithink ZTPAD ZT280 C91 Camera Replacement, Camera: шаг 10, изображение 1 из 1
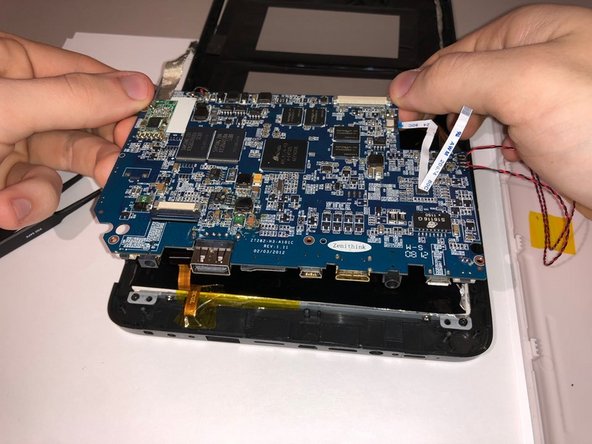
    • Peel back the adhesive tape holding the camera in place.

    • Remove the camera from the device.

Заключение

To reassemble your device, follow these instructions in reverse order.

Еще один человек закончил это руководство.

Keelie Beach

Участник с: 09/21/18

435 Репутация

Автор 3 руководств

Команда

University of North Texas, Team S6-G1, Thompson Fall 2018 Участник University of North Texas, Team S6-G1, Thompson Fall 2018

UNT-THOMPSON-F18S6G1

3 членов

Автор 5 руководств

0 Комментариев

Добавить комментарий

Просмотр статистики:

За последние 24часов: 0

За последние 7 дней: 0

За последние 30 дней: 0

За всё время: 130