Перейти к основному содержанию

iHome iP1 Faceplate and Tweeters Replacement

Выберете то, что вам нужно

  1. iHome iP1 Faceplate and Tweeters Replacement, Dock Cover: шаг 1, изображение 1 из 1
    • Orient the iHome upside down with the speakers facing you.

  2. iHome iP1 Faceplate and Tweeters Replacement: шаг 2, изображение 1 из 1
    • Remove the two 9.5 mm Phillips #1 screws from the dock cover.

  3. iHome iP1 Faceplate and Tweeters Replacement: шаг 3, изображение 1 из 3 iHome iP1 Faceplate and Tweeters Replacement: шаг 3, изображение 2 из 3 iHome iP1 Faceplate and Tweeters Replacement: шаг 3, изображение 3 из 3
    • Remove the dock cover by grabbing its sides and pulling it up and away from the faceplate.

  4. iHome iP1 Faceplate and Tweeters Replacement, Buttons: шаг 4, изображение 1 из 2 iHome iP1 Faceplate and Tweeters Replacement, Buttons: шаг 4, изображение 2 из 2
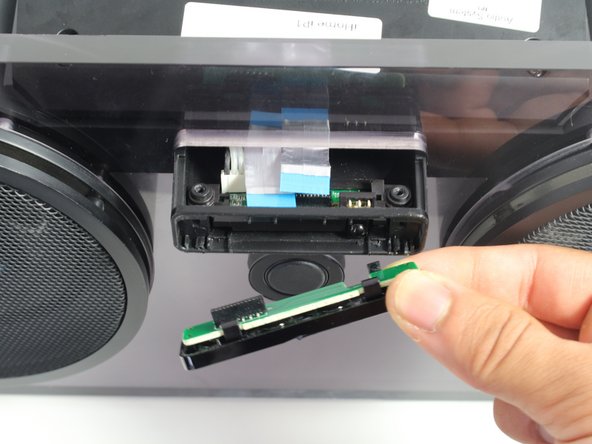
    • Disconnect the silver ribbon cable on the left-hand side by pulling away from the command buttons.

  5. iHome iP1 Faceplate and Tweeters Replacement: шаг 5, изображение 1 из 3 iHome iP1 Faceplate and Tweeters Replacement: шаг 5, изображение 2 из 3 iHome iP1 Faceplate and Tweeters Replacement: шаг 5, изображение 3 из 3
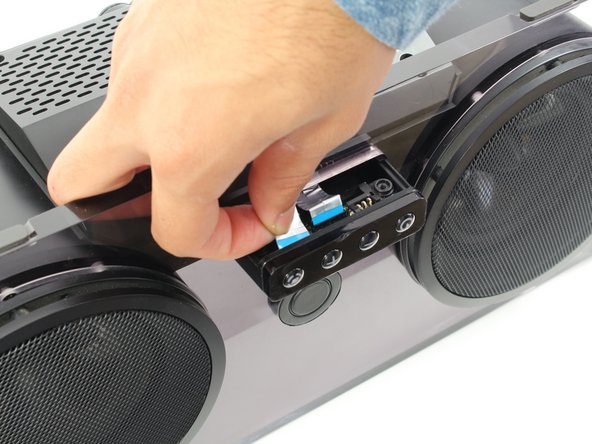
    • Remove the command buttons by pulling the small black panel containing them downward and away from the faceplate.

  6. iHome iP1 Faceplate and Tweeters Replacement, Back Cover: шаг 6, изображение 1 из 1
    • Orient the iHome upside down with the speakers facing away from you.

  7. iHome iP1 Faceplate and Tweeters Replacement: шаг 7, изображение 1 из 2 iHome iP1 Faceplate and Tweeters Replacement: шаг 7, изображение 2 из 2
    • Remove the four 9.5 mm Phillips #2 screws located on each of the four corners of the iHome's back cover.

  8. iHome iP1 Faceplate and Tweeters Replacement: шаг 8, изображение 1 из 1
    • Remove the back cover by grabbing its sides and lifting it off the iHome.

  9. iHome iP1 Faceplate and Tweeters Replacement, Speaker(s): шаг 9, изображение 1 из 3 iHome iP1 Faceplate and Tweeters Replacement, Speaker(s): шаг 9, изображение 2 из 3 iHome iP1 Faceplate and Tweeters Replacement, Speaker(s): шаг 9, изображение 3 из 3
    • Disconnect the white/black wires from the edges of the motherboard by pulling them away from their connection.

    • You may need to remove some black foam tape in order to fully disconnect some of the wires.

  10. iHome iP1 Faceplate and Tweeters Replacement: шаг 10, изображение 1 из 1
    • Carefully remove the glue attaching the wires to the housing using a metal spudger kit.

    • The glue is only used to keep the wires in place. It does not affect the function of the iHome.

    • If not all the glue can be removed at this step, remove the remaining glue after Step 8, where you can access the glue from the inside of the speaker housing.

  11. iHome iP1 Faceplate and Tweeters Replacement: шаг 11, изображение 1 из 3 iHome iP1 Faceplate and Tweeters Replacement: шаг 11, изображение 2 из 3 iHome iP1 Faceplate and Tweeters Replacement: шаг 11, изображение 3 из 3
    • Rotate the iHome so that the speakers are facing you.

    • Remove the speaker covers by pulling them off of the faceplate.

    • After this step, this guide only shows how to replace the left speaker. To remove the right speaker, follow the remaining steps as if they are mirrored.

  12. iHome iP1 Faceplate and Tweeters Replacement: шаг 12, изображение 1 из 1
    • Remove the four 12.0 mm Phillips #2 screws from the edges of the speaker.

  13. iHome iP1 Faceplate and Tweeters Replacement: шаг 13, изображение 1 из 2 iHome iP1 Faceplate and Tweeters Replacement: шаг 13, изображение 2 из 2
    • Remove the speaker from the housing by gripping the rubber ring near the edge of the speaker and pulling it away from the faceplate.

    • Be careful not to tear the rubber. Once the speaker is loose enough, you can remove it from the housing by grabbing the metal speaker edges.

  14. iHome iP1 Faceplate and Tweeters Replacement: шаг 14, изображение 1 из 3 iHome iP1 Faceplate and Tweeters Replacement: шаг 14, изображение 2 из 3 iHome iP1 Faceplate and Tweeters Replacement: шаг 14, изображение 3 из 3
    • Remove the speaker from the iHome by feeding the black/white wires through the hole on the opposite side of the housing.

  15. iHome iP1 Faceplate and Tweeters Replacement, Faceplate and Tweeters: шаг 15, изображение 1 из 3 iHome iP1 Faceplate and Tweeters Replacement, Faceplate and Tweeters: шаг 15, изображение 2 из 3 iHome iP1 Faceplate and Tweeters Replacement, Faceplate and Tweeters: шаг 15, изображение 3 из 3
    • Both speakers should be removed at this point. If only one speaker has been removed, follow steps 12-14 of this guide to remove the other speaker.

    • Disconnect the two red/black wire bundles located on the upper corners of the motherboard by pulling them away from their connection.

  16. iHome iP1 Faceplate and Tweeters Replacement: шаг 16, изображение 1 из 1
    • Feed the red/black wires through the hole in the speaker housing through which they stick out of. Do this to each of red/black wires you just disconnected.

  17. iHome iP1 Faceplate and Tweeters Replacement: шаг 17, изображение 1 из 1
    • Orient the iHome so that the now-removed speakers would be facing you.

    • Remove the black foam tape on the inside of the speaker housing that attaches the red/black wires to the speaker housing.

    • Pull the wires out of the speaker housing.

  18. iHome iP1 Faceplate and Tweeters Replacement: шаг 18, изображение 1 из 2 iHome iP1 Faceplate and Tweeters Replacement: шаг 18, изображение 2 из 2
    • Carefully remove the glue that attaches the red/black wires to the speaker housing adjacent to the tweeters using a metal spudger kit.

    • The glue is only used to keep the wires in place. It does not affect the function of the iHome.

  19. iHome iP1 Faceplate and Tweeters Replacement: шаг 19, изображение 1 из 1
    • Unscrew the twelve 14.5 mm Phillips #2 screws holding the faceplate to the speaker housing. (There are six screws connecting the faceplate to each speaker.)

  20. iHome iP1 Faceplate and Tweeters Replacement: шаг 20, изображение 1 из 2 iHome iP1 Faceplate and Tweeters Replacement: шаг 20, изображение 2 из 2
    • Remove the faceplate from the iHome by pulling it away from the speaker housing.

    • The 30-pin connector may not fit through the hole in the center of the faceplate. If this is the case, push the 30-pin connector into the dock housing before trying to remove the faceplate.

Заключение

To reassemble your device, follow these instructions in reverse order.

Еще один человек закончил это руководство.

Sachin Shenoi

Участник с: 10/10/16

333 Репутация

Автор 2 руководств

Команда

Cal Poly, Team 20-1, Livingston Fall 2016 Участник Cal Poly, Team 20-1, Livingston Fall 2016

CPSU-LIVINGSTON-F16S20G1

4 членов

Автор 7 руководств

0 Комментариев

Добавить комментарий

Просмотр статистики:

За последние 24часов: 0

За последние 7 дней: 0

За последние 30 дней: 4

За всё время: 604