Введение
Follow this guide to upgrade your iMac's hard drive with an SSD. It includes steps on installing the SSD's temperature sensor so that the Mac's fans will operate at the correct speed.
Prerequisite-only guide. SSD upgrade with temperature sensor for 2012-2017 iMacs.
Выберете то, что вам нужно
-
-
Depress the enclosure's front plate latch with your finger. While holding the latch down, swing the plate out.
-
Remove the front plate.
-
-
-
Line up the small SATA connector so that the short side on the SSD connector matches the short side on the enclosure connector.
-
Slide the drive in through the front of the enclosure until the SATA connector is fully seated.
-
-
-
You may optionally install two Philips #1 screws that came with the enclosure kit to secure the SSD in the enclosure.
-
Replace the front plate.
-
-
-
-
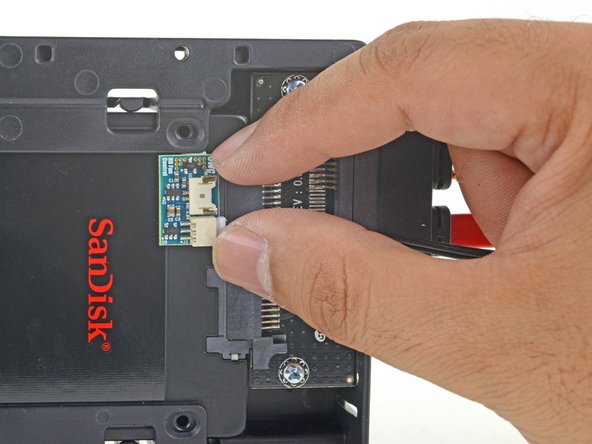
Peel the backing off of the adhesive back of the small temperature sensor board.
-
Adhere the temperature sensor board to an exposed, metal area of the surface of the SSD, as close as possible to the SATA connector.
-
Fold the excess temperature sensor wires so that they are out of the way while you install the enclosure.
-
-
-
Install the mounting pins from the old hard drive onto the sides of the enclosure.
-
-
-
Attach any mounting brackets removed from the old hard drive onto the enclosure.
-
-
-
Attach the iMac's SATA-combo cable to the new temperature-capable SATA-combo cable.
-
Route the SATA cables where they will not interfere with any other components.
-


To reassemble your device, follow these instructions in reverse order.
To reassemble your device, follow these instructions in reverse order.
Отменить: Я не выполнил это руководство.
11 участников успешно повторили данное руководство.


3 Комментариев
I love the guide~ it is super easy to follow. My computer is not recognizing the disk and I can’t figure out why. I feel like I missed something in reassembly. Any suggestions? Common errors?
Hi Julie!
Was the new drive formatted before you installed it? You can try to boot the iMac in recovery mode and reinstall the OS from there. If that doesn’t work, please post your question on our Answers forum and someone may be able to help you out!
when doing internet recovery First run the disk utility and Format it using mac journal, then continue to install the new disk will be visible.