Перейти к основному содержанию

iMac G4 15" 700 MHz EMC 1873 Hard Drive Replacement

Выберете то, что вам нужно

  1. iMac G4 15" 700 MHz EMC 1873 Hard Drive Replacement, Outer Base Plate: шаг 1, изображение 1 из 2 iMac G4 15" 700 MHz EMC 1873 Hard Drive Replacement, Outer Base Plate: шаг 1, изображение 2 из 2
    • Place the computer monitor face down on a safe, harmless surface.

    • Using a Phillips #00 screw driver, remove the four 6.86 mm screws from the metal plate.

  2. iMac G4 15" 700 MHz EMC 1873 Hard Drive Replacement: шаг 2, изображение 1 из 1
    • Remove the metal plate from bottom of the iMac G4.

    • The four screws do not completely separate from the metal plate.

  3. iMac G4 15" 700 MHz EMC 1873 Hard Drive Replacement, RAM DIMM: шаг 3, изображение 1 из 2 iMac G4 15" 700 MHz EMC 1873 Hard Drive Replacement, RAM DIMM: шаг 3, изображение 2 из 2
    • Release the tabs on each side of the module by simultaneously pushing each tab away from the RAM.

    • These tabs lock the module in place and releasing them will cause the module to "pop" up.

    • Remove the RAM module from the iMac.

  4. iMac G4 15" 700 MHz EMC 1873 Hard Drive Replacement, AirPort Card: шаг 4, изображение 1 из 1
    • Use a spudger to lift and remove the AirPort's antenna connector.

    • This step is only applicable to iMacs that came with an AirPort card installed.

  5. iMac G4 15" 700 MHz EMC 1873 Hard Drive Replacement, Removing the Lower Case: шаг 5, изображение 1 из 1
    • Remove the four 28.07mm Torx #15 screws from the lower case.

  6. iMac G4 15" 700 MHz EMC 1873 Hard Drive Replacement: шаг 6, изображение 1 из 2 iMac G4 15" 700 MHz EMC 1873 Hard Drive Replacement: шаг 6, изображение 2 из 2
    • Open the base by carefully pulling straight off, do not rotate the cover.

    • Open slowly to ensure that no cables are damaged or disconnected.

  7. iMac G4 15" 700 MHz EMC 1873 Hard Drive Replacement: шаг 7, изображение 1 из 1
    • Squeeze the small black tab and wiggle gently to remove the colored power cable.

    • Do not pull directly on the colored wires.

    • Do not remove black grounding wire.

  8. iMac G4 15" 700 MHz EMC 1873 Hard Drive Replacement: шаг 8, изображение 1 из 1
    • Grab both sides of the blue connector and firmly pull to remove it from the mother board.

    • Do not pull directly on the ribbon cable.

  9. iMac G4 15" 700 MHz EMC 1873 Hard Drive Replacement, Optical Drive: шаг 9, изображение 1 из 2 iMac G4 15" 700 MHz EMC 1873 Hard Drive Replacement, Optical Drive: шаг 9, изображение 2 из 2
    • Using a Torx #9 screw driver, remove the two 8.77mm screws holding the drive's shield onto your iMac G4.

    • Remove the drive shield from your iMac.

  10. iMac G4 15" 700 MHz EMC 1873 Hard Drive Replacement: шаг 10, изображение 1 из 1
    • Using a Torx # 10 screw driver, remove the four 19.12mm screws that mount the optical drive.

  11. iMac G4 15" 700 MHz EMC 1873 Hard Drive Replacement: шаг 11, изображение 1 из 1
    • Grasp the HD/Optical Drive bundle by the by the sides and gently wiggle it loose from the sides.

    • Ensure there are no wires passing over the top of the drive bundle when removing it, as it may unintentionally disconnect something.

  12. iMac G4 15" 700 MHz EMC 1873 Hard Drive Replacement: шаг 12, изображение 1 из 1
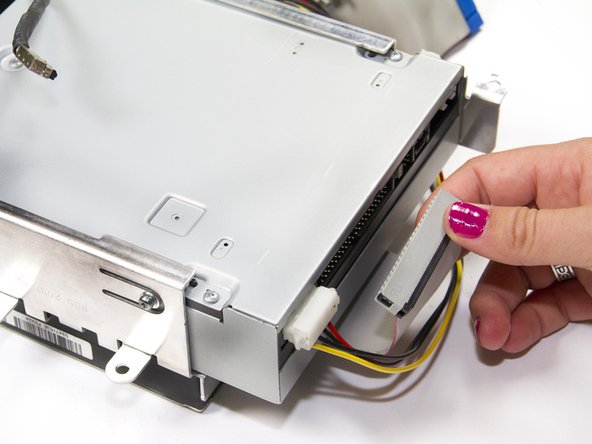
    • Unplug the power source from the optical drive by pinching the plastic base of the connector and wiggling it gently.

    • Do not use excessive force, or pull on the wires directly, in order to unplug the connector from the drive.

  13. iMac G4 15" 700 MHz EMC 1873 Hard Drive Replacement: шаг 13, изображение 1 из 1
    • Unplug the ribbon cable from the optical drive by grasping the plastic base of the connector and wiggling it gently.

    • Do not pull on the ribbon cable directly.

  14. iMac G4 15" 700 MHz EMC 1873 Hard Drive Replacement: шаг 14, изображение 1 из 1
    • Remove the four 6.75mm Torx # 10 screws mounting the drive.

    • There are two screws on both sides of drive mount.

  15. iMac G4 15" 700 MHz EMC 1873 Hard Drive Replacement: шаг 15, изображение 1 из 1
    • Slide the optical drive out from the metal support mounted to hard drive.

  16. iMac G4 15" 700 MHz EMC 1873 Hard Drive Replacement, Hard Drive: шаг 16, изображение 1 из 2 iMac G4 15" 700 MHz EMC 1873 Hard Drive Replacement, Hard Drive: шаг 16, изображение 2 из 2
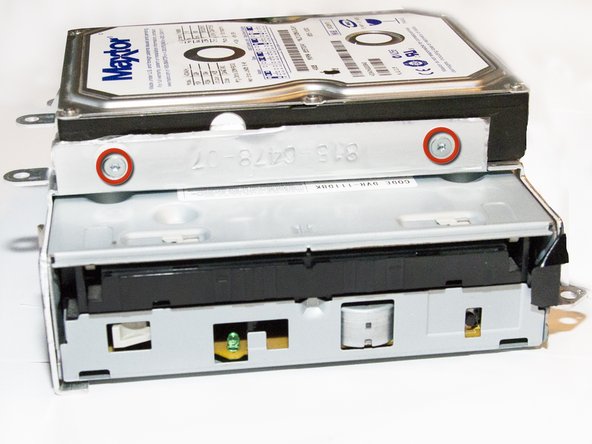
    • Using a Torx #10 screw driver, remove the four 6.03mm screws mounting the hard drive to the assembly.

    • There are two screws mounting the drive on each side.

  17. iMac G4 15" 700 MHz EMC 1873 Hard Drive Replacement: шаг 17, изображение 1 из 1
    • Slide the hard drive out of the assembly.

  18. iMac G4 15" 700 MHz EMC 1873 Hard Drive Replacement: шаг 18, изображение 1 из 1
    • Unplug the power connection from the Hard Drive by pinching the white plastic connector and wiggling gently.

    • Do not pull directly on the colored wires.

Заключение

To reassemble your device, follow these instructions in reverse order.

37 участников успешно повторили данное руководство.

Elliot Freerks

Участник с: 10/04/11

887 Репутация

Автор 3 руководств

Команда

Cal Poly, Team 5-32, Amido Fall 2011 Участник Cal Poly, Team 5-32, Amido Fall 2011

CPSU-AMIDO-F11S5G32

4 членов

Автор 8 руководств

2 Комментариев

This guide was very easy to follow and to the point. Thank you so very much for putting your time in creating it, you helped me! :-)

Elias Laleo - Ответить

What kind of hard drive would you need to get?

Jacob Vaughan - Ответить

Добавить комментарий

Просмотр статистики:

За последние 24часов: 5

За последние 7 дней: 25

За последние 30 дней: 105

За всё время: 28,973